
As you know, I have a laundry list of things I want to change in our home, but when it comes to crossing things off the list, I feel like I move at a snails’ pace! Remember last month when I drew up the grand plans for rearranging the living room?? (original post here) Well, for once, I got right on it, and have a few updates to share!!
To refresh your memory, this was the old layout:

Awkward short table next to the TV, wicker chair in the corner, desk blocking entry from entry-hall into the living room. Not ideal.
This was the updated plan for the changes I wanted to make:

On the list…
– Move the chair into the seating area (ultimately replacing the wicker with something else)
– Get rid of that awkward short table next to the TV
– Replace the awkward table with a bar cart or wine bar
– Move the desk next to the window
– Get a standing lamp
– Put two small x-benches where the desk used to be
First change (and the easiest one so far) was moving the desk next to the window – it really opens things up when you first walk in the room, and it’s so nice to work in this sunny nook! The standing lamp was also an easy decision to make, and I love how it looks next to the desk!

Moving on to the second change… here is a good snapshot of that awkward little table next to the TV.
It was WAY too short, and this is pretty much how it stood for the last year since we moved in. It’s not AWFUL, but it always drove me crazy. To say I wasn’t sad to see it go is a gross understatement!
Sayonara sucka!


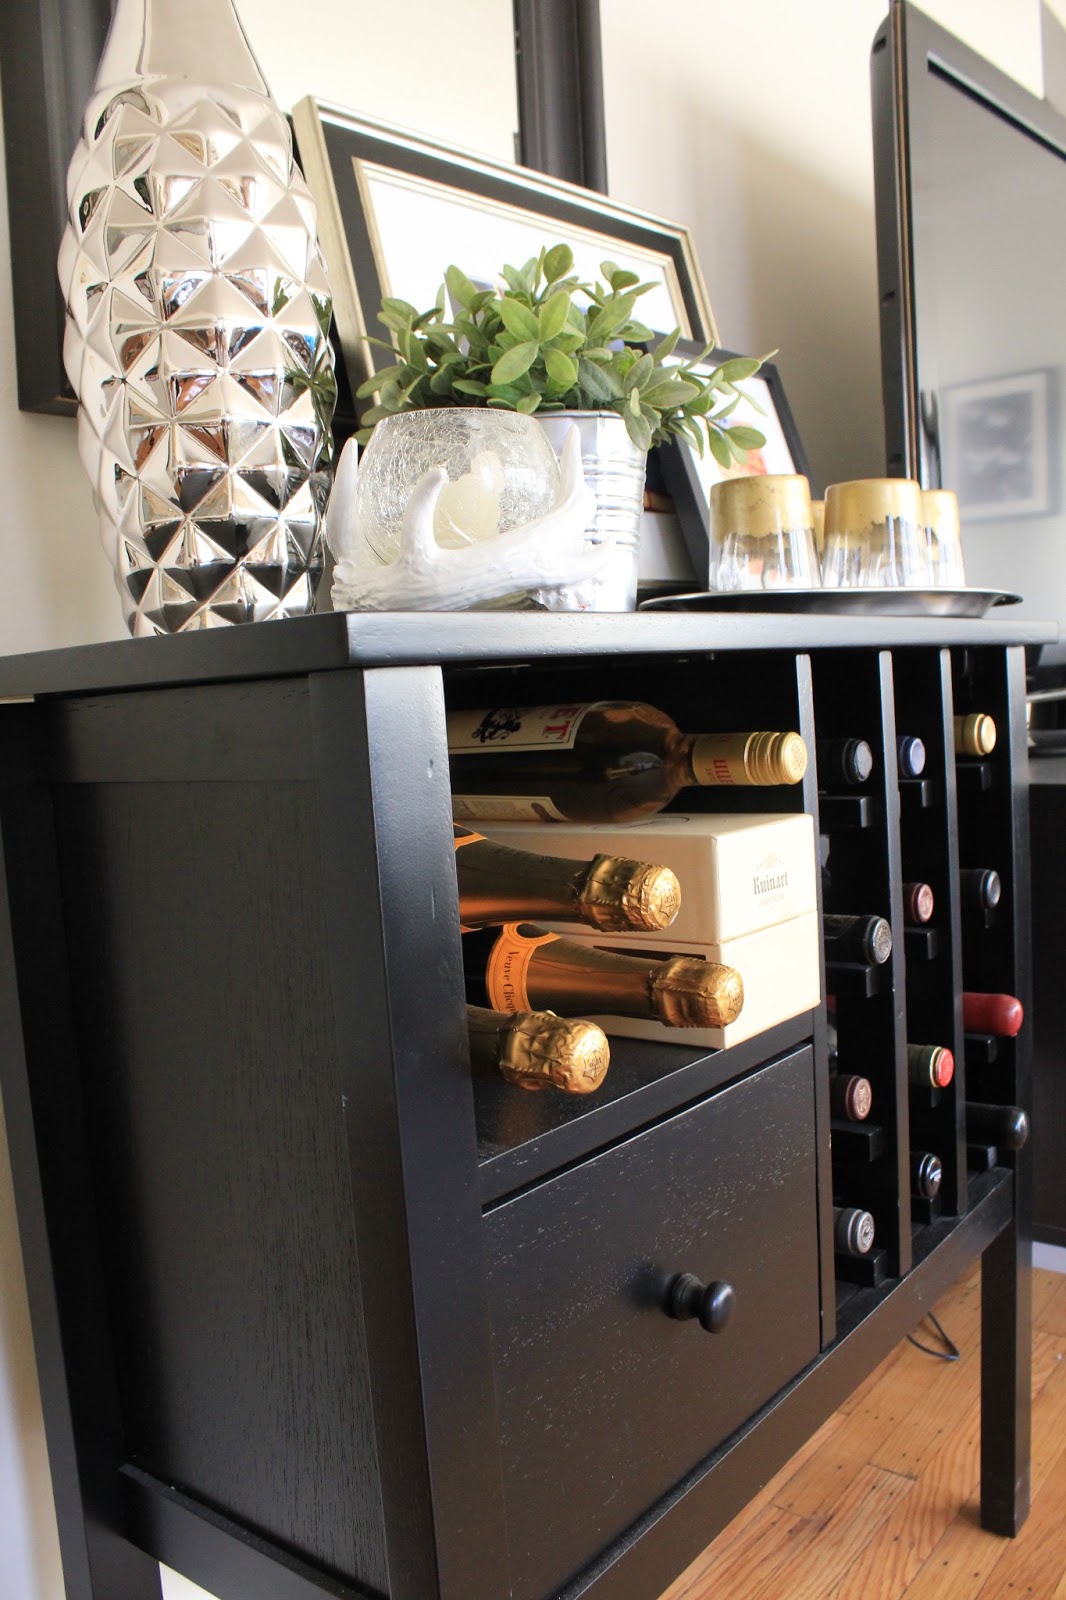
We had a wine rack in the dining room, sort of tucked into the corner – you couldn’t see it, and it ultimately made the room feel a bit cramped.
One day I had an ah-ha moment, and decided that the wine rack would be the PERFECT solution for this area of the living room. Moving it out of the dining room would open up that space, and re-purposing it for the living room would mean one less thing to buy!

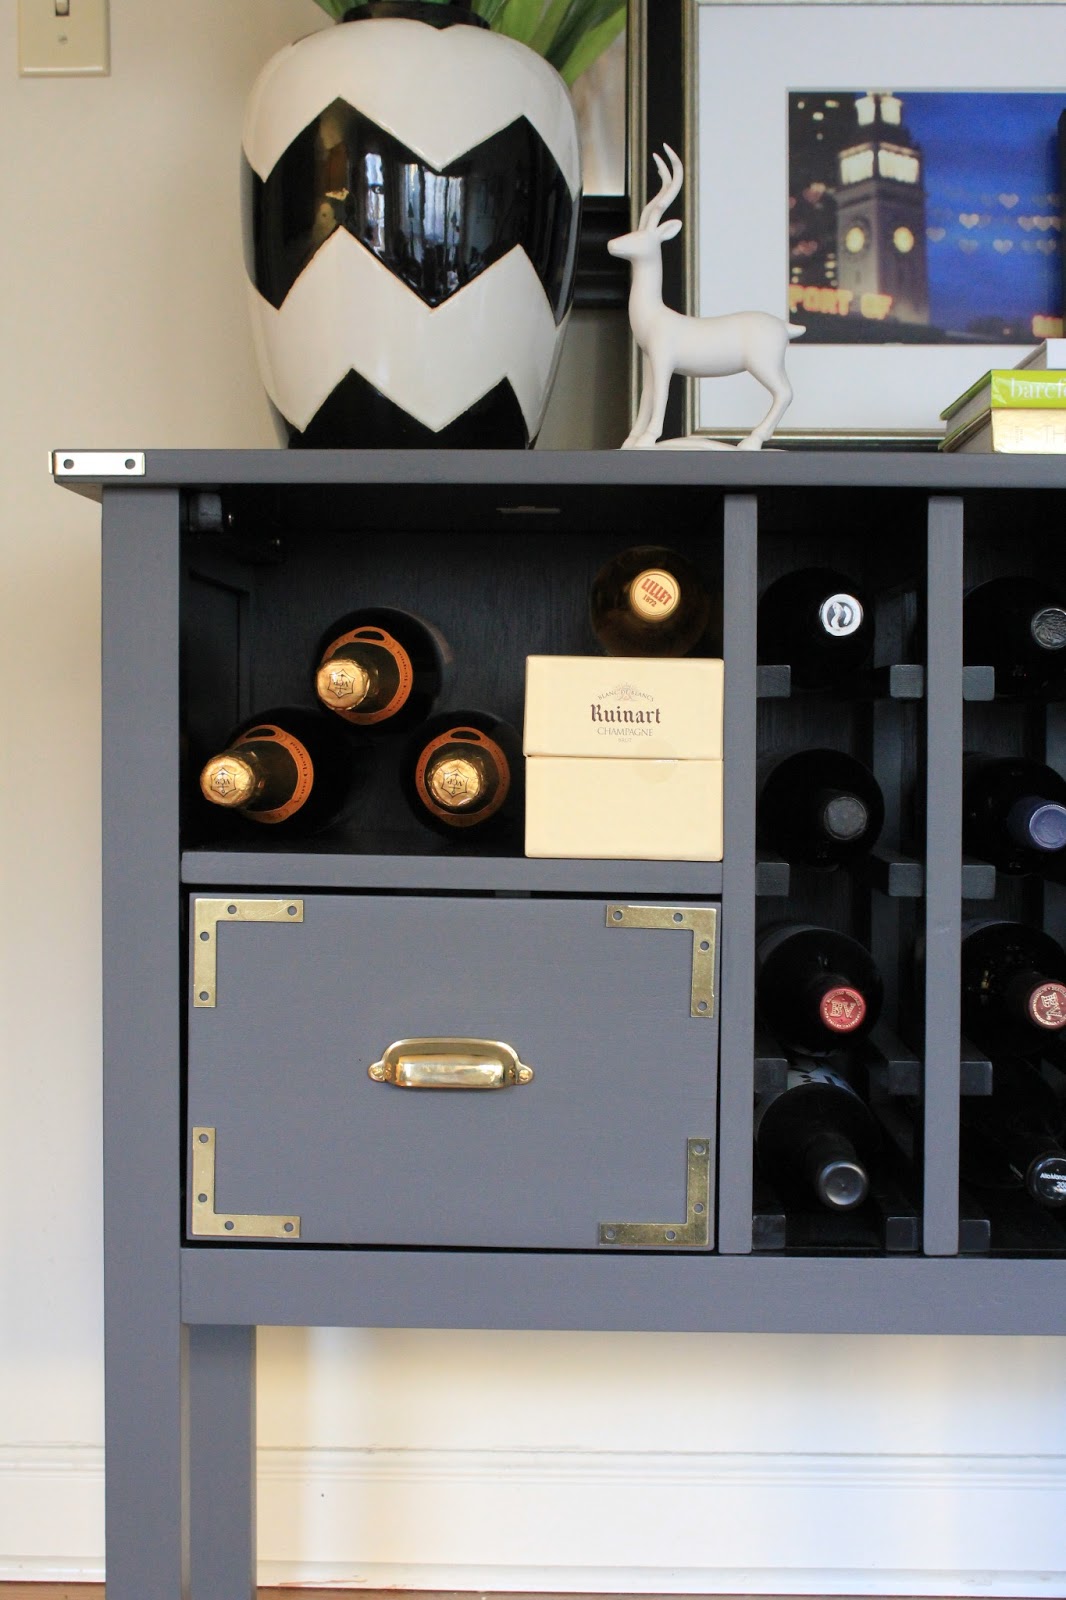
It’s not some unique, heirloom piece (it was from Target to be completely honest) but it was the right height and width, so I was determined to make it work…


Blah. Boring. Cheap.
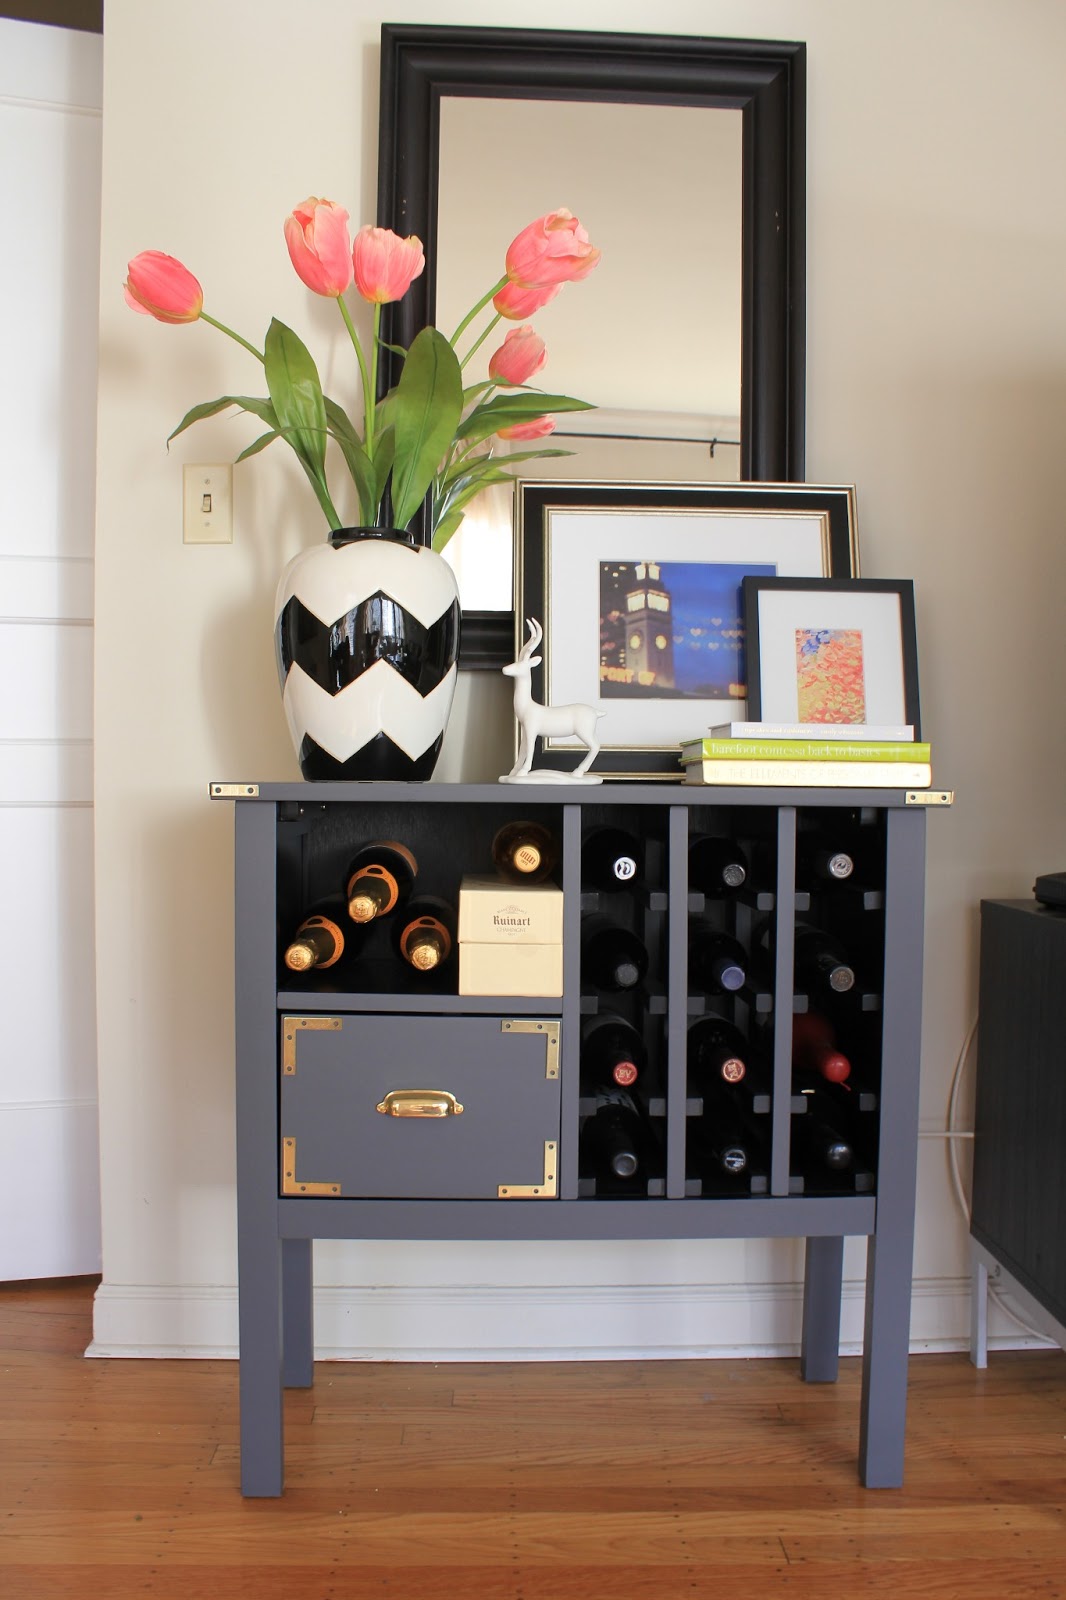
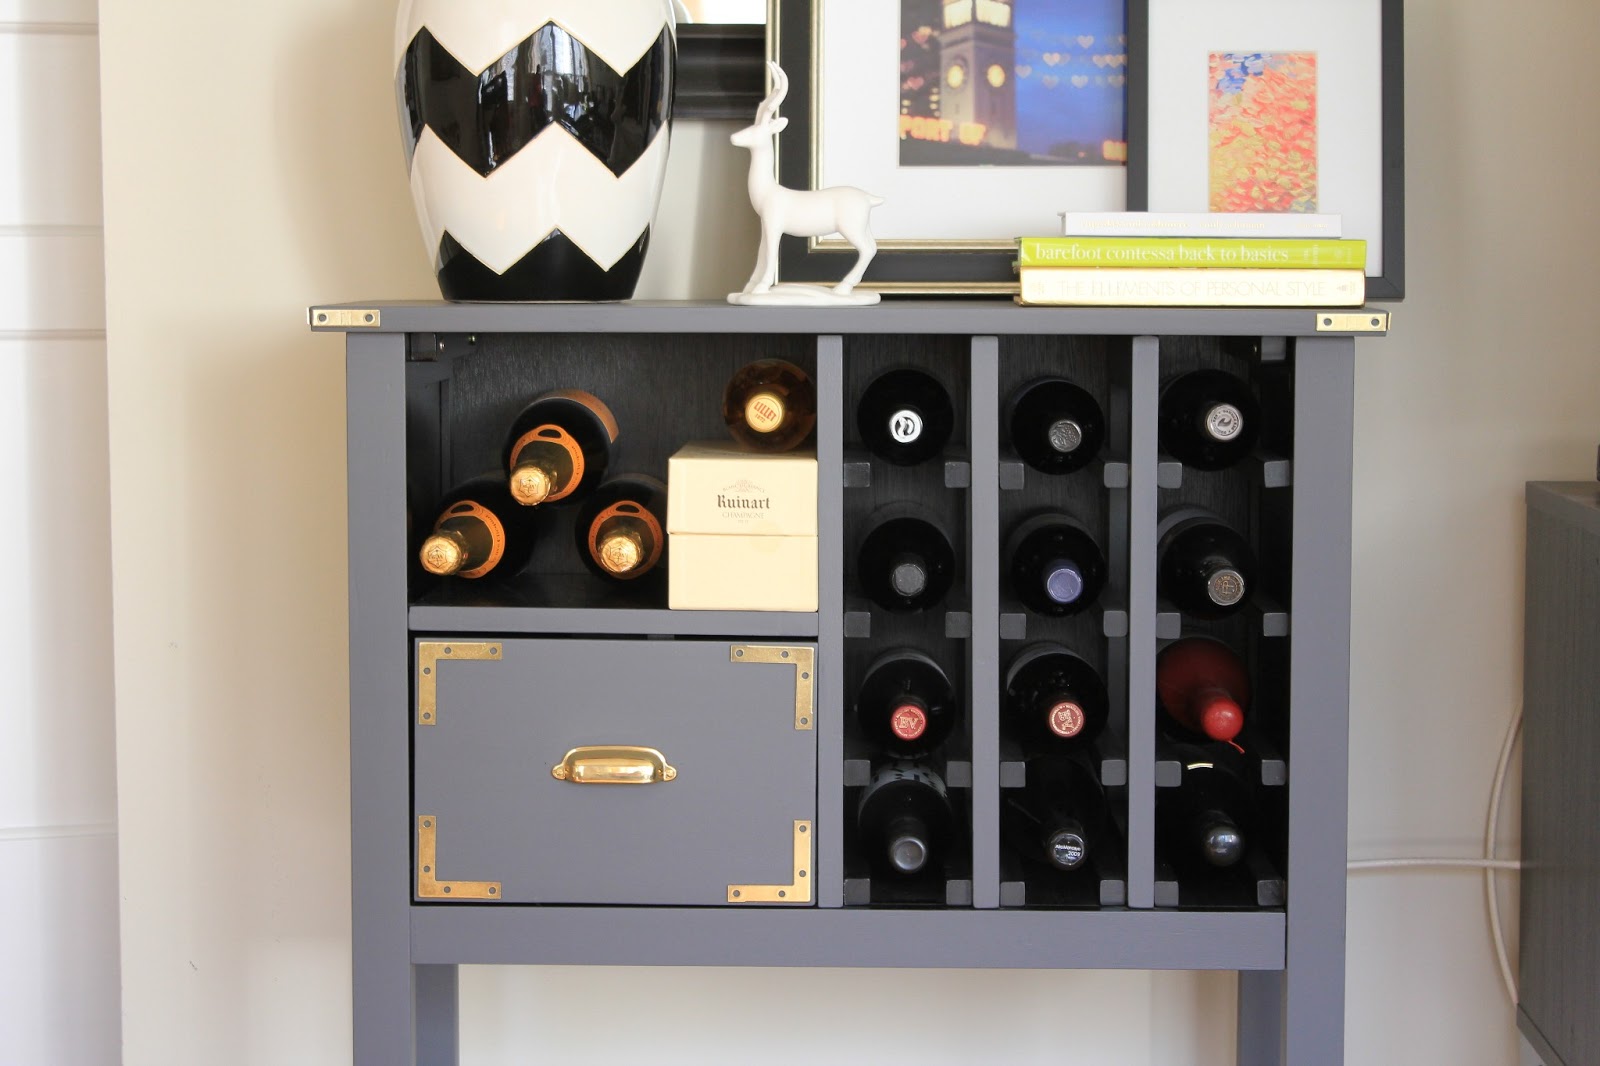
I’ve long admired the look of campaign furniture – the brackets, and hardware really dress things up, and so with this image in my mind, I set out for a mini makeover…

I needed paint, and hardware, but the weather had been really cold here, so I was in no mood to walk down to the hardware store and pick up a new quart of paint.
Feeling lazy, I decided to try mixing some paint I had laying around. I had a dark blue-grey quart of oil based paint that I had used to paint the back of our bookshelves with, and another quart of taupe chalkboard paint that I had used on the console table in our hallway. My little experiment could have ended disastrously but I figured that if it looked awful, or I ended up with peel-y paint, I could just sand it off, and start over.
I wasn’t quite sure how the paint would go on since it was half oil, and half chalkboard, but I have to say, the combination brought the best of both worlds.
The oil based paint made the application go on super smooth, and since the chalkboard paint was also in there, it dried really fast, and feels REALLY durable. Time will be the true test to it’s durability, but after waiting 24 hours for the paint to “cure” it was ready to get some hardware!
While I really admire the look of the traditional campaign pulls, most of them require you to bevel out an indent in the drawer so that it lays flush with the piece.


– Move the chair into the seating area (ultimately replacing the wicker with something else) – Get rid of that awkward short table next to the TV – Replace the awkward table with a bar cart or wine bar – Move the desk next to the window – Get a standing lamp
– Put two small x-benches where the desk used to be
Of course, I’ve since added to the list…
– Hang two additional curtain panels on the center windows
– Replace wicker chair (with a white slipper chair perhaps)
– Replace black and white Ikea prints
– Replace or revamp coffee table
I’m sure as I continue to make progress, the list will continue to grow, but at least I’ve made some headway!!

Wow, great job on the wine rack! It looks perfect without the casters.
LikeLike
I LOVE the makeover! I hear you on the black/brown wood…I have just always been too chicken to do something about it. You might have just inspired me though…
xo
ann e
LikeLike
Aww, thanks! I may be bringing casters into the room via another piece of furniture, so perhaps it was all for the best 🙂
LikeLike
It seriously was so easy, and chalkboard paint is my new best friend. No priming, and it is seriously SO DURABLE. I cannot believe it!
LikeLike
I completely love this! Amazing how you transformed a Target piece. Thanks for linking up 🙂
LikeLike
and congrats on being featured in emilyaclark's post this morning!
LikeLike
So cute! How did you attach the hardware on the corners? It doesn't look like nails/screws were involved but it's hard to tell! Thanks!
LikeLike
This is amazing! Love it.
Stephanie @ http://www.thestyledsoul.com
LikeLike
OMG, is it sad that I totally screamed in excitement?!
LikeLike
And thank YOU for featuring my little makeover on your blog! Seriously, SO AMAZING
xoxo
LikeLike
You're right… since this wine rack is made of some sort of faux wood (particle board??) I just used a hot glue gun to stick the hardware on the corners, (to avoid splintering the wood). Keeping it classy here 🙂 It actually bugs me that there are no screws, so I'm thinking of getting bolt cutters, cutting the actual heads off the screws and gluing those on there, purely for aesthetics!
What do you think?
LikeLike
Thanks for stopping by!
LikeLike
Fabulous!!!! Just the idea I was looking for! Great job!
LikeLike
Thanks!!
LikeLike