Three Cocktails to Liven up your Holidays

It’s 5:00 somewhere… am I right??  Today I’m participating in the link up party at The Lovely Cupboard, where there is bound to be quite a few yummy cocktail recipes abound!
After getting our new bar cart, I went wild at BevMo, so we are stocked to the gills with delicious holiday beverage accouterments…. everything from brandied cherries (these are just AMAZING in a manhattan), to flavored syrups, whiskey, vodka, mixers, and LOTS of champagne… 
To keep things feeling festive, I’ve devised three holiday cocktails to perpetuate that warm feeling of holiday cheer (or is that warm feeling from taste-testing three different cocktails in the afternoon…)
The hard part about this post wasn’t coming up with three cocktails, but, actually limiting myself to just three!!  I had a little too much fun with this one!
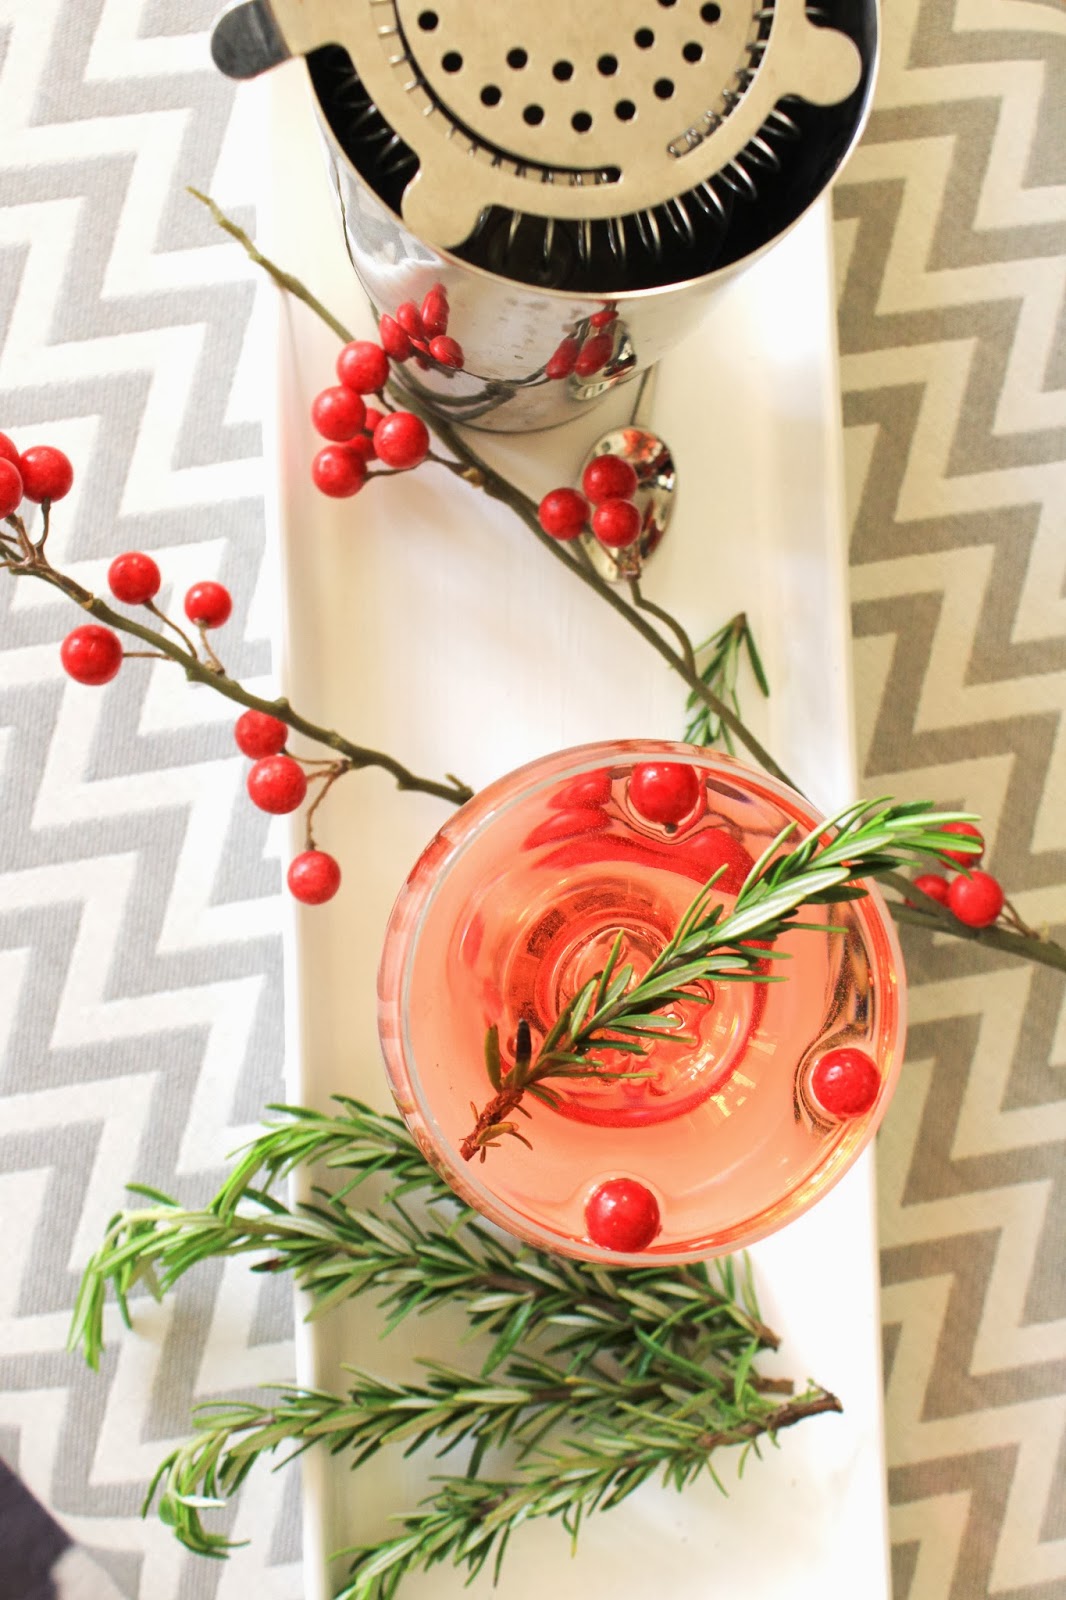
The first cocktail up, is the Rose “merry” and Cranberry Cooler… ya like that name??
I, for one, LOVE mixing savory and sweet flavors, and the rosemary in this recipe gives this cocktail a nice earthy balance.  
It also could not be easier to concoct this bad boy, and it’s as delicious as it is pretty!  I mean come on… red and green??  It doesn’t get more festive!

Ingredients:
  – Vodka
  – Unsweetened Cranberry Juice
  – Simple Syrup
  – Rosemary
  – Ice
  – Campari

Directions:
Muddle Rosemary in your cocktail shaker.  Pour in one part vodka, two parts unsweetened cranberry juice, one part simple syrup, and 1/2 part Campari.  Add 4 large ice cubes, and stir 30 seconds.  Strain into martini class (or here, I used a pretty crystal coupe from my mama).

This drink is sweet, but also bitter (from the campari) and a bit sour from the cranberry juice, and earthy from the rosemary.  It’s a little TOO good…

If you’re not a fan of Campari, just leave it out – I made a second version without it, and it was also absolutely delish!

Next up, is the Orange & Mango Fizz…   This is a bit of a twist on the classic mimosa, but the bitters and the mango spice it up a bit… 
Ingredients
  – 1 orange wedge
  – 2 1/2 cups sparkling wine, prosecco or champagne
  – 3/4 cup mango nectar
  – 1 teaspoon orange bitters
  – orange zest twists, for garnish
Directions
In a large pitcher, combine the wine, mango nectar, and bitters. Serve in a champagne flutes, and garnish with an orange zest twist.
It literally could not be easier, and this serves four! Perfect for Christmas morning if you ask me, and aside from the mango, most people have everything else on hand already!  If you don’t usually keep bitters on hand, you should start!  Great in food (mainly sauces, soups and broths as an aromatic) and drinks.

Finally, onto dessert…. err… I mean dessert drinks.  
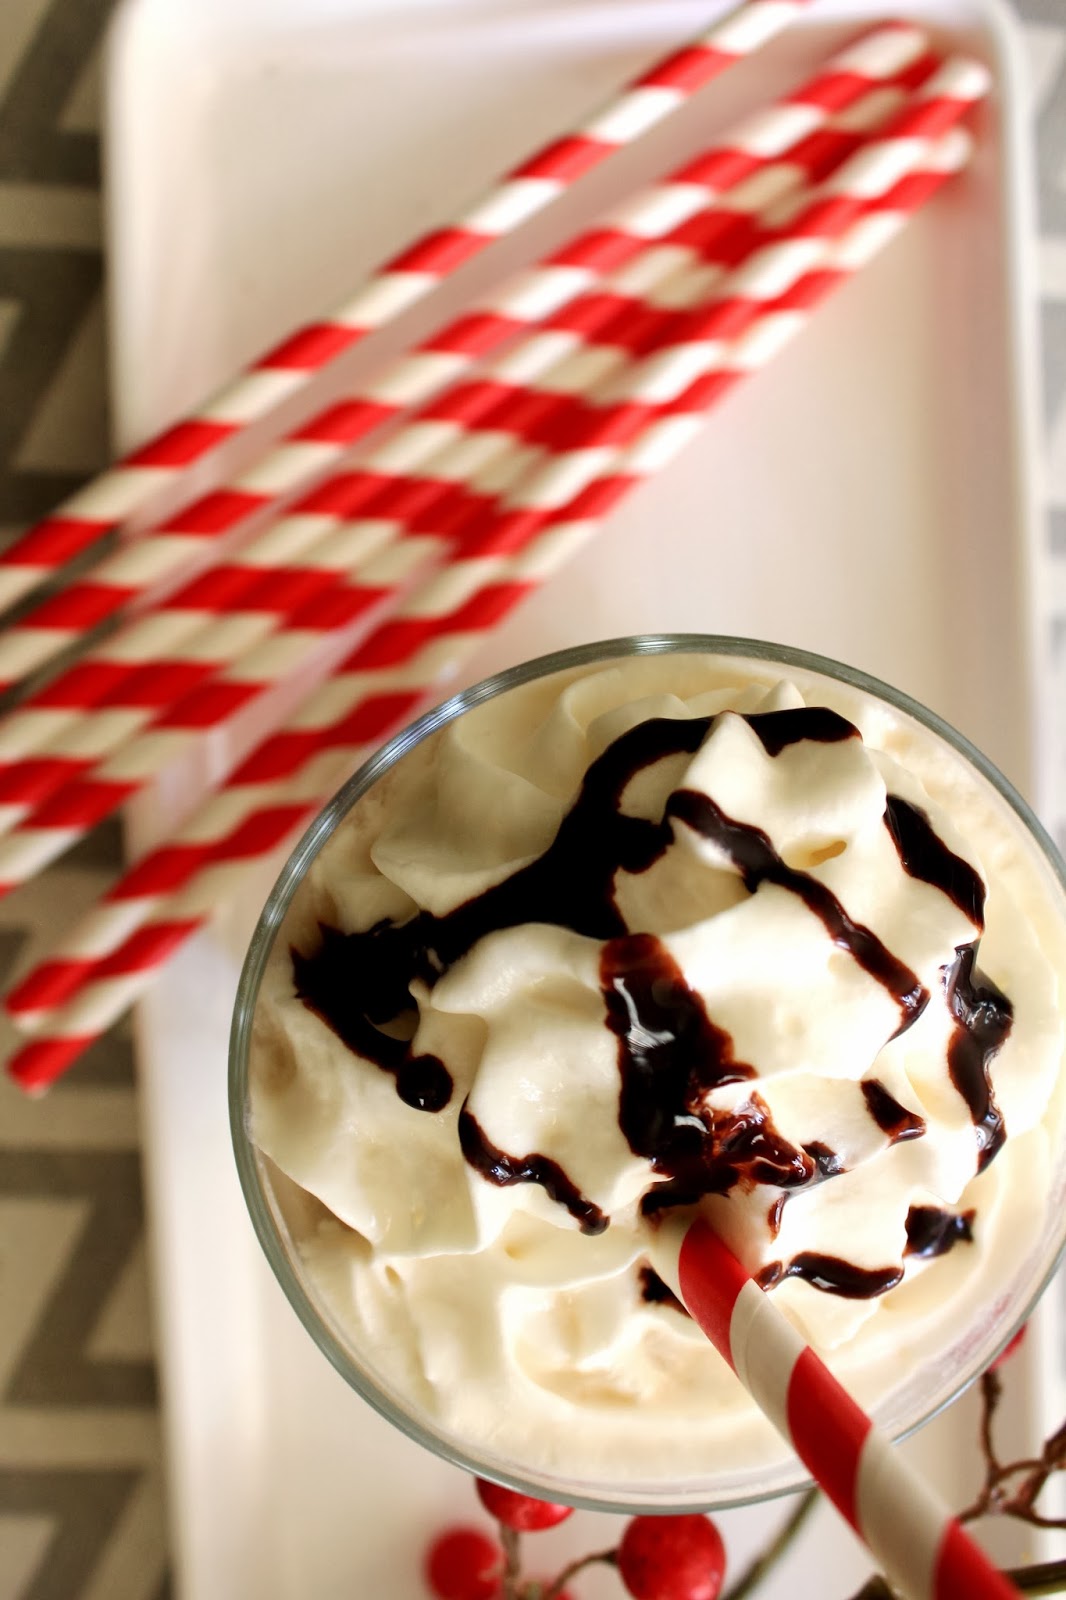
The Snowy White Russian is so sweet and yummy, you’ll want to skip the fig pudding… or yule log… or grandma’s fudge, or whatever traditional Christmas dessert you have!

Ingredients
  – Vodka
  – Kahlua
  – Milk (I’ve used non-fat before, but 2% is better)
  – Chocolate Syrup
  – Whipped Cream
Directions
Combine one part vodka, one part kahlua, and one part milk in a glass, stir.  Add three large ice cubes, and top with whipped cream and chocolate syrup.

You can thank me later.

Making this one totally took me back to my college days – my girlfriends and I would make these on a regular basis, regardless of season, and now I remember why.  They are SO GOOD.
I mean… YUM!!  Can we get a close-up glamour shot here??

Ohhh yeahhhh… nom nom…

And how cute are these glasses?

Kris got them from his sister as a birthday present, and I’m kind of obsessed (they originally came from Restoration Hardware although I can’t find them online anymore).  They are labeled to measure out how much “medicine” you might need after a grueling day of caroling, or an especially brutal snowball fight…

Super cute, right??

So that’s it!!  Do you have any favorite holiday beverages??  Mulled cider?  Mulled wine?  Some sort of yummy whiskey cocktail??  A hot toddy???  I could go all day people!

May your holiday’s be merry and bright(er) with these fun cocktail recipes!

xoxo

Butternut Squash + Sage Soup

I guess our “Indian Summer” is officially over. The last week has been cool and crisp – you can see your breath in the mornings, the wind was howling all last night, and it was the first time in a while where we had to put an extra blanket on our bed… 
Just like that, it’s fall!  

With the cool weather finally upon us, I decided to make soup.  Butternut squash soup to be exact, and it could not have been easier!

I didn’t use a specific recipe, and eyeballed pretty much everything, but it turned out amazing, and I pretty much guarentee that this is going to become one of our fall staples for supper this year.

Here’s how to make it…

Ingredients:
  – One large butternut squash
  – Half of a yellow onion
  – Three large cloves of garlic
  – One low sodium carton of chicken stock
  – Sprig of Sage
  – Olive Oil
  – Butter
  – Half and Half
  – Salt
  – Pepper
  – Cinnamon
  – All Spice
  – Chili Powder

Recipe Instructions:
Use a regular potato peeler to peel the thick skin off the butternut squash.  It’s pretty tough so I don’t recommend a paring knife unless you really know what you’re doing.

Once the skin is off, cut the butternut squash into cubes.  Near the “bulb” of the squash, there is seeds and fiber that you’ll want to scoop out with a spoon.

Once it’s peeled, toss the cubes in a large pot with the chopped up onion and garlic (you can also use shallots, but I didn’t have any on hand).

Coat everything generously with extra virgin olive oil, and a sprinkle of salt, and get things sauteing. As everything starts to cook, add in a bit of butter – I used around 3 tablespoons, or roughly 1/4 of a cube of butter.  At this point I also added in a dash of cinnamon, a dash of all spice, a dash of chili powder, and a large sprig of torn up sage (about 5 large leaves).

Cook things on medium to high heat until everything has softened a bit – just before the butter starts to get brown, add in the chicken stock.  I didn’t measure at all – just poured until the stock covered most of the butternut squash, about 3/4 of the way – I used about half to 3/4 of a 1-quart carton.

Put the lid of the pot on, and let things cook.  You want to make sure the butternut squash is really soft – let it go for 15 – 20 minutes or so.

At this point, turn the heat off, and let it cool for a few minutes.  Spoon the cooked ingredients into the blender (in batches) and blend until smooth.  I ended up adding a bit more chicken stock as each batch blended to get it really super smooth.  An immersion blender would have been amazing at this point, but the regular blender worked just fine.

Once everything was all blended, I added everything back into the big pot, turned the heat back on and tasted the soup.  It will probably be pretty bland still – I went with low sodium chicken stock so I could control the salt, so I added in more salt (I’m guessing around two teaspoons or so), along with two more dashes of cinnamon, two dashes of all spice, two dashes of chili powder, and pepper.

Keep tasting as you season – you might like more salt, or pepper, or less cinnamon, etc.  It’s all personal preference at this point. I also added a splash of half and half (only about 1/4 cup).

The soup was already really creamy without it, so you could absolutely skip this step if you wanted to keep this healthier.  Mix it all together, let the ingredients cook a bit more, and you’re ready to eat!

That’s it!  It sounds like a lot of steps, but it was SO EASY, and it only took me about 30-40 minutes total.  Also, it ended up being super cheap!  I think it cost about $8 total for the squash, stock, and sage.
I’m guessing it made about 2 large servings, so if you’re making this for more, double everything.
I ended up garnishing it with a few more sprigs of sage, but if you don’t like sage, feel free to skip it entirely.  I happen to love it, and I find that it really tempers the sweet flavors of the squash.
Enjoy!!

Pumpkin Bread

I’m in Portland this week for work, and after checking the weather online yesterday, I realized that that I would be going from 80 degrees and sunny to 50 degrees and rainy.

I needed to get myself in the correct mental state for cool weather, stat.

So I made pumpkin bread.

I mean… you GUYS!  This plate, could not look more “Halloween” if I tried!!

Aside from it looking like fall, and our house smelling like a haven of pumpkin spice, it is AMAZING.  Like unbelievably good, and soooo easy to make.

It all started with this pin from Pinterest…

The recipe said that all you needed was yellow cake mix, and canned pumpkin.

Let me start by saying, I LOVE yellow cake.  In my heart, I KNEW, that this recipe could only end in success, since we were starting with the base of my favorite sweet treat in the world.  As I went along, I doctored the recipe a bit, and found that I needed (and wanted) a few additional ingrediants.

As I was mixing, the batter was really REALLY dry, so to get the mix fully incorporated with the pumpkin, I added a little bit of milk.  Roughly two tablespoons did the trick to get it fully mixed in.  I also added roughly a teaspoon of vanilla extract, a few dashes of all spice, and about two teaspoons of cinnamon.

All I have to say is, you have to try this.  It’s cheap, and simple, and apparently somewhat healthy since there’s no added sugar (two weight watcher points per piece… or so says Pinterest).

The recipe is for muffins, but I made a loaf of pumpkin bread since I apparently don’t have a muffin tin (how is that possible??)

I baked it until a knife came out clean – roughly 45 minutes – and even so, the bread is SO moist, without falling apart or being gooey.

You have to try this!  For once, the recipe turned out to be both easy AND good… you really can have your (pumpkin) cake and eat it too.

Enjoy!

Beautiful (and Delicious) Ice Cream Cake

Kris hates cake.  It kind of kills me since I LOVE cake.  I could eat yellow cake with chocoalte frosting every day and never get tired of it, but I can barely coerce him into a bite.  For years, I’d make him a cake for his birthday, and he’d pretend to be wowed by it, and push it around on his plate, and ultimately go get a bowl of ice cream.  This past year, I skipped the cake, and bought 4 different kinds of ice cream to make him an enormous banana split.  While he was happy as a clam, it wasn’t the same… for me… birthdays need cake damn it!
My new solution?  
This cake.  This ICE CREAM cake that doesn’t conjure up tacky images of Baskin-Robins’ confections covered in power rangers, or ninja turtles, or whatever superhero show the kids are watching these days.

Not only would it look beautiful on a cake tray with candles to blow out (it’s not a birthday if you’re not blowing out candles) but it’s 90% ice cream… so it’s a win win!

I have been craving a yummy dessert lately, and maybe this is just the thing to try out this weekend!

Here’s the recipe (a la Bon Appetite):

Ingredients:
Cake
   Nonstick vegetable oil spray
   1 cup cake flour
   1 teaspoon baking powder
   1/4 teaspoon salt
   1/2 cup sugar
   1/4 cup (1/2 stick) unsalted butter, room temperature
   1 large egg
   1 teaspoon vanilla extract
   1/3 cup whole milk
Ice cream
   11 large egg yolks
   3/4 cup (packed) golden brown sugar
   3/4 cup malted milk powder
   6 tablespoons bourbon
   1 1/2 tablespoons vanilla extract
   2 1/4 cups whipping cream
   2 1/4 cups whole milk
   1 cup plus 2 tablespoons sugar
   Topping
   1/2 cup water
   6 tablespoons sugar
   4 1/2-pint containers blackberries, divided
Preparation:
Cake
Preheat oven to 375°F. Spray 9-inch-diameter springform pan with nonstick spray. Sift flour, baking powder, and salt 3 times into medium bowl. Using electric mixer, beat sugar and butter in another medium bowl until blended. Add egg and vanilla; beat until thick, about 3 minutes. Beat in dry ingredients in 3 additions alternately with milk. Spread batter in pan (layer will be thin).
Bake cake until tester inserted into center comes out clean, about 15 minutes. Cool cake in pan on rack. Remove pan sides. Cut enough off top of cake to make 1/2-inch-thick layer. Reattach pan sides, leaving cake layer in pan.
ice cream
Whisk first 5 ingredients in large bowl to blend. Stir cream, milk, and 1 cup plus 2 tablespoons sugar in heavy large saucepan over medium heat until mixture comes to simmer. Gradually whisk hot cream mixture into yolk mixture. Return to pan and cook over medium heat until custard thickens enough to coat spoon, stirring constantly, about 3 minutes (do not boil).
Strain custard into large bowl; set over pot of ice and water. Cool 1 hour, stirring often, then chill 1 hour. Process custard in ice cream maker according to manufacturer’s instructions. Spread ice cream over cake in pan.
(or for those of us without an ice cream maker, get reallllyyyyy good ice cream, let it soften, and then spread over the cake…)
Cover and freeze until firm, at least 4 hours and up to 2 days.
Topping
Stir 1/2 cup water and sugar in heavy large saucepan. Add half of berries and bring to boil. Reduce heat and simmer until syrup thickens, mashing berries with back of fork, about 12 minutes. Pour into medium bowl; gently stir in remaining berries. 
Cover and chill until cold, at least 3 hours and up to 1 day.

Using hot knife, cut around pan sides to loosen ice cream cake. Remove pan sides. Transfer cake to platter. Spoon half of berry topping onto center of cake. Cut cake into wedges and serve, passing remaining topping separately.

Grilled Peach Summer Salad

So… how amazing does this look???


Ahhhmaaaayyyyzzzziinnngggggg!

Grilled peaches?  I say yes please to that smoky caramelized flavor!  I came upon this recipe on the blog Feasting at Home, and it’s officially been added into the queue for summer recipes.  Let’s be honest… nothing says “summer” better than a perfectly sweet, juicy peach.

Here’s a little tip to help you find the best peaches… pick out your fruit by smell.  This is actually how you should pick out all stone fruit – apricots, peaches, nectarines (by the way, this salad would be fantastic with nectarines as well) – these fruits taste the way they smell, so if there is little smell to the peach, it won’t taste like much at all.

For this salad, here’s what you need…

Salad:
   – Peaches
   – Goat Cheese
   – Basil (she uses purple basil)
   – Arugula
   – Nasturtium petals (to be fancy of course)
Dressing:
   – Balsamic vinegar
   – Olive oil
   – Salt
   – Pepper
   – Agave

The directions are painfully simple, although some of the ingredients might be harder to come by.  The original recipe used white balsamic vinegar in the dressing, but I’m sure regular balsamic would be great.  Nasturtium petals are not going to make or break this dish, but if you have them on hand, or you’re really trying to impress company, track those bad boys down!

Ok, so cut the peaches in half, and take out the pits.  Coat in olive oil, and put in the grill for for about 5 minutes, juicy side down.

While those grill away, mix up the dressing, whisking all the ingredients in a large bowl.  Toss in the arugula and basil, and coat the leaves evenly.  Arrange on a flat platter for a pretty presentation.

Take the peaches off the grill and cut into thin slices.  Arrange on top of the greens, and finish off the salad with the flower petals.  The picture below also includes watercress and toasted almond slices… get creative! It’s your salad!

For a heartier version, I’d add grilled chicken – avocado would also be yummy in here too.  Unfortunately for me, we have zero outdoor space, so we won’t be able to use a grill with a flame, but an indoor grill would work just as well.

I’m hungry just thinking about it!

Brussels Sprouts Chips

Kale chips are pretty much all the rage – a small bag from the market is around $5!  I’ve taken to making them at home, but just saw this recipe for Brussels Sprout Chips, and think I’ll be adding this to me repertoire 

Just as easy, and it is a nice way to switch up a healthy snack.

Source

Brussels sprouts weren’t exactly my favorite vegetable for a long time – I’m not a picky eater by any stretch of the imagination, but this is one food that I only started enjoying recently.

Turning them into a roasted crispy snack with fresh flavors like lemon and sea salt take away the pungent flavor that comes with steaming them.  Not a route I like to go!

Ingredients
 – brussels sprouts
 – olive oil
 – sea salt
 – lemon
Instructions
First separate each leaf from the brussels sprout. The smallest leaves won’t separate so you can either go ahead and cook those too or save them for another meal idea. 
Lightly coat the leaves in olive oil. Bake at 400°F for 8-10 minutes until edges begin to get crispy. Be sure to keep an eye on them, as they can burn quickly. 
Remove from oven, squeeze on some fresh lemon juice and sprinkle with sea salt.
It doesn’t get much easier than that!  Enjoy!

A Bite of Heaven… aka Whipped Bleu Cheese Bites

I’m officially on the one-month countdown to our girls’ trip to Cabo, which means no fast food (what does that mean), no cheese (how can I possibly eliminate a food group like that), and only “good carbs”… which makes finding mouth watering blogs like Iowa Girl Eats impossible to look at.  
This recipe for Whipped Bleu Cheese Bites with Balsamic Reduction, guest posted by fellow blogger Dana, of The Minimalist Baker had me at the first picture… and it sounds as good as it looks.  You are welcome in advance…

I mean… humina humina…  take her description of this appetizer:
Each luxurious bite melts in your mouth with a distinct airiness from the bleu cheese dip and a crisp finish from the baguette. The flavors are spectacular, melding together create the perfect savory, sweet bite.

Um…. how freaking fast can I ditch this “healthy eating thing”, and jump on the ooey-gooey-bleu-cheese-dip-wagon?!

Answer: not fast enough.

If you’re a fellow cheese lover like myself, scroll down for the full recipe and instructions…

Ingredients:
4oz (1/2 cup) bleu cheese crumbles
4oz 1/3 fat cream cheese
1 Tablespoon white vinegar
2 Tablespoons extra virgin olive oil
pinch black pepper
~ 1/4 cup 2% or whole milk
3/4 cup balsamic vinegar
8-10 sprigs asparagus and/or 1/2 red onion
12-14 slices wheat baguette
Directions:
 Preheat oven to low broil and position rack on second from top position. Slice baguette into 1/2 inch pieces and arrange on baking sheet. Plan for 1-2 per person. Set aside.
Prepare bleu cheese dip by placing bleu cheese, cream cheese, vinegar, olive oil, and pepper in a food processor and mixing until well combined. Drizzle in milk 1 Tbsp at a time while mixing until desired consistency is achieved. It should be thick like frosting. Scoop into a large plastic bag and set aside.
Saute asparagus and/or red onion in a large saucepan over medium heat until tender. Season with salt and black pepper. To properly caramelize the onions, make sure to keep the lid on to lock in moisture and get them really soft. Set aside.
Prepare balsamic reduction by placing balsamic vinegar in a small saucepan over medium heat, stirring occasionally and being careful not to boil. Cook for about 10 minutes or until the liquid has reduced by about half and a wooden spoon scraped across the bottom leaves a visible line – it should appear somewhat “syrupy.” Pour into a small ramekin for serving.
Pop baguette in the oven and watch closely, toasting until light golden brown. Then remove from the oven, pipe on whipped bleu cheese, and top with sautéed asparagus and/or caramelized onion. Drizzle with balsamic reduction and serve immediately.
Estimated nutrition per bite: 142 calories, 9 g fat, 1 g saturated fat, 124 mg sodium, 9 g carbohydrates, 1.7 g fiber, 1.8 g sugar, 6 g protein
Inspired by The Sprouted Kitchen Cookbook
10 minutes prep time
20 minutes cook time
30 minutes total

MUST. MAKE. ASAP.

A Little Indulgence

In an effort to improve my eating habits (and shave off some of the winter weight everyone puts on while hibernating) I’ve been trying to come up with healthy alternatives to my favorite snacks.
Case in point… the french fry.  Salty and Delicious… yes, slimming?  Definitely NOT.
My solution?  Homemade sweet potato fries, and they are AMAZING.

One large sweet potato makes two servings, and the easiest way to make these is to prepare them early, and keep them in the fridge until you’re ready to snack.

Directions:
Peel sweet potatotes, and cut them into thin slivers.  I like to do two or three large sweet potatoes at once, and save the extra for another time.  Take what you don’t use and put them in a zip log bag in the refrigerator.

Toss sweet potatoes in olive oil, and liberally season with salt and pepper.  I also add a few sprinkles of red pepper flakes or cayenne pepper for heat.  That’s optional, but it’s delish.  Spread out the sweet potatos on a flat cookie sheet, and cook them in a hot 400 degree oven for about 12 minutes.

While those cook, make your dipping sauce.  In lieu of ranch dressing, I make a healthy version using greek yogurt and ranch seasoning.  Make a whole batch at once, and use to dip raw veggies in it all week.  It’s 60 calories for half a cup, so feel free to dip away without guilt.

The combination of sweet potatoes and greek yogurt is high in protein and fiber and low on calories, and I promise you won’t even miss french fries with this little treat.

I know what I’m making tonight!!

Steamed Lobster Tails

Happy Monday ya’ll!  The weather has been beautiful here in San Francisco after a bit of rain last week, and it’s all bright blue skies, and crisp cold air!  Yesterday, my parents came into the city for the day, and we took a long walk on the Marina Green down to the Golden Gate Bridge – we really do live in the most incredible city in the world.

How can you say no to that view?!

Last night, the Grammy’s were on (did you end up watching??), and we wanted to stay in for dinner.  On the menu were lobster tails!  Sounds daunting, but they were the easiest thing to make IN THE WORLD.

Our lobster tail feast came about because they were on sale at the market – $5 each!  Kris came home with them to surprise me, and since I’m still a novice in the kitchen, I was more than a little worried about not messing them up.

After discovering that our broiler didn’t work (awesome news) I turned to Google, and found out that steaming them was the easiest way to go.

Here they are – perfectly steamed and begging to be eaten!  In case you are thinking of tackling lobster (perhaps a good idea for Valentine’s Day dinner this week?) here are the instructions – so easy, and SO delicious!

How to prepare perfectly steamed lobster tails:
Fill a pot with about an inch of water, salt the water, and place in a steamer (in my case, we didn’t have a steamer, so I used a small colander with legs).  Once the water comes to a boil, toss in the lobster tails, and put the lid on tight.

Set the timer for 6 minutes, and do NOT take the lid off.  While the lobster tails are steaming away, melt some butter in a pan.  I tossed in a few whole garlic cloves, and a few red pepper flakes to flavor the butter.

Once the timer goes off, rescue your little lobster tails – they should be bright red, and curled up a bit.  Do not let them go longer than the timer!  Overcooked lobster is tough, and chewy, and not very good.

The lobster is easy enough to take out of the shell – but if you don’t want to deal with it after it’s cooked, you can also run your knife along the shell before steaming.  We dipped it in the butter, and feasted like kings – I kept the sides simple, some roasted broccolini, and mashed potatoes, but these would be amazing with polenta, on top of a salad, or even just with french bread.

Superbowl Snacks

Pizza and Beer… pretty sure that would make any guy happy when watching a big game, but not this girl!  As a San Franciscan, whose parents also grew up here, it’s in my blood to root for the 49ers this weekend, but watching football is not something I usually partake in.  For me, the Superbowl is all about the food (and commercials), and so pizza and beer just won’t cut it!
I’ve been seeing all sorts of yummy snacks as the weekend gets closer and closer, and these roasted Jalapeno Popper Potato Skins are at the top of my list to make this Sunday.
One of my biggest pet peeves is to go to a party and have food that you need to eat with two hands – especially when you are holding your cocktail!  So annoying!  For Superbowl parties, it’s especially important to have bite size food since the living room is likely to be crowded, and possibly a little rowdy.  
The potato skin is kind of perfect – easy to pick up, easy to eat, no dipping involved since the toppings are already on, and they are hearty – no complaints from the boys about having to eat “dainty food”… don’t even get me started…
Here’s how to make them:
Ingredients:
2-3 jalapenos (depending on how spicy you want the potato skins)
2lbs baby red potatoes, roughly the same size
2 Tablespoons canola or vegetable oil, divided
salt
8oz 1/3 less-fat cream cheese, softened to room temperature
1 cup shredded sharp cheddar cheese
6 strips center-cut bacon, cooked and crumbled
Directions:
Place oven rack to top position and preheat broiler. Place jalapenos onto a foil-lined baking sheet then broil, turning occasionally, until skins are black on all sides. Remove jalapenos to a paper sack then seal. When jalapenos are cool enough to handle, peel away skin then remove seeds from insides and chop. Combine with cream cheese in a bowl then set aside (do not refrigerate.)
Place oven rack to center of oven then turn heat to 400 degrees. Wash and dry potatoes then prick once or twice with a fork. Place onto a foil-lined baking sheet then drizzle with 1 Tablespoon oil and coat all sides. Bake for 30 minutes, or until a knife inserted into the center goes in easily.
Turn oven heat to 450 degrees. When potatoes are cool enough to handle, cut in half lengthwise then scoop out flesh, leaving 1/8″ potato inside the skin (save for mashed potatoes/other uses.) Brush insides with remaining oil then sprinkle with salt and bake for 10 minutes.
Fill each potato skin with 1 teaspoon roasted jalapeno cream cheese mixture, then top with bacon and shredded cheddar cheese. Broil for 1-2 minutes, or until cheese is melted.

Makes ~24 potato skins

That’s it!! Super easy, and surprisingly not that bad for you (since the insides of the potatoes are scooped out)!  Perfect for game day if you ask me!!