Cow Hide Rug – Do or Don’t?

Dark gray and cream living room
Emily A Clark

I am a city girl at heart – I love to be in nature but I also like to come home to my blow dryer and cozy bed – but while I might be slightly scared of horses, and would never wrangle a cow in a million years, I am really into the idea of a cow hide rug!

I keep seeing cow hides pop up in some really refined, contemporary spaces, and they look really cool – not cowgirl.  I’ve been drawn to the lighter dyed versions (cow spots are not really my thing), but I’ve even seen a few with a zebra print on them that looks SO cool.


Stephmodo
One time, I told Kris that I loved the look of zebra print, and he gave me his “Who-is-this-crazy-person-and-where-did-my-completely-sane-girlfriend-go” look, but I SWEAR, if done right, zebra print can look classic!  I need to print out this photo from Stephmodo’s blog, and put it on the fridge for him to see.  This room is actually a nook off the hallway of a Southern California home, that the family made into a functional office space. Genius!

Cow Hide Rug cow hide rug
willowdecor
Look at how these light cow hide rugs blend into these rooms!  The rest of the decor is relatively simple – clean lines, and not a lot of color.  Aside from the irregular edges on the rugs, nothing about them looks “risky” – the first word that comes to mind when I think about purchasing a cow hide rug.  Maybe simplicity is the best way to ease into it?

Beige cow hide rug
DecorPad
Ok, this room is just awesome, right?  Those icy blue walls with the vibrant yellow Louis XIV chairs?? If I had an office, this is the color scheme I’d want to go with.  It’s bright and light all at the same time, and somehow it doesn’t feel like too much.  Dare I say it, the rug is the safest choice in this room!

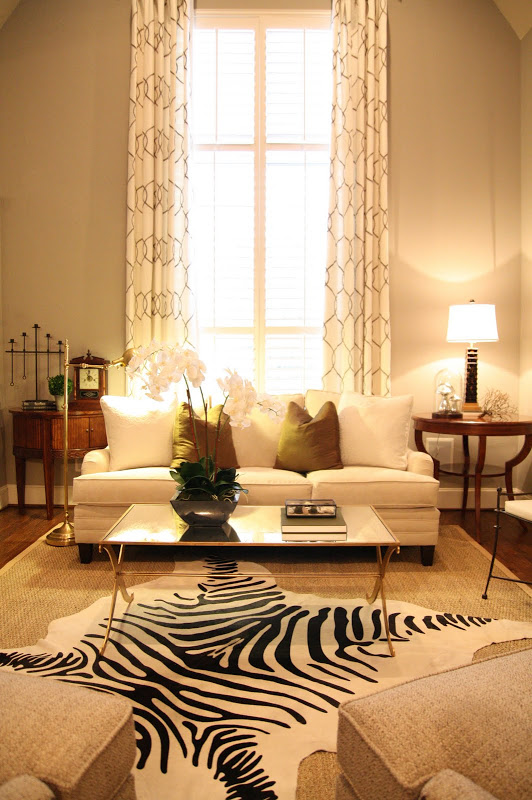
So… this room is very “styled”.  I actually hate the ceiling from the sunburst light fixture to the bamboo wallpaper (sorry homeowners), BUT what I do love is how the zebra print cow hide is positioned underneath a glass coffee table (so as not to obscure the pattern), and that when laid lengthwise, it mirrors the symmetry of the two sofa’s that are facing one another.  I’ll ignore the ceiling, the screens, and the complicated sconces, because the rest of the room is spot on perfection.

I once stayed at a house for a weekend that was decorated with a vibrant orange as the focal color. They had a cow hide rug as well.  Beyond all this, I'd really like to see more of the coffee table.
Create Girl
And… the cow print.  Not my taste, but I’ll admit that it brings some much needed life into a totally neutral oatmeal colored room.  This rug also looks a bit furry, which creeps me out a bit too much.  How do you find a rug with minimal “fur” – I really do not want to imagine my rug in it’s former life… aka eating grass and chilling on a hill in the sun.

DIY – No Sew Throw Pillows

The living room has been getting a gradual face-lift, and while we haven’t gone so far as to buy new sofas (a major purchase off my growing apartment wish list), the addition of a new rug, curtains, potted succulents, and some sea fan art have helped re-vamp this room.  The throw pillows on the sofas have been mismatched since we moved in (last November), and while this has bugged me endlessly, I hadn’t gotten around to replacing them… until now!
I’d been looking for throw pillows, but since they run anywhere from $30 (on the low end) to $100 (on the high end… well, MY high end) I couldn’t commit!  It started feeling like a big purchase, and I didn’t want to make the wrong decision.
Finally, one of the mismatched throw pillow covers ripped, and that was pretty much the straw that broke the camel’s back.  Hallelujah – a good excuse to get some new (matching) pillow covers!  
Since I’ve been such a commitment-phobe over buying throw pillows, I decided that I’d make them – a pretty aggressive decision since I do not know how to sew – I don’t even own a sewing machine.  I thought to myslef, how hard can it be??  Famous last words, right?  Wrong!  If you have a hot iron, you can make a throw pillow – I promise.
Read on for my crafty tutorial!
Step I: Buy Fabric

I am admittedly frugal – always looking for a way to save a few dollars, even though I like nice things.  Interior fabrics that have a good weight AND an attractive pattern can get pricey pretty quickly.  Enter my solution – the shower curtain.

I was at Target, when I stumbled upon this shower curtain – it measures 6’x6′ which means I have plenty of fabric to mess up a few times, and at $20, you can’t beat it!  This pattern in particular picks up all the colors in the rest of the room – blues, golds, and grays, on a creamy background – just what I was looking for!  I told my best friend that I bought a shower curtain to make pillows and she laughed so hard.  Little did she know what a genius I was… after showing her the finished product, she’s not laughing anymore.

Step II: Measure fabric 

Since these pillows are “no sew” there are no zippers.  An envelope pocket on the back makes this work, so this means that for each pillow, you will be cutting out three pieces of fabric. The front panel, and the two back “envelope pocket” panels.  Knowing that my pillow insert measured 20″x20″ I wanted to be sure I cut out plenty of fabric to account for the seams.  After messing up my first few pillow covers, I figured out the right measurements to make a tight fit.  I learned the hard way that if the pocket pieces aren’t long enough, the fluffy pillow pops out of the pocket (fail) so the key to making this work is having the pocket flaps overlap by at least 8 inches.

  – The front should measure 22″x22″
  – The back pocket panels should measure 22″x17″

(for those of you who know what you are doing, you can probably make the front panel 21″x21″)

Step III: cut out all the pieces you’ll need

I like to work in assembly line fashion – cut out all the pieces you’ll need at once, so you can move on to the next step – it’s just faster this way… trust me.

Step IV: Gather your supplies

Once the pieces are cut out, get everything set up to make these pillows.  Make sure your iron is filled with water for the “steam” function.  Plug it in, and get it hot.  Pull out the ironing board, and grab a damp washcloth, and your iron on fusing (aka the glue that holds these pillows together).  I used Singer Regular Hold Iron-on Fusing Web – grabbed it at Target (conveniently located in the same aisle with the ironing boards)

Step V: Assemble

Take a look at these diagrams – it will make it a lot more clear when assembling

Lay the “front” pattern side up, and lay the first envelope flap on top of it pattern side down (patterns should be facing each other.

Measure out the fusing web, and place it between the two panels of fabric.

Take the damp washcloth, place it over the fabric, and press the hot iron for 20-30 seconds.  The combination of the moisture and the heat will make the fusing web melt and bond the fabric.  Do not just try to use the steam from the iron – it’s not enough!

At this point, the fusing web should have connected the front panel to the first envelope pocket flap on three sides – see dotted line int he diagram below:

Lay the second panel face side down on the other side, and fuse to the first envelope flap and the pillow front.  The panels will (and should) overlap.  See diagram below:

Once the fusing is done (it takes deceivingly longer than anticipated), let the pillow cool (so the “glue” doesn’t come apart) and carefully flip pattern side out.  Put the pillow in, and voila… insta throw pillows – no sewing required… they look pretty good!  Best shower curtain EVER.

Can I Live Here??

dream. home.

But seriously… can I really live here?

From the oversize chandelier, to the exposed brick wall, to the high vaulted cieling, to the black and white contemporary furniture, and tons of light and windows…  I have some serious jealousy looking at this!  Don’t get me wrong, I love our little apartment, but sites like Lonny and Pinterest make me green with envy over other people’s homes that boast fabulous architectural details.

Normally, my taste is a bit more traditional, and I like to use more color in our home, but the black and white (and shades of grey) in this room are so clean, and bright, and pretty… I can’t help myself!  This room takes the staples that I love (clean classic lines on the “core” furniture – sofa, chair, side table) and couples it with some masculine feeling contemporary pieces (the coffee table, graphic pillows, and brick wall).

I’ve gone out of my comfort zone for this inspiration board, to put together a room that “feels” the same as this inspiration, but is much more in line with the budgets normal people (aka me) would be working with…

Inspiration: Black and White Opulence:

The goal here is to create the same look and feel of this lofty, architecturally stunning room, when the details may not already exist.  Kris and I live in an art deco apartment from the 1930’s.  It does not have exposed brick anywhere, no vaulted ceilings, and no arched windows overlooking a courtyard.

Tom Hagga makes some really awesome wallpaper’s, and the one I used in the inspiration board has the look of exposed brick.  I’d be really careful when deciding where to roll this paper on the walls.  Keep in mind that from a distance, it looks like brick, but up-close there is zero dimension.  I’d be sparing, using cool paper like this on a small wall, or on a wall with large windows, so that this paper peeks out from the architectural details – as opposed to dominating an entire wall.

For rooms without large expansive windows, Ballard Designs has a huge assortment of floor to ceiling height mirrors that have the look and feel of windows (pretty clever, eh?).  The Amiel Arch Mirror has a lovely dark maple arched frame, and antiqued mirrors that reflect light.  This would be an awesome solution to open up a smaller room.

Aidan Gray Kason side table is pretty much perfection.  I am a sucker for a pretty pedestal, and the weathered wood on this perfection.  For a tenth of the cost, the West Elm.com Turned Pedestal Side Table (made of mango wood) has the same dimensions and would do the trick just as well.

The finishing touches bring the room to life, and add a bit of glamour – with the mercury glass lamp, the pretty chandelier, and the graphic black and white throw pillows.  One note with a chandelier – do not try to hang in the center of a living space if the cieling isn’t vaulted.  Opt for a corner over a chair for reading, or over a desk on the room’s perimeter.

For some greenery, a fiddle leaf fig always looks well groomed, orchids mean minimal maintenance, and the little black stallion figurine is as sassy as it is inexpensive (I went with black here, but gold would look awesome too).  I took a queue from one of my favorite bloggers who spray paints inexpensive children’s toys to display as art – yep, $2 plastic toys become decor.  It’s pretty much genius if you ask me.  Check out Cassie’s DIY Brass Figurines to see the before, the after, and trust me when I say it looks amazing.


Tom Hagga Exposed Brick Wallpaper (price upon inquiry)

Target White Slipper Chair $199
ZGallerie White Graham Slip-covered Sofa $899

Crate and Barrel Frame Medium Coffee Table $499
Aidan Grey’s Kason Wooden Side Table $1200 (West Elm’s Turned Pedestal Side table is VERY similar at $199)
Home Depot Chandelier $99
RugsUSA Dark Grey Rug $300 for the 8×10
Ballard Designs Amiel Arch Mirror $699 (each)
Homegoods Mercury Glass Lamp and Shade $40
Horse “Sculpture” DIY (idea from the fabulous Cassie of HiSugerplum)
Black and White Graphic Throw Pillows: Etsy ($30-50 each)
Fiddle Leaf Fig Plant + White Orchid

Flokati Rug

I spotted a Flokati rug in a commercial for this local San Francisco furniture store, and it looked so soft, and luxe, I’ve since become a bit obsessed.  You are probably thinking, this crazy girl JUST got a new rug… and this is true, but I think that when we move into a larger space, I’d love to invest in a pretty, fluffy Flokati for the bedroom.

I see all the fluff and think how it might not stand up well to a high traffic area like a living room… but in a bedroom… that could be a match made in heaven.  Just picture it… it’s a cold morning, still dark out, and the alarm goes off… you get up and swing your legs of bed… imagine how amazing this rug would feel under your feet!  Like butter, I tell you!

A real Flokati rug could put you into some serious debt, but the amazing RugsUsa.com (I wish they had a different name) has the Standard Shag Greek Flokati Natural Rug for a sweet deal.  The 5’x7′ is ~$600 normally, but it’s 35% off right now.

Doesn’t it just look like a cloud with all the pale grey accents below?  And with the zebra skin??  So chic.  I wonder if this is a look I’d tire of, since I normally go for cleaner lines, and very classic pieces.  This is way more hippie dippie than I’d normally go, but looking at these photos where the rooms are based around classic furniture… Luckily we’ve got quite a few big ticket items already lined up, so this goes at the bottom of the list, but the Flokati… it’s on the radar for sure (plus it’s just so fun to say).

Re-Vamping the Bedroom

I am like a giddy little puppy – we have made the decision to go with a king size bed and replace our queen mattress!  Hooray!!
Knowing that, I can really start planning out our bedroom.  I made a few short term changes by flipping over our duvet, and getting some cute pillows and throw blankets to spruce up the bedding, but it’s time to make some real strides here!  I came up with this inspiration board based on the changes in my tastes, and some of the accessories we already have!
Obviously, we’ll be working with what we’ve got, so while the red punches of color from my original bedroom inspiration board would be fun and bright, I need to look for things that match the core pieces in the room – the biggest being the rug.
Right now, the bedroom has a large piece of remnant carpet I got for next to nothing in my early 20’s – it’s an oatmeal color, and while it has done it’s job, it’s time to move on to greener pastures.  Recently, we got a new rug for the living room, which means the old living room rug has been rolled up and is chilling in our dining room.  It’s currently leaned up against the wall and I can’t wait to move into our bedroom.  Our “old” living room rug looks almost EXACTLY like the one in my inspiration board, so the red touches from past inspiration boards would feel wrong with this soothing tone.
Now that you can see that the rug is all soothing shades of aqua, tan, and brown, I think I should keep that feeling going throughout the bedding as well.  For the most part, the biggest changes will be the bed frame (one nail-head upholstered headboard… coming right up), the bedding, the “new” rug, and a chandelier (for glamour).  The art in my inspiration board is already hanging up, the lamps are a done deal, and you all remember my toil (posted here) to re-finish the dresser and nightstands in the bedroom…
I could also do bedding like the Barbara Barry collection.  I do love the look of the blue quilted bedding, with a big fluffy duvet folded at the foot of the bed.
I also really like this pale blue paisley – I think I’ll have to see how busy the room looks once the rug is in there.  The room doesn’t get a ton of natural light which is a real challenge, so I don’t want to make it feel super small, or super dark….
What should I do?  Are these too dark?  Too girly?  Should I keep looking?  Or am I over analyzing everything??

Mirror Love & a Bedroom Makeover

I love a good mirror, and I’m a firm believer that there should be one in every room.  Not only is it nice to not have to trek to the bathroom to check your hair or outfit before leaving the house, but mirrors reflect light, open up a room, and make everything feel bigger and brighter than normal.  Whether it’s a big picture frame mirror, a delicate scrolled mirror, a sunburst mirror, or a convex mirror… I love them all!

Is anyone else LOVING those porthole mirrors like I am?  Look at a few more close-ups… So cool!!
I am pretty sure this room is going to be the inspiration for our bedroom re-design.  The chandelier is perfection, silk drapes are always my number one choice, and that upholstered nail-head trim headboard?!  I am dying a little inside…

I absolutely love the look of the convex mirrors lined up above the bed.  We have the trio of quatrefoil mirrors above our bed in the meantime (remember how hard I looked for those??)  Well, despite all the work it took to hunt those bad boys down, I am thinking of  something smaller to go above the bed when we get our new bed and headboard! (no, Kris does not yet know about the new headboard, hee hee hee…)  

Not to worry, the quatrefoil mirrors will find a home elsewhere in the apartment, but I am looking forward to updating the bedroom – you have no idea!  Don’t you love this bedding?  I saw a few similar rooms and just love the smoky paisley.  Take a look at this similar and equally awesome smoky paisley print bed… sooo pretty!  I also love the zebra paired with it!  Are you as in love with this look as I am right now?

We could also do a grand starburst mirror like this one… with the beveled edges, it brings a lot of glamour to the look.  Unfortunately, I’ll just have to admire that detailed crown molding from afar – we’ve got crown molding, but nothing like that!

Here is another in a dining room – the more I see them, the more I love them!


So much to think about…

DIY Headboard Inspiration

I’ve recently been struggling with the idea of buying a new headboard for our bedroom.  Being completely honest, the headboards I like are WAY outside of my price range, and I just cannot justify spending upwards of $500 for a quality tufted headboard.

Last night, I stumbled across an amazing Pinterest find: 34 DIY Headboard Ideas.  Um, hello, where have you been for the last several months?!
While I am still toying with the idea of making my own tufted headboard, some of these ideas are so cool, it’s really given me some different ideas that are outside of my comfort zone.
First up – Laser cut metal roofing!  Who’d have thunk?  Somehow it has a glamorous feel, despite using the most un-sexy of materials.  Pretty sure Kris would say no, but it’s so creative, I kind of love it!
Talk about getting a bang for your buck – this headboard is just a decal on a bold colored wall – you could easily stencil it on with paint as an alternative, but it’s dramatic, and EXTREMELY cost effective.  Perhaps not my taste, but this would be so fun in a teenager’s room.  16 year old me would have gone wild for this!
A similar idea to the last headboard, this one here uses chalkboard paint so you can have fun with it.  Again, not quite what I had in mind, but such a cool idea!
Take some reclaimed wooden boards, cut to size, nail gun to wall.  Easy, cheap, and very shabby chic.  Where I will find reclaimed wood lying around in SF, I do not know… I also don’t think I’d want that anywhere near my bed if I found it on the street here, but that’s a whole separate issue.
A huge piece of art has taken over this next bed – very chic & very minimalist while being very dramatic.  I love how this looks, but it’s a bit stark for my taste.
Why have I never thought of this before?!  Use a folding screen as a large dramatic headboard.  I recently saw one at Cost Plus for less than $200 – it was natural colored linen with nail head trim… may need to go back and swoop that up!!
Ok, I want to live here!  Look at those amazing old doors propped up behind the bed – amazing.  And that chandelier?!  WOW
Anyway, check out the rest of the article for more unique DIY headboards!
xo

Live Beautifully

I am officially in love with Maria Beck’s blog, Live Beautifully, and I am not ashamed to admit that I want her life.  She is a prominent Texan interior designer, who owns her own company.  Her taste is flawless, and her renovations are absolutely stunning – we are talking serious transformations on some of these – tearing down walls, gutting entire floors of homes, etc.  After discovering her site, several hours disappeared a little too quickly as I scrolled through page after page of beautiful design.

What I especially love is how she aims to preserve the integrity of the homes she revamps, and stays true to the era of the home.


This is her most recent kitchen renovation where she made a much smaller kitchen an open functional space for a large family who entertains.

The before and after is really shocking.  She opened up a wall to open the kitchen to the living space, knocked down a wall to expand the kitchen into previously un-used square footage, expanded the island, and extended the cabinets up to the ceiling (one of her favorite tricks, and I have to say, one of the biggest impact changes to every kitchen remodel she does!)


This is one of my favorite dining room transformations – the room is small (compared to some of the expansive Texan homes she works on) but feels grand at the same time.  You wouldn’t know to look at it now, but the room had painted cement tile floors before the transformation (woof).  Thankfully these were replaced with french herringbone wood floors – so pretty (see below)

Her rooms are peppered with all my favorite styles – neutral colored core pieces, lots of dark wood, nail-head trim on everything, high mounted curtains, classic subway tiles (in kitchens and in bathrooms), animal print, lots (I mean LOTS) of white, natural fiber fabrics, grand chandeliers, deep tufting… oh my!  The list goes on!  These rooms look livable, but elegant.  I would not hesitate to sink into the deep fluffy furniture or cook in these kitchens.

Enjoy some of my favorite transformations from her blog, and be sure to check out Live Beautifully – you will fall in love!