DIY Projects: Halloween

I love fall, but the decor for Halloween that you find in stores leaves a little to be desired.  I scoured the internet for some clever decor ideas that are simple, and relatively inexpensive.  It’s such a short lived holiday, no one wants to break the bank on fake witches and over the top lawn displays (or maybe you do… I know I don’t!)

Read on for some fun ideas to get into the Halloween spirit!!


Glittery Pumpkin Candle Holders:

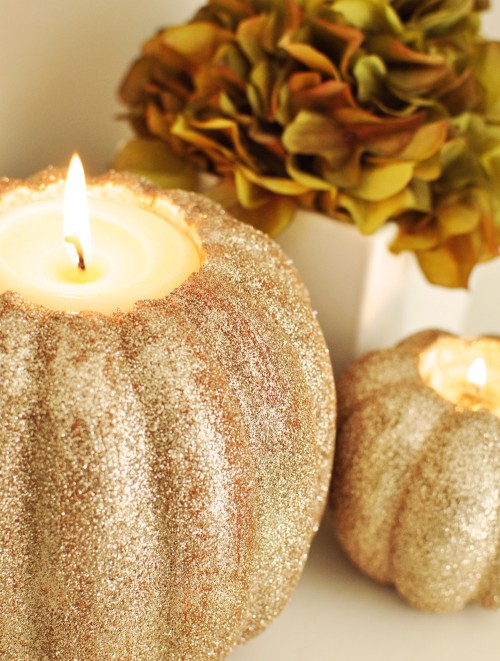
This one is perfection – Twig and Thistle has a fabulous tutorial for turning foam pumpkins into sparkly accessories for fall.  Tutorial here!

Spooky Porch Decor:

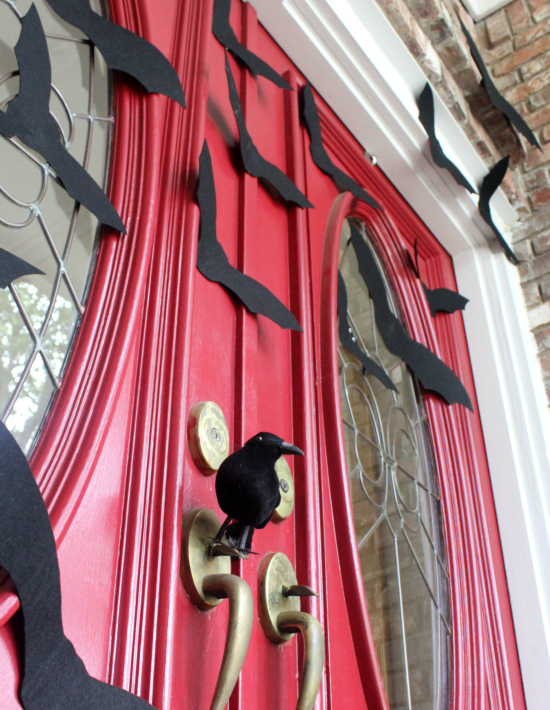
Cassie from Hi Sugarplum! decked out her porch with a swarm of bats, which is spooky, not silly (my favorite type of Halloween decor).  She used thick felt, and fake crows from the dollar store, and it’s incredibly striking (and easy!)  Check out her tutorial (and more pictures) here!

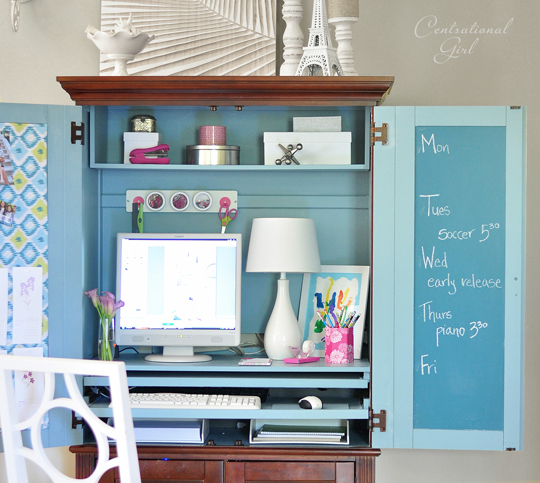
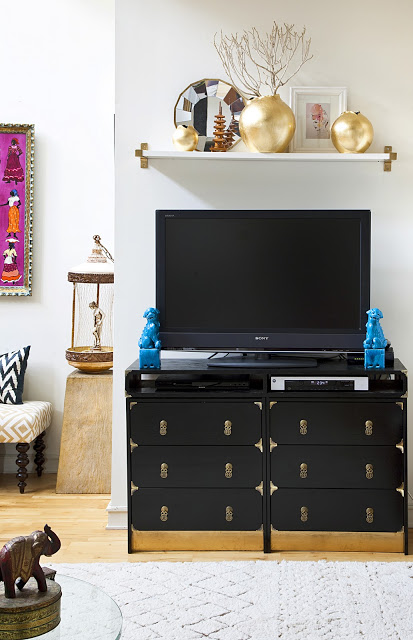
Glittery Spider Webs and Spooky Shelves:

Centsational Girl is the ultimate in crafty DIY, and has been making all the stops for Halloween.  These bookshelves capture the Halloween spirit without being tacky. One of my favorite ideas!!  Go look at the whole tutorial here.

DIY Trick or Treat Pillows:

The Cutest Blog on the Block had an easy idea for some DIY Halloween Pillows – these would work indoors or outdoors but with the glitter involved, I think I’d keep these outside on a porch, or in an area you could easily sweep (unless you want to find glitter in your carpet for years to come).  Tutorial here.

Pumpkin Punch Bowl:

You’ll need an extra large pumpkin to pull this off, but Martha Stewart reigns again with her clever ideas for fall entertaining!  Check it out here

“Pick your Poison” Bar Setup:

Throwing a party?  While we are on the topic of entertaining, this is a fabulous little set-up for an adult Halloween Party!  Get more details here on BHG!

DIY Treat Bags:

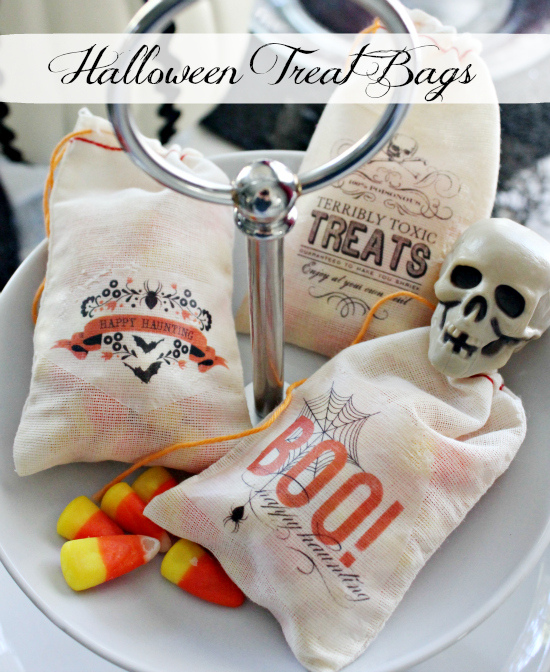
Hi Sugarplum! made it on this list of fabulous DIY projects twice (she really is that clever) – this time with her cute idea for Treat Bags.  Adorable!!

What did I miss??  Any other cute Halloween DIY’s that I should test out??

DIY Art – Wishbone Replica

Ok – a really quick update on a small DIY I took on last night…  Remember this piece of art I found yesterday?

Well I successfully made a small piece of my own, and am very pleased with how it turned out!!

I had some extra paint laying around from projects I’d done – black from painting the bedroom furniture, a little brown from painting the top of the console table, and some gold leaf paint left over from painting the shadowboxes for the sea fans.  Nothing fancy at all… I actually painted my masterpiece on a sheet of printer paper, ha!
Best part?? I didn’t pay a dime for my little work of art, and I think it’s pretty close to the original inspiration!

Wishbone Art

We have a lot of framed pictures in our house – photographs we’ve taken for the most part, but I’ve been looking for some new art to add some variation.  I don’t think I am that picky, but everything (non-photographs) that I’ve seen at a reasonable price, seems so generic (I’m not feeling the Monet replicas or the bowl of fruit… thanks but no thanks).

I was on Houzz looking for inspiration, and randomly came across this awesome gold wishbone print.  It’s actually from Etsy, and even though it’s affordable, I actually think that it would be a fun project to do myself.  It looks simple enough, so I plan on channeling my inner artist (pronounced arteest) to whip something similar up…

Etsy Print
That’s what I’ll be doing tonight… what about you?

Chalkboards at Home

It’s not a secret that chalkboard paint has made a huge resurgence recently, and it keeps popping up all over the internet.  It’s making offices functional, giving kitchens a fun place for children to play, and it’s dull finish looks uber chic when painted on furniture.

Is anyone surprised that Martha Stewart jumped on this bandwagon??  Not only did she feature an entire chalkboard wall, but also featured various shades of chalkboard grey that make up a perfect calendar grid – ingenious!  Bravo Martha… bravo!

Martha Stewart

This next wall – a feature in the dining room – actually has magnetic chalkboard paint – a double whammy 🙂 If the room were busy, it would all be way too much, but with simple furnishings, clean lines, and natural materials, it looks amazing – even once it’s covered in doodles.

Source

Ok, try to tell me that this isn’t the most clever idea yet!!  Using chalkboard paint to create a whimsical headboard in a child’s room.  If our bedroom weren’t so dark, I’d be seriously considering this for our headboard!!

Decoist

Kate from Centsational Girl recently madeover an computer armoire, taking a once dingy dark desk, and making it bright and functional – I love that the inside doors are used to keep track of schedules, but that it can all be closed up at the end of the day.

Centsational Girl

And finally – chalkboard paint in a super formal dining room.  All that wood paneling is giving me a bit of anxiety to be honest, but I do love the creativity of creating a fun chalkboard border.  This room needs a can of white paint on that paneling, stat, along with a non-brown rug, but that’s beside the point.  Bravo to these homeowners to stepping outside the box a bit!

Apartment Therpay

Dorothy Draper on the Brain

I had posted about my love of Dorothy Draper furniture a few weeks ago, and I’ve still got it on the brain.  Not to over-obsess, but these bad boy’s made it into the Vogue offices in the Sex and the City movie… so you know it’s legit.

Anyway, I’d mentioned that we need a taller piece for our TV in the bedroom – right now the TV is on a lower TV stand, which is a problem because you can’t see the TV when you are laying back in bed.  We literally have to be sitting straight up in bed to see the screen, which really defeats the whole purpose of watching TV in bed – right?!

Anyway, I am in the process of working out the exact specs I want the dresser to have in our bedroom, but I absolutely love the longer look of the cabinets here.

I saw a similar Ikea hack to the one I posted earlier this month.   Naomi, of Design Manifest, actually turned two Rast nightstands into a TV console.  You can see in this picture, that she added an extra shelf on top to house the cable box, and create a completely flat surface for the TV above.  Awesome right??  My hesitation is that I’m crafty enough to build an additional shelving unit, and I worry that I’d end up after this project with an unstable surface that we’d have to balance the TV on…


See in this second picture how the sides are not completely flush with the top?? I do like the idea of having a space for the cable box, but it’s starting to sound like too much work for me.  The other work-around to making both pieces flush would be to sand everything down… Am I way overthinking this??
rast

Maybe I should keep looking on Craigslist….

The Little Hallway that Could

Ok – no judging allowed, but just wanted to share some updates on our hallway.  I swear I’ve been doing work on it, and not just having fun – this means coming home at 10pm, and working until bedtime.  It’s getting old my friends… real old.

That said, I’ve made some serious progress!  You all remember these sad “before” pictures right…

Brown on brown on brown… GROSS.  I mean, it was just depressing!

There is still work to be done, but here is some preliminary “afters”:

Actually, let’s call this a “during” since we are still working on it…
The updates??  Most obviously removing all that was hideous and brown – repainting the console, and bringing in my new rug.  Love looveeee that rug.

It’s a little hard to see clearly in some of these (sorry, iPhone pics in early morning light before work = grainy snapshots), but after painting the console, I roughed up the edges with some trusty sandpaper.  Focusing on the areas that would get the most natural wear, it made some of the details pop back out, and gave it a nice antique feeling.  You’ll also notice that I decided to paint the top (instead of keeping the super shiny faux inlay), but before painting, I took a hammer to it, and really banged it up (aka took some aggression out on it).  Aside from being extremely fun and therapeutic, I think I succeeded in making it look genuinely old antique.  Kris said so himself, so it must be true 🙂

I’m still going back and forth on spray painting the hardware a brushed bronze… the silver looks much better than I thought it would, so I think I’m going to hold off making any decisions on that for a few weeks – see if I change my mind.  Besides, my can of Rustoleum isn’t going anywhere…

In addition to my freshly painted console (the least labor intensive part of this whole deal), the door, the built in linen closet, and the crown molding got a little makeover with some “Decorators White” from Benjamin Moore.  Trust me when I say, adding white paint to the dingy hallway, and defining the trim have made the largest impact of anything I could possibly do in here.  It creates some much needed architectural interest, and a point of reference for the ceiling – it feels taller!

The linen closet still has zero character, so painting it fresh white is probably the best I can do with it.  Some battles I’m willing to let go of… we are renters after all.

Let’s do a side by side comparison for fun… shall we?

The light in this “before” photo isn’t great, but you can see what I’m getting at – you couldn’t even see the trim before! It totally blended in with the walls.  Woof.  Now the clean white is bright, and it just makes me happy…

The window is waiting on a new fancy treatment… another DIY on it’s way with my new pretty fabric  (hopefully not an epic failure)!

Also, you can see that I’m now trying to decide where to hang things on the wall (thus, the lonely square of painters tape).  Last night when I was measuring out the tape, I felt that the 20″x16″ filled out the space, and anything more would be too much, but now, looking at this from a distance in this photo, I’m wondering if it would benefit from a few more smaller frames on the side.

Also, I think this sunburst mirror is too small for the wall, and we need something larger to fill the space – especially next to the built in that goes up to the ceiling.  There is just a lot of wall, with a cluster of “stuff” down near the table, and in the small space, I want to draw the eye up as much as possible.

*Side note: this photo is really washed out from the direct light… 
the walls and linen closet are distinctly different colors

Right??  Lots of wall… that mirror will find a home elsewhere – not to worry 🙂  Also… just realized that the rug needs to come closer to the entryway… easy changes…

Fabulous Find: Fun, Funky Fabric (like the alliteration?)

There is a good thing going on at Lewis and Sheron Textiles with tons – and I mean TONS – of amazing interior fabrics to choose from.  They have a promotion right now for 20% off all fabrics when you use the code LSFABRICS FIRST.  I’m thinking that since I’m doing a little freshening up at our house, it could be a great chance to get a few designer patterns at a discount!
I’m loving the citron colors in these patterns:
Clockwise from top left: Secret GateCoral SplendorAzzuro, Kalita
I’m also really loving this bird print, and dabbling with the idea of ordering a bit of it since it’s just so pretty!  What I will do with it, I’m not sure yet, but I have a few ideas in mind…
Roberta 21003
This set of indigo prints are so pretty – this is one color that I love, but it doesn’t exist anywhere in our house.  I’m thinking that this might be really soothing and pretty for the bedding in our bedroom.  The rest of the room is pretty much a neutral palate with light taupe walls, bright white trim, and creme colored silk curtains.  With white fluffy bedding, and an upholstered headboard with nail head trim… a few pillows in these prints could really wake things up.
Clockwise from top left: Cross SectionCasablanca WhtflaJoy (very aptly named I might add… this linking print in a blue bell color just makes me happy), Bloom Stripe
Finally, I just LOVE this water colored floral print – it’s pretty enough to frame!  I’d love to order it, but I don’t really have a great spot for it at the moment… 
Fleur

I’ve Been a Busy Bee

Holy moly – does anyone else need a weekend from their weekend?!  I definitely do!  I got together with an old friend for brunch and mani pedis on Saturday, celebrated my mama’s birthday with a big dinner party that night (more on that later), and on Sunday, we headed up to Mount Tamalpais in Marin county for what turned into a very tiring hike.

This is the view from the top… you can see San Francisco wayyy in the distance… and all that fog??  Yep, that’s where the ocean should be!
Between all of that, I swear I have been making progress on our little hallway in the last week… proof??  Here is a sneak peek at the freshly painted and “antiqued” console table… excuse the wires in the background – the console has made a temporary home in the middle of our living room while the hallway gets painted.

The Hallway is Getting some Love (FINALLY)

There are a few changes taking place in our home right now, and most of them involve a bit of paint.  In this month’s issue of House Beautiful, one designer was quoted saying that paint is the cheapest and easiest way to update a room.  I couldn’t agree more!!
The first face-lift on the list is our small hallway that leads from the front of our apartment (living room, dining room and kitchen) to the back (bedroom and bathroom).  The hallway isn’t long – it’s maybe 15 feet, and it’s main feature is the large linen closet that takes up most of it.  As you can see from the photo’s below – it’s less than attractive.
As it stands, the hallway is monochromatic – the walls, ceiling, trim, and linen closet are all currently painted the same color of blah off-white, and with the wood floors and wood console table, it feels dark, drab, and utterly boring.  To make matters worse, the runner we’ve got in there right now is also brown. The hallway is brown on brown on brown.  It really can’t get worse, so my plan is to transform the space with a few cans of paint.
*View from the Dining Room                                                             *View from Bedroom

Brown on Brown on Brown…. so ugly!!

Anyway, the main changes will be to our existing console table that is in serious need of some TLC.  I found it on Craigslist a few years ago for around $20, so since it’s not a priceless antique, I am very excited to slap some paint on it.  The table has great lines, but the overly shiny finish makes it look cheap.  It’s not good.  
I did a little research into removing lacquer and it sounds like A LOT of work, so instead of bending over backwards to refinish and re-stain this cheap wood console table, I’m going to paint it.  Easy.
*The faux inlay isn’t bad… but the shine!!  Oye!                                 *It’s like a mirror!!  Woof!

Luckily, the console table has really great lines – it has a pretty carved apron and cabriole legs that give it a French Provincial look, and I think it’s going to make a really great makeover.  
The top of the table has a faux herringbone inlay which I had originally planned on painting, but I haven’t FULLY committed to covering it up yet.  Perhaps the inlay will look much better once the varnish is gone?  Who knows, but if it still looks god awful, my plan is to distress the wood – aka really ding it up with a hammer and some extra gritty sandpaper.  Once it’s distressed I have a dark taupe paint called “Squirrel” that my sister will get a kick out of (side note: she is deathly scared of squirrels, so as soon as I saw that the paint was named “Squirrel” I had to have it)  The plan is to paint the legs and apron first and tackle the top afterwards.

*Look at these great lines! I love the turned legs, the scalloped apron, and detail on the drawers!
This is the console table set up in the garage, ready for it’s makeover…
Aside from some paint on the console table, I’ll be painting the walls, trim, and linen closet to brighten up the space.  The walls will get a warm creamy color and the trim, doors, and linen closet will be painted a glossy bright white.  I think the color is actually called “Decorators White” so I can pretend I’m some sort of professional.  Ha!
Here is the inspiration board I built around what I hope to achieve:

Finally, that awful brown runner is getting the heave-ho, and my newest purchase from Ballard – the Saybrook Indoor/Outdoor runner – is going in it’s place.  I actually got this runner several months ago, but it’s been waiting for the rest of the hallway to catch up in terms of aesthetics.  I love the calming colors, and since our dining room (that is adjacent to this hallway) has a lot of the same colors, it will make for a pretty seamless transition from room to room.

I once read that in small spaces, it’s good to repeat similar color palates from room to room, as it makes the space feel larger.  We will see if that is true….

Stay tuned for updates!!

DIY Mirror

This mirror is adorable, right?!! It looks like it could have come from Restoration Hardware or Pottery Barn, but believe it or not, it’s a DIY project that cost less than $15!  Unbelievable!
I stumbled across this DIY on Pinterest, and after clicking through, discovered the most adorable blog, Shanty 2 Chic – a blog all about putting in some extra time to turn inexpensive pieces into something amazing.  I love that for a little elbow grease, you can save big bucks, and walk away with something fabulous.  My personal opinion?? This mirror looks WAY more expensive than it is!
In my early 20’s I didn’t know a lot about the power of a little DIY – how I wish sites like Pinterest existed back then!!  Unfortunately, they didn’t, so being totally naive, I bought stuff to merely fill the space we lived in.  The goal was to avoid spending a lot of money and come away with something that looked nice enough. This meant that a lot of my stuff was scored on Craigslist (I was literally the queen of Craigslist for a while) and Ikea.  While I am still absolutely in love with some of my Craigslist finds (antique dining room table and chairs for $50!!), I am growing tired of the shoddy quality and generic feel of a lot of my purchases.  
The coffee table and side tables in our living room came as a set, and when I originally purchased them at 23 years old, I thought nothing was more elegant and classy than matching furniture sets.  WOOF.  Live and learn I guess…
I am slowly in the process of trying to replace a lot of the black clunky furniture with pieces in varying materials – metal, glass, naturally stained wood… the list goes on.  I’ve even busted out some spray paint to make some quick fixes to some of our inexpensive pieces… I literally reached a breaking point with the all black furniture everywhere.  
While the coffee table and side tables in the living room are there to stay – at least for now… or until they finally give out – there is a matching black framed mirror hanging on the wall that is begging for a makeover. 
I think this DIY might be in my very near future…
For the full tutorial, check it out at Shanty 2 Chic! Trust me when I say that you will end up losing a solid hour of your work day browsing through all their amazing ideas.  The two sisters that write this blog seem so normal, and relatable, and crafty!  Makes me want to call my sister right now!!