DIY Upholstered Headboard Tutorial

So… I’ve sat on this post for just about a year now…

Sorry about that.

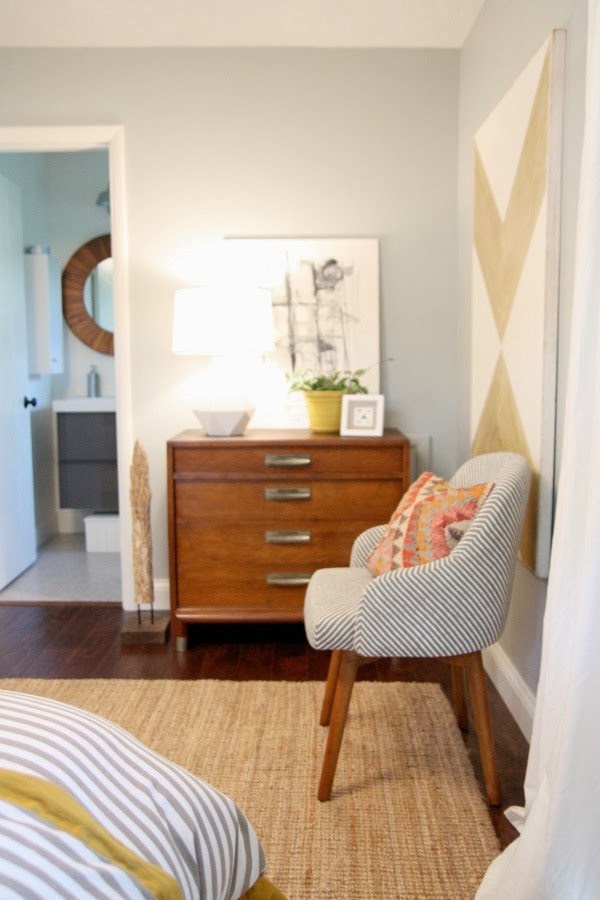
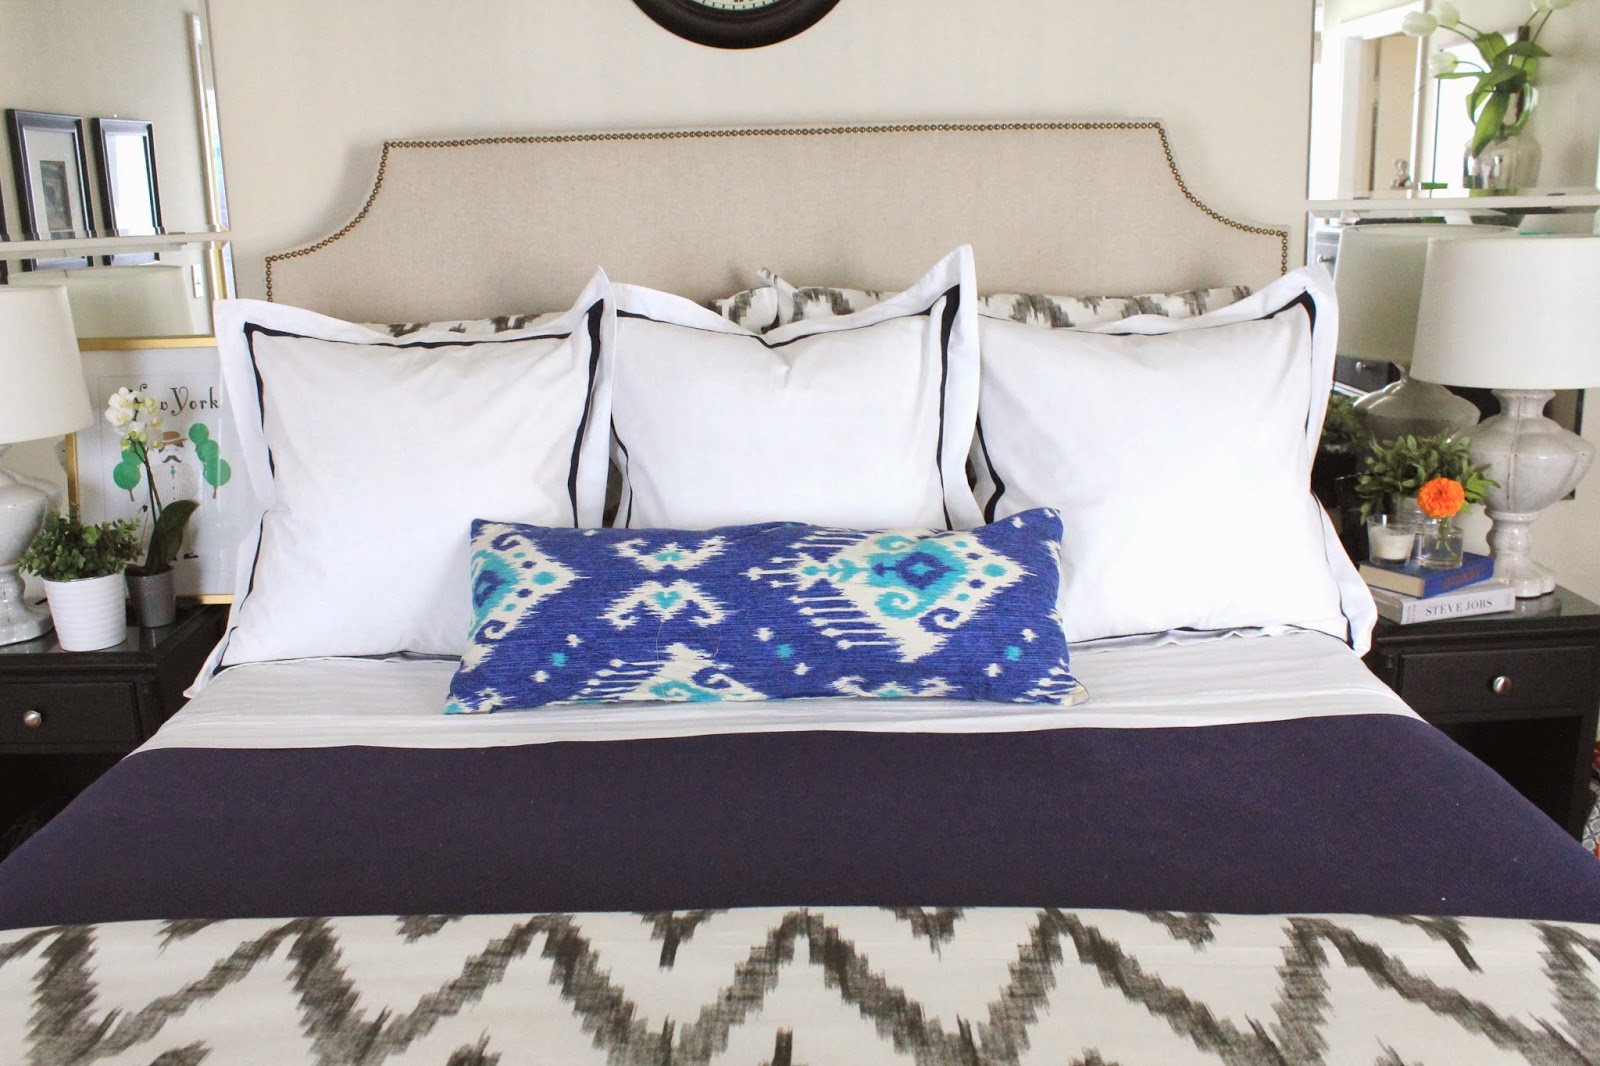
You’ve all seen the glamour shots of my beautiful upholstered headboard, but it took many comments, posts, and private emails from you guys asking me for a tutorial, to get me to put together my upholstered headboard tutorial!!!!!

I’ve conquered my laziness, and prevailed.

For anyone new to the blog, let me rewind a bit… before starting this project (which let me just add, was one of the biggest DIY undertakings I’ve done to date) I’d obsessed for months and months about having an upholstered headboard in our bedroom.  Pinterest was my best friend, and for a while all I was pinning was lovely pictures of bedrooms with overstuffed, soft upholstered headboards.  I loved them all – thick velvet headboards, classic linen headboards, dark headboards, light headboards, tufted headboards, rounded headboards…. headboards with nailheads… headboards with pattern… headboards with detailed cut-outs and sloping sides.

Getting a new bed last year (an upgrade to a California King for my tall honey-bunch) was the catalyst for this project – our brand new shiny bed needed to be decked out, and so the hunt for a headboard started.

To say I felt defeated as I shopped online for an upholstered headboard is an understatement.  They are freaking expensive, people!!  For a California King, we were faced with a thousand dollar price range – especially once shipping and delivery surcharges were factored in.  No way.

After coming up empty handed, I turned to the internet for inspiration, and after reading a few headboard tutorials, I was on board to try my hand at making my own!  This was around the time when I turned to my lovely parents for assistance, so this DIY project became a family affair.

Let’s dive right in, shall we??

It started with this picture:

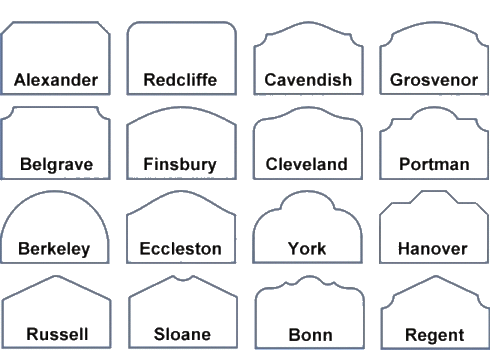
It isn’t the sexiest thing, but it really helped me determine what shape I wanted.

Belgrave… for me it was all about Belgrave (and with a strapping name like that, why wouldn’t it be??)

Actually, I wanted something like Cavendish or Grosvenor originally, but decided to KISS (keep it simple stupid… remember that??) and that a simple design = less of a chance to royally mess this up.

Once the shape was decided on, my mom and I went shopping.  I want to brag for a second… I am the LEAST decisive person ever, but when we walked into the fabric store, and I spotted this fabric it was all over.  Done.  Easiest decision of my life.

It has a beautiful, rough weave, and it’s the perfect color of greige (grey / beige) with nubby bits here and there.

Not only will it conceal dirt fairly well in the long run, but the rough weave promises that it will never look like I was trying (and failing) to “match” other fabrics in the bedding to it (btw, every time I type “rough weave” I can’t help but think of something like this)

Anyway…

We also ordered us some of these from Beacon Fabrics:

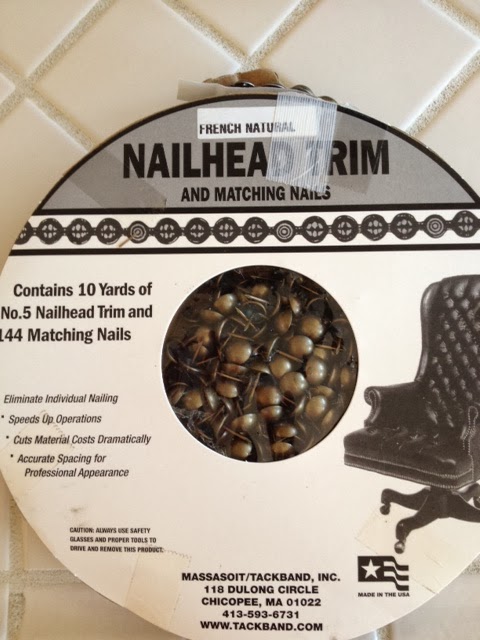
It’s a roll of nailhead trim.  Best. Decision. Ever.

The trim comes as one long strand, and every 5th nailhead or so, you hammer a real nailhead through to anchor it down.  The trim comes in different colors / finishes – we went with the French Natural, and I love it.

Initially, my mom tried to convince me that we should do individual nail heads.

Cannot. Fathom.

We will get to that later… but trust me you guys, nailhead trim is the way to go unless you have about a bazillion hours to kill and the patience of a saint.  As it was, I almost lost my s*** installing the trim so I can’t even imagine the individual nail heads.

Sorry.  It still brings up a lot of emotion thinking about the nailheads.

Ok, moving on.

What else do you need for this project besides fabric and nailheads??

– A big piece of cardboard
– An even bigger piece of plywood (and beware, plywood is heavier than you think!)
– A friend with muscles to help lift and carry heavy plywood
– Batting
– Rubber mallet
– Spray adhesive
– Jigsaw
– Sandpaper
– Staple Gun
– Pencil
– Upholstery Backing
– Straight Edge

If you want to attach legs, you’ll need a few extra items…
– Solid wood (my dad used two pieces of pine)
– Wood Stain (for the legs)
– Bolts (we used 4)
– Bolt cutter
– Industrial Strength File
– Patience

Step one – decide how high you want your headboard to be.  It was incredibly helpful for me to visually see a mocked up headboard behind our bed to determine height with the pillows all stacked up in front of it.  It also helped me determine how big and at what angle I wanted the cut outs to be.

So our bedroom looked really classy for a week or so with this piece of cardboard behind the bed:

Once I decided on my own we agreed on how big the cutouts would be, and how tall it would stand (for reference, I think I went with 68″ tall, and about 5″ wider than our mattress), we went for it.

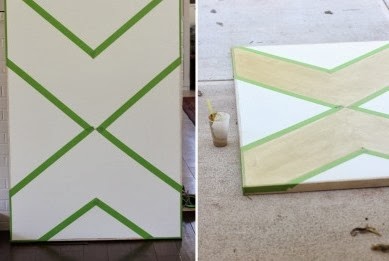
Step 2 – trace cutouts and width on the plywood.

Cut it down to size using a sweet jigsaw.

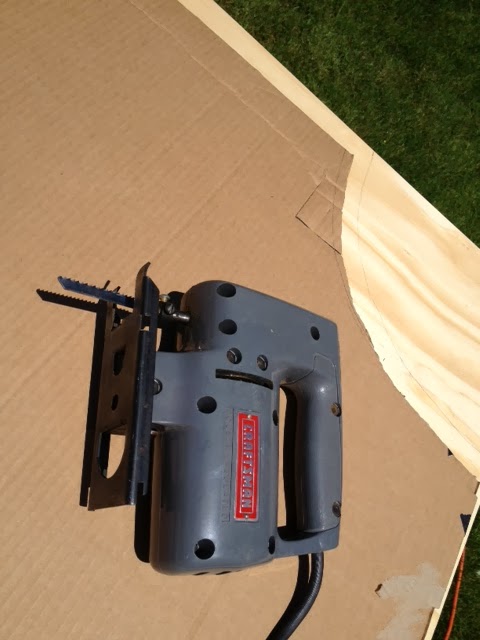
Side note: I love how easy it was to type out that step.  It’s easy guys!  Just cut it down to size. With your power tools.  That you hopefully know how to use!

That step actually should have said, “Dad, put your safety glasses on before using the saw!!!”

Ok now they are on… now that the saw is off.  Awesome.

Anyway – I have the best dad, who knocked these cuts out in like .2 seconds.  Luckily no eyes were lost or injured in this process.  Bad dad.

Anyway, at this point get out the sandpaper and make sure all the edges are smooth.

It’s also at this point that if you’re attaching legs to the bottom of the headboard, that you attach said legs.  If you’re in our family and seek perfection in everything, then you stain the legs a few days ahead of time, so that they are pretty (thanks Dad!)

Why attach legs? you might wonder…

Because I wanted the most massive headboard in the world… no because I wanted it to stand higher than our pillows instead of getting hidden behind them once the bed was properly made.  Plywood comes as a standard 4×8′ and so with just 4 feet in height, it needed a little extra from the legs.

This is also a step where you want to be sure to measure everything well!

That should almost go unsaid, and be a general rule in all DIY projects (I can just hear my dad say, “Measure twice, cut once”) but here’s why it’s crucial to be sure on your measurements when attaching the legs…

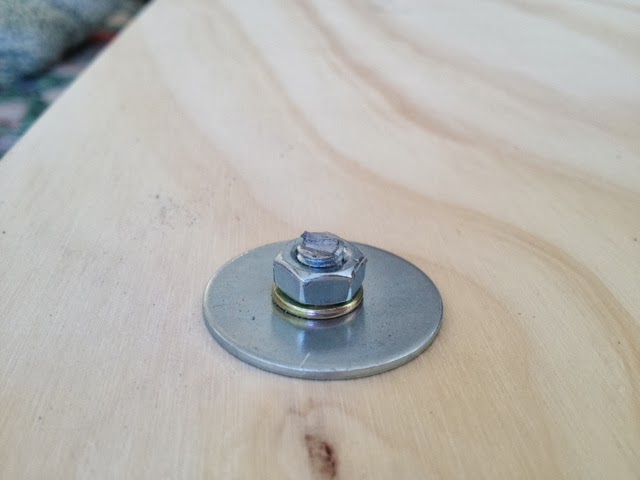
This headboard is really big and heavy, so to be sure it was steady behind the bed, we wanted to anchor it to the bed frame (you CAN anchor it to the wall, but because we rent, wanted to avoid putting massive holes in the wall, attaching the headboard to the bed is key).  Long story short, the legs need to line up with the bed frame, so make note of the bed frame measurements before attaching the legs.

Once the legs are bolted on, we cut down the extra length of the bolts, and smoothed the nub down as much as possible with these tools…

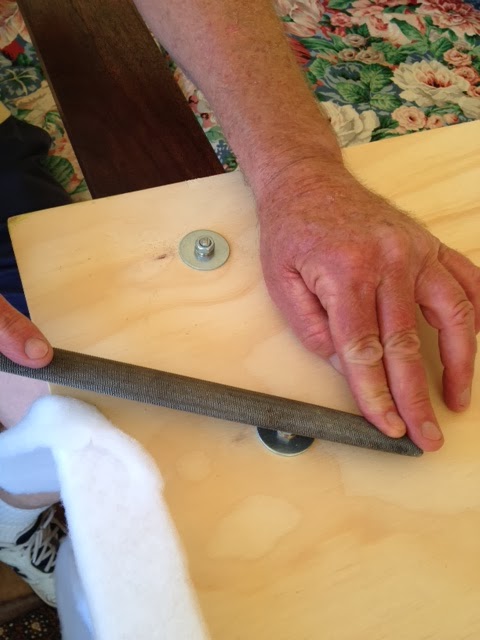
Not sure what the technical term for this tool is (industrial strength emery board?), but it’s basically a huge nail file for metal.  Pretend you’re doing manicures.

Ok one more glamour shot of the pretty stained legs…
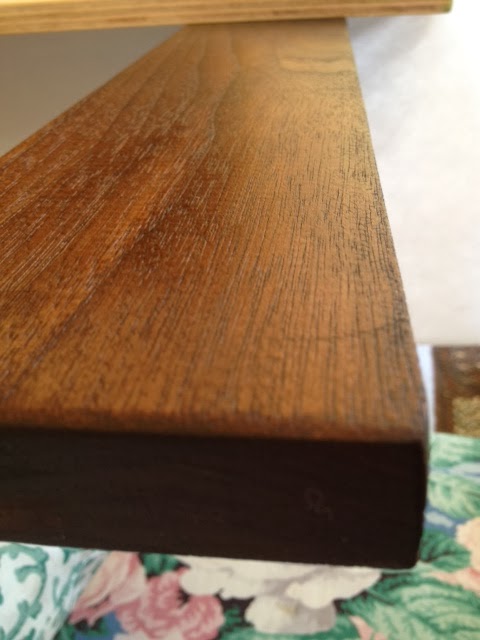
Gorgeous.

Now that you’ve got the base built, and legs attached, take the headboard inside – it’s time to cover it in batting and fabric.

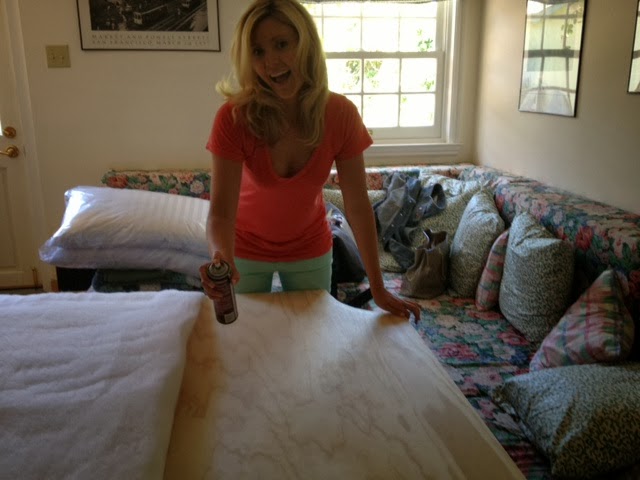
Roll out the batting and bust out the spray adhesive.

Because we’re a family of Type A personalities, we had to steam the batting first.  This is entirely optional (but satisfying).

Once the batting is smoothed out from being bunched up in the package, spray the headboard (the front side) with spray adhesive and smooth the batting from the center to the edges.

The excitement around spraying the adhesive is optional.

Once the batting is attached to the front, you’ll want to pull it tight on the edges and staple it to the back.  Super simple.

On the curved corners, we cut the batting like this so we could wrap it around the curve nice and tight – no lumps.

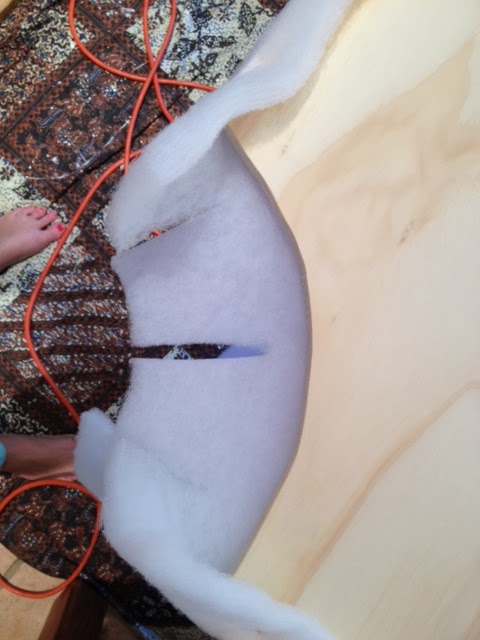
See how that works?  Staple it down so it’s secure, and use a hammer to tap in the staples that didn’t sink all the way in.  Cut off the excess batting around the staples.

Repeat this process with the batting another time for a second layer of batting – this will make for a nice cushy headboard.

You’ll notice I didn’t say anything about foam.


We didn’t use foam on the headboard, which is why we wrapped it with the batting twice.  The plywood is really thick, and at first I was really pushing to use foam, but since we weren’t going to do any tufting (that seemed a bit ambitious for first timers) the foam would have made the headboard too thick to have nailhead.

In the end, no foam for us.  Just batting.  If you are going for a tufted headboard, you’ll of course need to use foam, but since we weren’t doing tufting, the batting is plenty cushy.  I believe the batting we used was the high loft as well (in case you were wondering).

At this point, the headboard should really be taking shape! It’s going to feel like you are on the home-stretch…  but you’re not.

Not yet… it still has to be covered with the fabric (and the nailhead trim is still waiting for you).

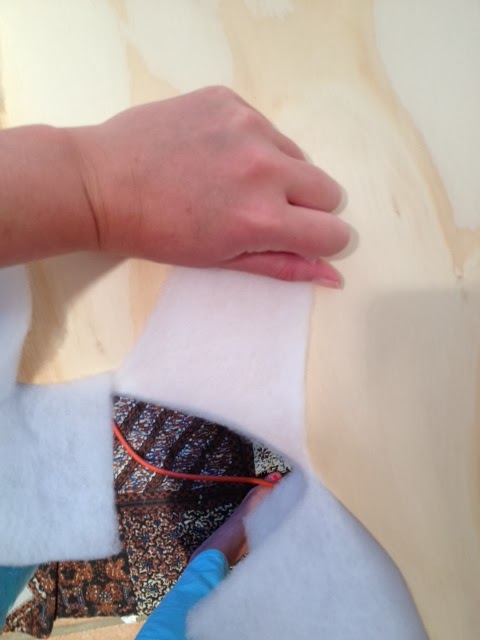
The obvious next step is to covering the headboard with the fabric – be sure that your fabric is ironed.  To have wrinkles would be a shame after all this work.  We found it was easiest to lay the ironed fabric face-down, lay the headboard face-down over the fabric, and start stapling from there.

Following the diagram below will be the easiest for you to follow where to staple and in what order:

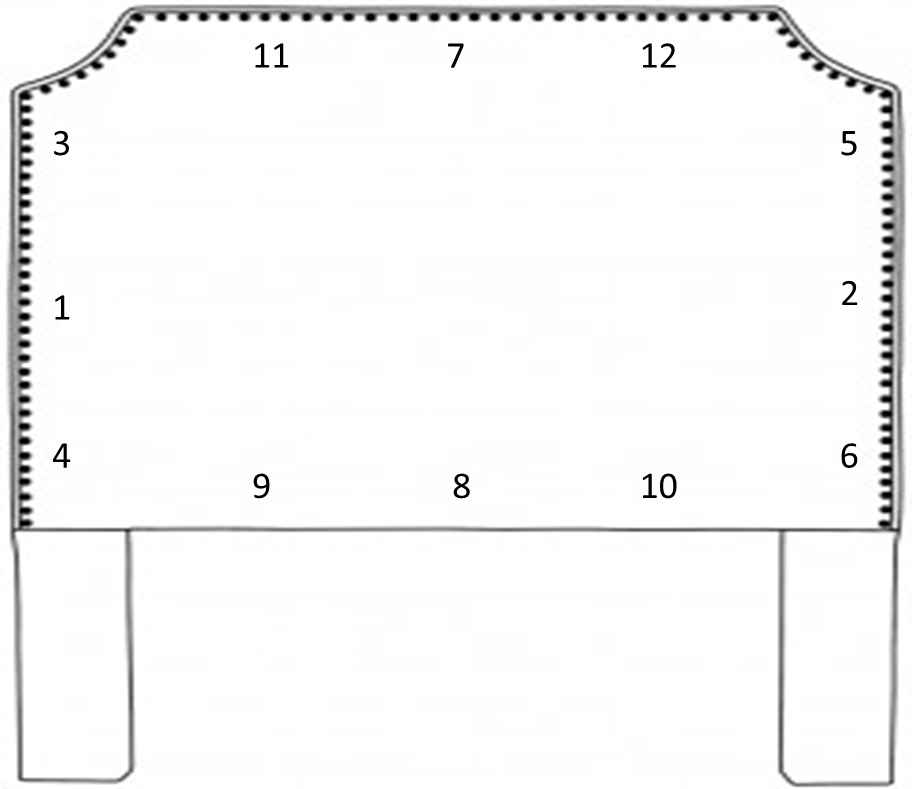
The order goes like this:
  1. Secure the sides
  2. Secure the top and bottom
  3. Secure the curved areas.

Once the core staples are in that hold the fabric to the board, we picked the headboard up and stood it upright to finish the stapling like this.  Having my parents hold it steady while I stapled allowed us to see where the fabric needed to be tighter, etc.

As you go, use as many staples as you want – go to town with the staple gun in fact.  You don’t want the fabric moving anywhere.

After everything was secured, I went back in between all the staples for another round – in the end my staples were about 2 inches apart – one inch in some cases, especially around the corners.

For the curved areas, I used the same method of cutting the fabric towards the board as I did for the batting – this just really helped it hug the curve with no bunching.

For the areas around the legs, just do your best – we turned it under and secured with a staple, but keep in mind, no one is going to see this area pretty much ever.

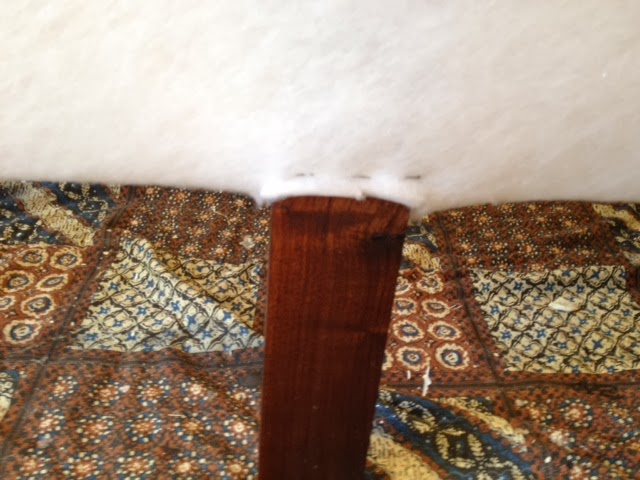
We forgot that no one would ever see the legs, and ended up trimming it out all pretty with silk tape and nailheads.

Go figure.

We’re Type A, and can’t help it! It’s really an illness!

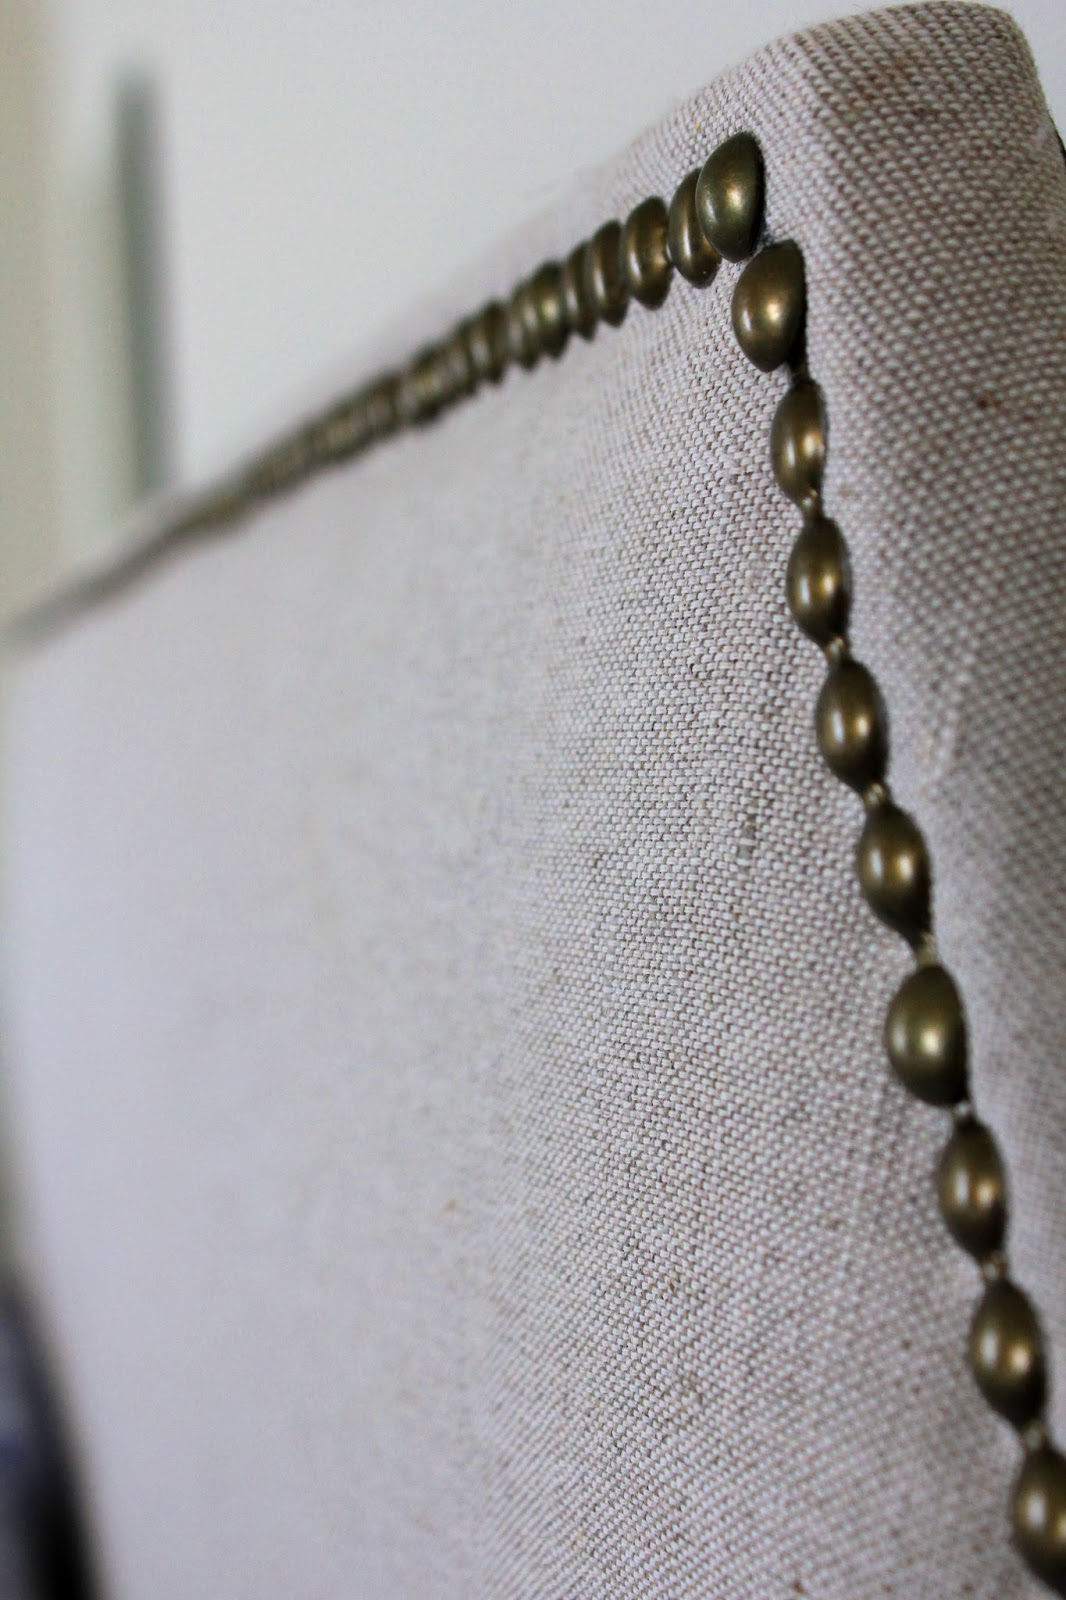
Ok, not to get ahead of myself here… the next step to the headboard is appending the nailhead trim.

I am not going to lie, this was the hardest part, and probably the most time consuming, and frustrating for us because we made a few mistakes (which you can easily avoid).  This is where a straight-edge, two pairs of hands, and an extra set of eyes come in very handy.

All I can say is thank god we got the nailhead trim instead of trying to hammer in individual nailheads.

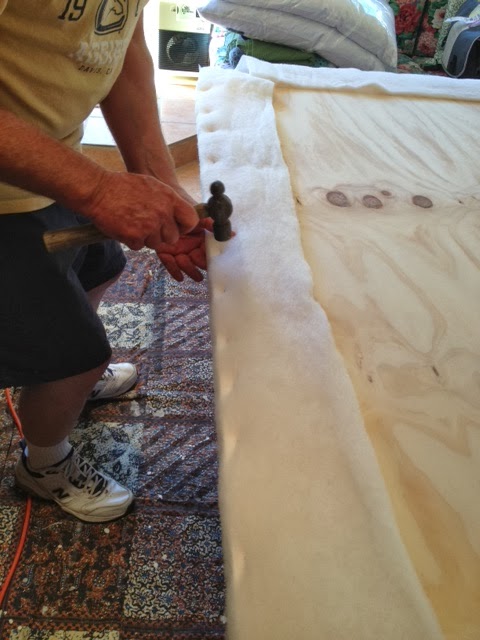
Ok, so this doesn’t take much explanation, but the process here is to lay the nailhead trim down, and use the rubber mallet to pound in a nail head every few beads.  DO NOT USE A HAMMER – you NEED a rubber mallet otherwise all your nailheads will be dented.

When you unravel the trim it should look like this:

There’s a little hole every fourth bead, so you know exactly where each individual nail will go.  Pretty foolproof.  The tricky part is keeping the row running straight.  We used the straight edge and a pencil to lightly draw where the row would go, but use this only as a LOOSE guide.  We layed the nailhead on the line we’d drawn, not realizing that the fabric shifted a bit as we went, so the row started trailing off at a very slight diagonal.

A word from the wise: step back every few nailheads and look at the headboard from a few feet back.

Up close, it looked like we were going straight across the top, but standing back we realized we went off course.  Save yourself the pain because once it’s pounded in – especially to plywood – it’s VERY hard to get it off.

If you keep these tips in mind, go slow, check your work from a few feet back, and be patient, you won’t have to go back and redo all your hard work (like we did).  It SHOULD be easy!

A few other things I wanted to point out…

The trim had really sharp edges! My dad cut himself numerous times on it, and was nearly banished from this project after bleeding on my brand new headboard.

I forgave him.  But only because he’s my dad.

Also, the trim is really easy to bend, so it you’re working on a headboard with curved details, fear not, you can just bend it around very easily.

Finally, it’s relatively thin, so while we used heavy duty snippers to cut it, you could actually even use normal scissors.  It wasn’t that thick.  Promise.

At this point, you’re basically finished – the headboard is cut, legs attached, padding and fabric stapled down, and nailhead applied, but we did finish it off with one final step – which I should add is entirely optional – we finished the back with upholstery backing.

It’s super cheap, and usually comes in black.

We cut it to size and stapled it over the back to cover the raw plywood, and to cover all the unfinished fabric edges and staples.

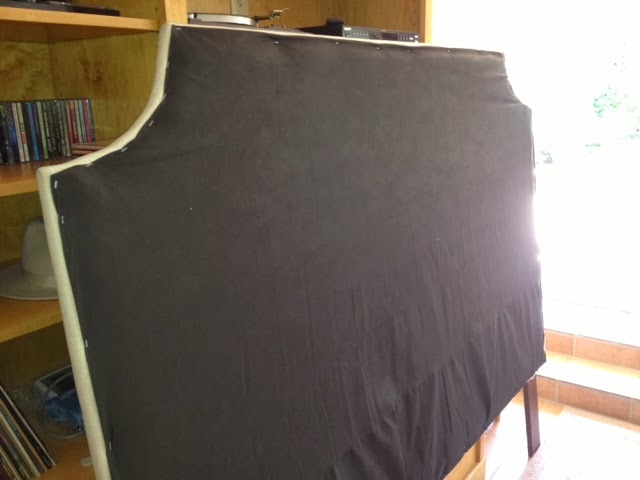
It really finishes it off, and after spending a full day on this sucker, we were going for perfection!

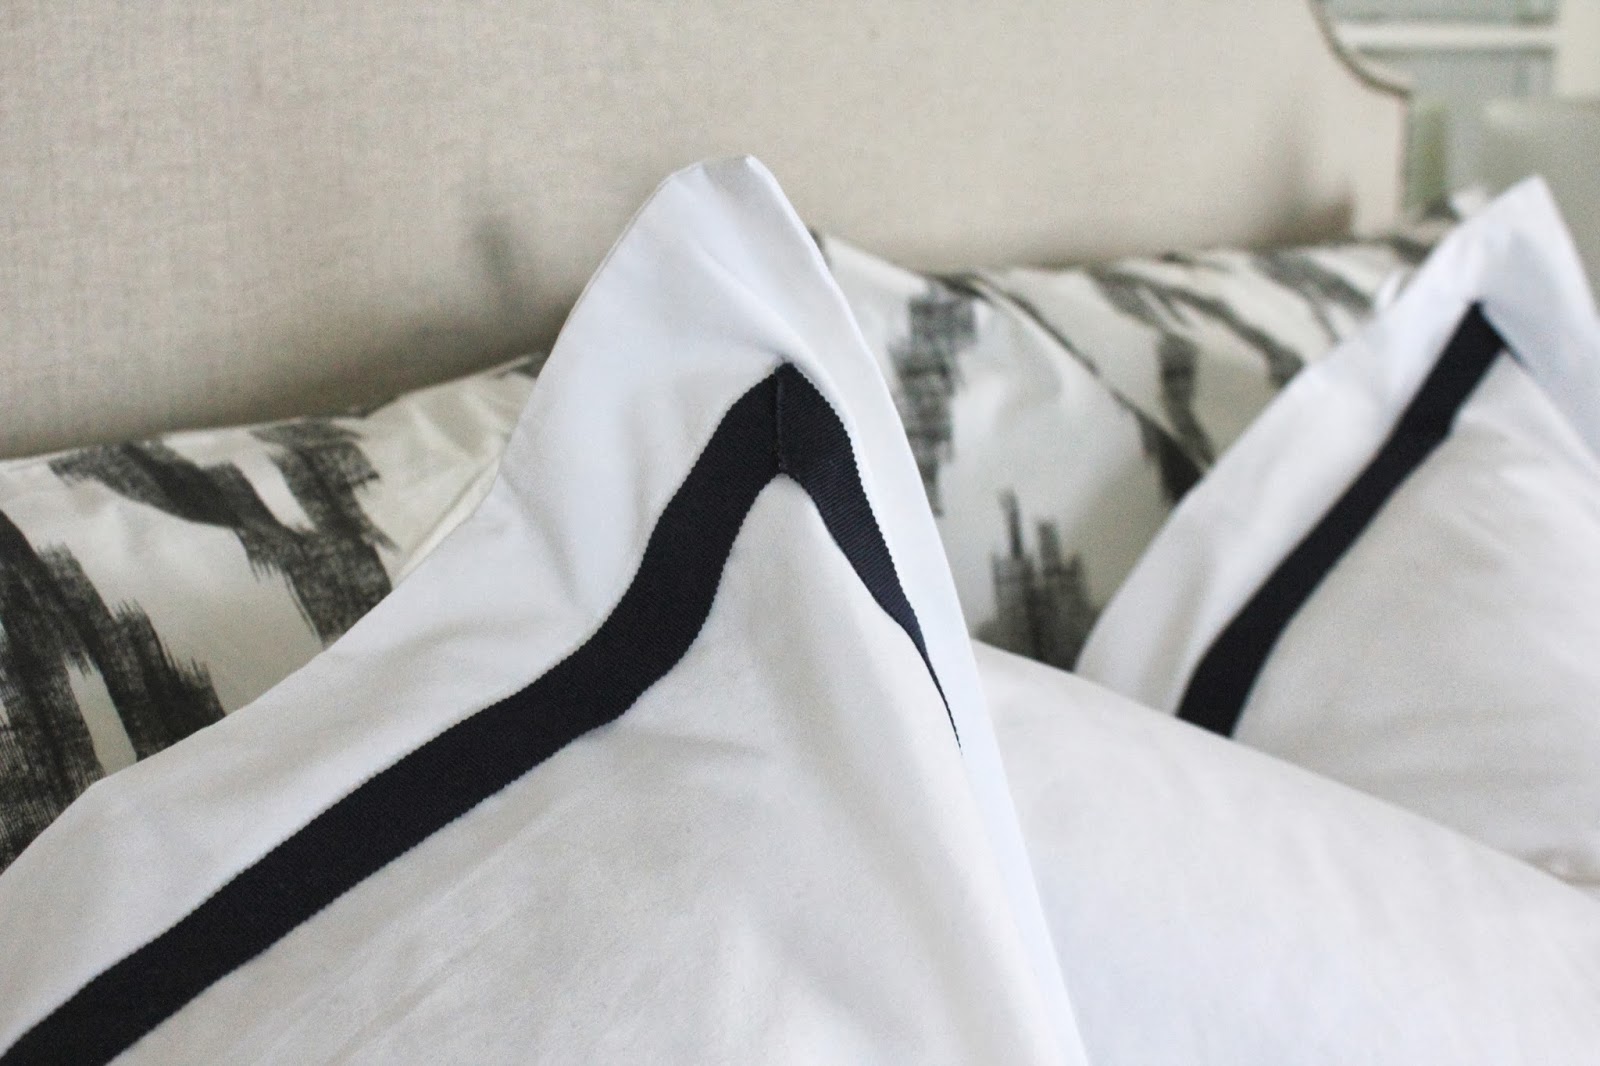
I mean just look at those glorious nailheads!

And that fabric!!  LOVE!!

So that’s it my friends – the full tutorial on how our DIY headboard came to be.

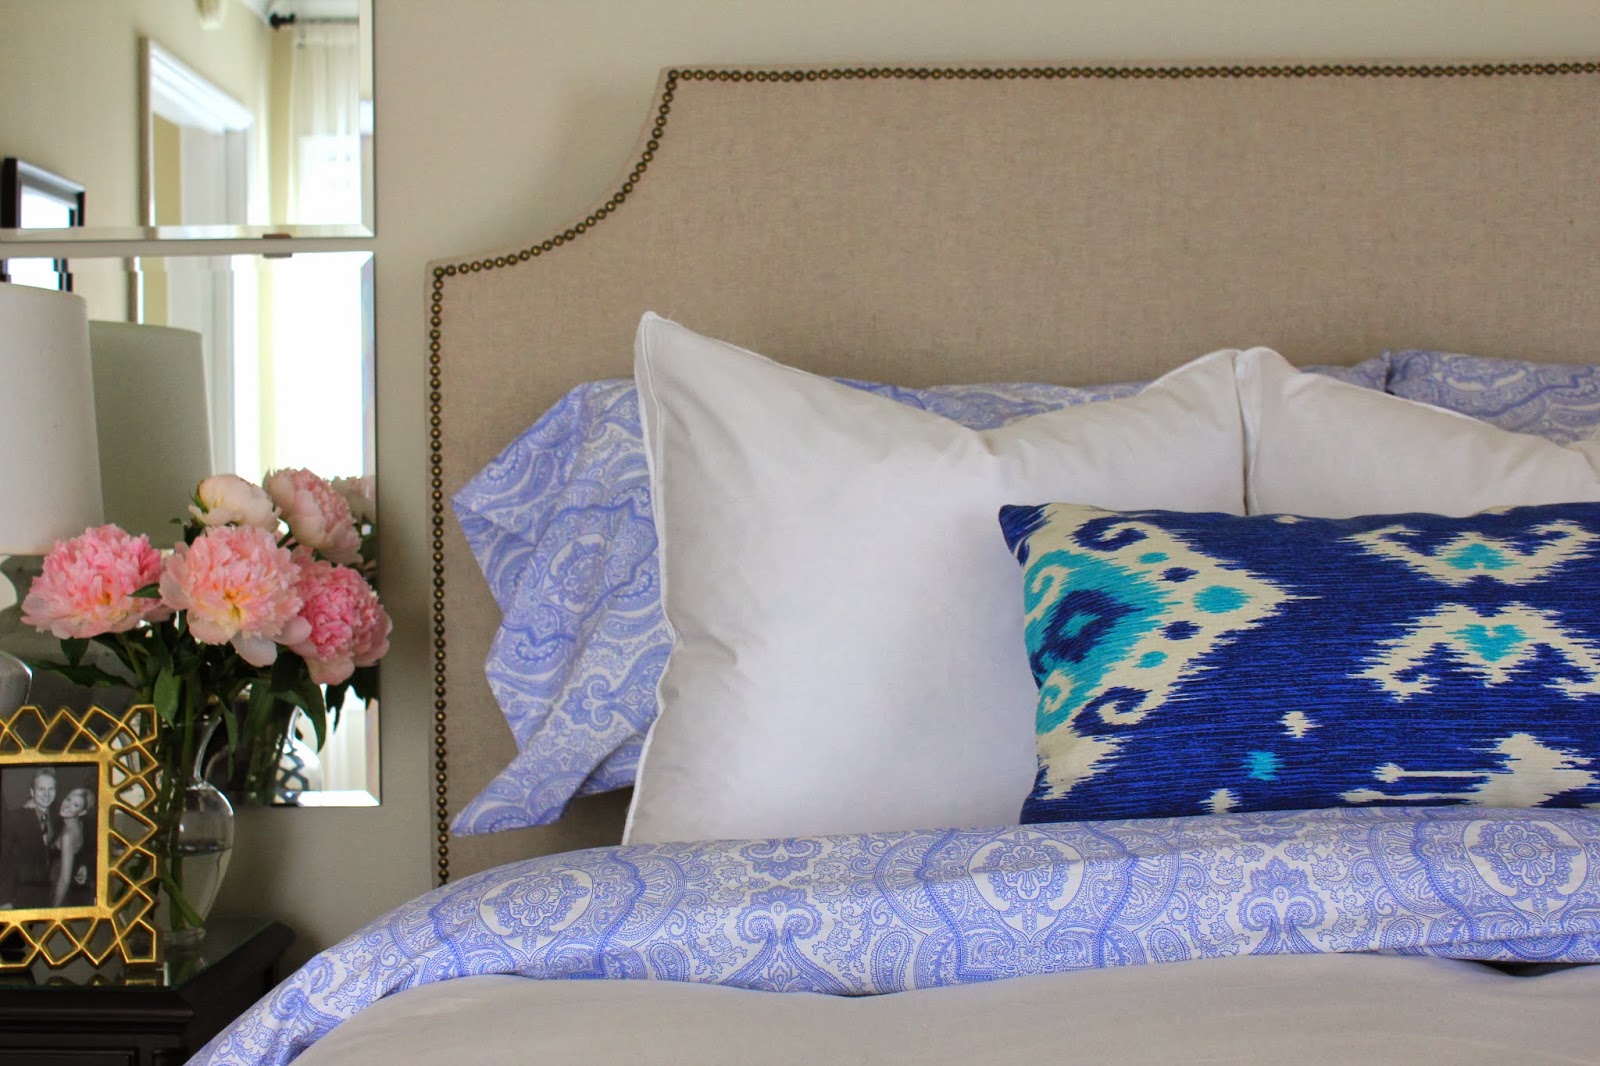
It’s been almost a year since we built it, and it’s holding up SO WELL!  I mean it’s pretty much still brand new in my mind, and we could not be more happy!

The double layer of batting makes it really cushy to lean against when we’re reading in bed, the nailhead trim adds a little extra detail, and I am still so in love with the shape of the Belgrave.

For the seasoned DIY’ers out there, this project will be a cinch, and even for us first timers, it wasn’t so bad (minus the frustrations with the nailhead being perfectly straight).

If there’s anything I missed in my tutorial, or any other questions, just post them below or email me!  I’m happy to add more detail, or answer any questions you have if you’re attempting this on your own.

Custom Stationary

Who else here reads Cupcakes and Cashmere??  Emily was the second blog that I got into after discovering Centsational Girl.  It was like my eyes had been opened to this awesome little world that I had no idea existed!!

Well Emily has made quite a career for herself, having already published a lifestyle book that spun off from her blog, and she is so talented and relatable – I think that’s why I (and so many others) just love her.  I look to her for inspiration for fashion, crafting, and recipes all the time, but this week she posted about creating your own stationary, and a light bulb went off in my head.

photo via cupcakes and cashmere

I’ve already ordered my own embosser, a few stamps, clear ink, and some heavy cardstock and I’m like a little kid waiting for Christmas morning right now…  I cannot WAIT to test it out!  For more details on how to do this on your own, by all means check out her tutorial and examples

In the meantime, I’ve been looking for inspiration for stationary that I want to try and re-create on my own…

How fun would it be to make some stationary that gives a nod to our little city by the bay??  This would be so cute!

And simple personalized stationary is so lovely with just their initials embossed on it.  This one would make a really great, personal gift for a friend.

And one with chevron… I need to find a larger chevron stamp, but I’m sure I can make that happen… imagine this in gold.  AMAZING…

Anything with dogs would be perfect too… I mean how cute are these??

Ok, the embosser needs to get here already!  I’m raring to go!

I Cheated…

I cheated… but just a little!!

I’m linking up today with Michaela at Michaela Noelle Designs for a fun craft link up party!

There have been some AMAZING ideas posted already, and while I had grand plans to post up a fun paper Christmas Tree project, there have not been enough hours in my day.  Eh, you can’t win them all… so I’ve contributed to the link up with my ornament garland from last year that has held up SO WELL.

Last year it stood alone in the hallway, but this year, it’s a part of the winter wonderland I posted about last week!

Go take a look at some of the amazing ideas and projects!!  Some of them totally doable, and some I know are outside of my talent level…

A few favorites already??

This super charming Swedish Felt Christmas Tree from Southern Distinctions….

I’m obsessed with Sarah’s blog, so it’s no surprise that I loved her feather garland… I just love how it catches the light and sort of glows…

And this felt wreath from Life on Virginia Street is so festive, and relatively simple to make!

If I had a mantle, you can bet your buttons that I’d be whipping up a few of these trees from Little Bits of Home!  I love the tinsel one along with the one with the pompoms.  So clever!!

Have you gone and checked out all the brilliant projects??  Prepare yourself… you’ll get totally sucked in!

DIY Art: Gold Leaf Arrows

Happy Wednesday!!  It’s the day before Thanksgiving, and I thought I’d continue the DIY Art posts again this week…

We’re sticking with a simple concept (simple is best for us budding artists) – this week, gold arrows on a dark background…

Gorgeous, right??

And the DIY could not be more simple!!

What you’ll need:
  – Black Cardstock
  – Gold Leaf
  – Adhesive Pen
  – Ikea Ribba Frames (with mattes)

Next steps… just free-hand multiple arrows with the adhesive pen, and then apply the gold leaf (according to package instructions).

Easy, right??

Take it another step MORE easy, and instead of using gold leaf, use a gold paint pen.  Takes out the messy part, so you could whip these up fairly quickly.

Could be a great project to tackle over the long weekend…

DIY Art: Inverted Arrows

Hey guys!  Hope you’re having an awesome week, and for those in the Bay Area, are you all loving this cold weather that came in as much as I am??  Cozy sweaters at last!
Last week, I’d posted about a DIY art project, and I wanted to continue talking about this topic today.  As I’d mentioned, buying art can be expensive, but making your own art can be really cost effective, fun, and dare I say it… easy.   
No more blank boring walls people – here’s another simple DIY art project to try out…

I saw this vignette, and almost died.  That chair (from West Elm)… love it.  The mid-century dresser… so pretty.  And that painting??  The inverted arrows???  A blown up, modern take on my favorite chevron print?????  I’m all over it!

This DIY painting hardly needs explanation, because all you need is some painters tape and the ability to measure the halfway points on the canvas… if you don’t have a single “artistic” bone in your body, then this is the DIY paint project for you.

As for the “how to” the progress photos pretty much say it all…

Still wanting instructions? Ok, here we go:

For this art project, you’ll need:
  – A canvas
  – Painters tape (I like frog tape because it comes off easier)
  – Two paint colors (here, it’s white and gold)
  – A foam brush

Directions:
  – Tape off the design you want with painters tape…
  – Paint desired areas…
  – Remove tape…
  – Hang on wall.

Ta-da!!  Idiot proof, right??


This is definitely a project that I’m DYING to try. What about you?

I actually think several of these would look really cool hung in a row.

The original project was done with varying colors of gold, but it would also be really cool to mix in a bit of rusty copper for even more variation in the depth.  Or what if you applied a bit of gold leaf to a few specific areas after you were finished for a bit of dimension.  I think the added depth and color variation from gold leaf and mixed metallics would be super important if you were to do a series of a few in a row, but less so if you’re just going to have one.

What do you think??

Are you putting on your beret and getting out an easel as we speak??

DIY Art: Ombre Effect

I’ve found that art can get really expensive.  I’m a huge fan of framing prints (you can order large prints or posters pretty cheap from sites like Art.com or Posters.com) but I love a good piece of abstract art on a canvas.
We have a few hanging in our home that I’m obsessed with – we have one very large piece from Ballard that I’m still obsessed with two years later… it hangs in our living room.  And another piece of black and white abstract from West Elm that is in our dining room.
I believe everyone has a creative streak in themselves, so I wanted to start posting ideas about creating art for your own home. First up… an ombre art project…
For this project you’ll need:
  – A large stretched canvas (or small… if you want to test it out before going big)
  – A 2″ foam brush (they are cheap, and you can toss it when you’re finished)
  – A super saturated paint (any kind of paint would do… wall paint, craft paint, oil…)
  – White paint
  – Plastic tray or plate for mixing (something you can throw away – Tupperware works too)

Once you have all your materials, it’s time to make some art!

Start with the darkest color first – squeeze out a bunch onto your plastic tray / plate / tupperware, and load up your foam brush.  Make a single long streak starting at the far left.  You’ll probably need to load up your brush several times if you’re working on a larger canvas.  I like that the edges here are more streaky, and the middle is solid – I’d start in the middle and work out to the top and bottom to be sure it’s nice and textured on each end.

Add a bit of white paint to the mix, stir it around, and paint your next stripe.

As you go, continue adding white to lighten the color, up until you’re finished. The final stripe should really be a wash of the color – nearly colorless.

I am loving the green they used above, but you could do blues, blacks and greys… really any color combo that suits you!

Fun, right??  I really want to try this out!

Hotel Bedding DIY

Our bed got a mini update last week – nothing earth shattering, but a definite improvement…
It’s probably not very noticeable to most people, but we FINALLY got some euro shams for our bed, and I did a little hotel bedding DIY on them.
I’ve been wanting actual hotel bedding pretty much since we moved in here a few years ago, but its SO expensive.  Even just 3 euro shams from Restoration Hardware run several hundred dollars, and I was not about to pay that for just a few decorative pillow cases.  Thanks, but no thanks.
I’d been digging on Overstock, eBay, and Amazon for other options… I looked at a few at Macys, Bloomingdales (yep, they sell bedding online!), and Lands End, but either the options were still really pricey, poor quality, or the wrong colors.  I wanted either navy, or a dark grey (black seemed more limiting since we have a lot of navy going on in here)…
So I decided to experiment with a little project.
I’d seen projects online where people had used grosgrain ribbon to trim out curtains, so I figured the same could be done with pillow cases.
I started by ordering some fairly inexpensive plain white euro sham pillow cases off of Overstock.  I ordered these ones in case you’re interested. They look nice, but aren’t the best quality to be honest. I don’t really care since we’re not sleeping on them, but I wouldn’t recommend them for anything other than a decorative euro sham.
Once I got the shams in the mail, I went to the fabric store and bought 10 yards of their 1″ cotton grosgrain ribbon.  Our euro pillows are 26″, so I needed a minimum of 8 2/3 yards, and in case I messed up a bit, I wanted extra yardage.
A word of warning – do not go with a synthetic grosgrain ribbon.  When you iron it, it crinkles up, so be sure you pay the extra few dollars for the 100% cotton (learned that the hard way folks).
Anyway, the project was really simple – once I had the ribbon and the pillow shams, I got out my stitch witchery (iron on adhesive tape) and went to work ironing the pieces of ribbon on.
If I were to go back in time and do this again, I’d also invest in a REALLY sharp straight edge, and something to measure a perfect 45 degree angle for the angled cuts for each corner, but live and learn. I found that my sewing scissors weren’t quite as sharp as I would have liked, so it was more difficult to get a perfectly clean cut on a 45 degree angle. A few of the corners aren’t perfect, but its not that noticeable.
Live and learn.
Anyway, I still need to go back with a paintbrush and a dab of glue to all the cut edges to seal them and ensure they don’t fray, but the project only took me about 45 minutes to iron everything down, and get it on the bed.  It also cost me maybe $80 total for all three pillows and the ribbon – SO much less than any other option, where the pillows ran close to $50 each.
I’m really happy with how it all turned out (clearly), and our bedroom just feels so much more finished. Like I said – a small change, but it’s one more thing to check off the list!

Happy Monday!

Gold Leaf Placecard

It’s almost November, which means it’s almost my FAVORITE holiday…  Thanksgiving!!

With fall, and Thanksgiving on the brain, I saw this image, and had to share.  Isn’t this the best idea for simple DIY place cards at the table??  
*Source Unknown

Just go out in the yard and collect the biggest sycamore leaves you can find, spray them gold, and write everyone’s name on each one.
I thought that was the most clever idea – can’t wait to copy it…
Happy Tuesday!

Black and White and Grey All Over

I just cannot get enough of this image…

I am absolutely loving the greyed out wood floors, and the perfectly imperfect dining room table, and all the lovely muted colors…. but what I really love the most is the awesome bookshelf in the background.  Totally unassuming, but so cool – a little industrial, a little classic, a little natural. It’s amazing.

I’ve seen lots of bookshelves with patterned backs – using wallpaper, fabric, wrapping paper… but I really love how the back of this bookcase has simple planks of wood.  The greyed out, light wood allows all the accessories on the shelves to take center stage, but while they are a “quiet” muted slate for displaying the contents of the shelves, I think that they bring something really special to this bookshelf…

I also love that the shelves of this bookshelf are made out of the same cool muted wood (or is it “wood”… so hard to tell!).

After admiring this bookshelf for a while, I started brainstorming how to recreate this awesome bookshelf, and came up with a game plan.

The bookshelf in this picture looks A LOT like the Vittsjo Shelving unit from Ikea

The problem, is that since the Vittsjo is made of a lightweight metal, it’s would require some serious skillz to securely hang rustic wooden planks from the back.  I’m actually not convinced that it would really work out… it seems like a terrible idea to mount heavy wood planks on one side of a light weight frame.  I can just picture that thing toppling over.

So, to avoid DIY catastrophe, I say that using actual wood is out… going to plan b, I’m thinking something sturdy but lightweight like particle board would be a MUCH better bet. It’s cheap, so all you would need are a few long sheets at Home Depot (they can measure and cut to size for you)!

Once you have a long piece of particle board cut to size, it’s time to get creative.

Queue up the Faux Bois Rocker

This one is Martha Stewart, but I’m sure there are others out there…  doesn’t look like much, but it creates the COOLEST EFFECTS.  It’s to be used much like a paint roller to create the cool look of wood, on flat surfaces… walls, dressers, foors, shelves… you get the idea.
Here are a few good examples of a faux bois finish…

Pretty awesome, right??

The last photo comes from Little Green Notebook, and she has a FABULOUS tutorial on how to create this effect.

OKKK – now that we’ve gone down the faux bois rabbit hole… I’ll continue.

Create this finish (perhaps more subtly) on the MDF / particle board, screw holes in the bookshelf and attache the boards to the back.

So easy, and likely $100 for the entire project (or less if you are able to find a Vittsjo on Craigslist).

I REALLLLYYYYYY want to try this now!

DIY Paper Mache Pumpkins

Happy Friday you guys!  Are you as excited for the weekend as I am??
So I saw this fabulous little Esty shop that sells these charming pumpkins, and not to derail her business (at ALL), but I was just thinking of what a fun DIY project these Paper Mache pumpkins would make.

I’m thinking that it could be as easy as this…

Supplies:
  – Small Pumpkins
  – Glue
  – Craft Brush / Foam Brush
  – Small Container
  – Old Books
  – Moss

1. Buy some small irregularly shaped pumpkins from the grocery store (look for ones with long stems)
2. Mix one parts glue (Elmer’s white glue) and one parts water in a small container
3. Rip book pages out of an old book you’ll never read again (hey, I just gave you a use for the copy of Twilight hiding in the bookcase!)
4. Tear pages into small pieces
5. Adhere pieces of the book pages to the sides of the pumpkin
6. Glue a bit of moss around the stem of the pumpkin
7.  You’re done!

You could mix it up like the pumpkin on the far right, and use plain creme colored paper and finish it off with a cool stamp…

You could take things a step further and use a little gold leaf on a few of these…

Like the above pumpkins, you could hang small jewels, brooches, or name tags off of these – how cute would these be as a name card for a place setting at a spooky Halloween dinner??

I might have to give this DIY a go!

Happy weekend 🙂