The Lion’s are Here!!!

My little lion heads brass pulls are here!!
I was SO STOKED to see these come in the mail yesterday – I rushed home from work just to put them on the dresser, and was able to snap a few photos on my phone before it was completely dark.
With the days getting shorter, there was not a lot of natural light left, so the pictures are fuzzy and dark, but you get the idea… the brass pulls are AWESOME!!  Actually, even better than I hoped they would be!
They are actually quite small – the head itself is maybe an inch, but the ring adds to the size.
In the picture below, you can actually see that I hadn’t screwed the pulls on the other side yet… I was too excited (and the light was fading fast), but there will be more pictures to come soon – promise.
What do we think of the decorative brass corner caps??  I looked into options to antique them a bit, but it involves toxic chemicals to strip off the protective film (I read that the natural stripping methods with lemon juice, etc do NOT work).  
I think I’ll pass on the toxic stuff, and either make do as is, or scratch the idea all together.  I think I like how they look, and the little extra detail (almost called it flair… Office Space anyone??) but they are just so perfectly shiny in comparison to my awesome patina’d lion heads…
I think I’ll sit on any big decisions for attaching the end caps for now, and just keep them resting there for the time being…
More pictures to come, and they will NOT be blurry ones… promise 🙂

Bedding Sneak Peek

I’ve been busy in the bedroom… get your mind out of the gutter!  I’ve been busy making updates in the bedroom!  We’re still on hold waiting for that darn brass hardware to arrive for our new dresser, but in the meantime, our bedding got a little freshening…

I’d snagged the West Elm ikat duvet on sale, but it was taking forever to ship, so while it was en route, I started thinking of accessories, and styling…  Here’s what I came up with for our bedroom… 

And as of last night, this is where our bedding landed…

Darn close… am I right?!
I made the lumbar pillow from the Waverly Santa Maria Desert Flower Fabric which I LOVE (Kris is still warming up to it), with this easy no-sew pillow cover tutorial.  It literally took me about 15 minutes on Sunday night to whip it up!
You can’t see it in this picture, but the crap storage under the bed is now concealed by a neutral bed-skirt.  Nothing special – we just wanted it to blend in and hide all the random stuff under our bed (board games, surf-board bags, College memorabilia, fake flowers, Christmas ornaments… you name it)

These are just low resolution iPhone photos, and there are more to come – I’m still hunting down Euro shams to cover the plain white pillows, but instead of a black stripe, I think it would be really cool to use a similar ultra-marine blue to the dresser / TV stand…

I know… you guys haven’t seen it yet, but this is still a progress photo.  Looking good though, eh??

Now I’m scheming for some sort of artwork, mirror, clock, fill-in-the-blank to hang over the bed, and surround the TV.  Not that I want to put too many more holes in our walls… but just a little something to draw the eye up.  It’s been looking mighty empty over our gorgeous headboard, and the wall behind the TV is still crying out for something…

I still love our white and blue bedding, and don’t you worry… it WILL be back… but this is a fun change for now…

Ahh, so pretty… but a little too summery right now…

Do you remember what our bedroom used to look like??  Before the blue accents, the bedroom looked like this…

And before that, it looked like this…

And look at the busy dark curtains… what was I thinking??

And remember this??

Yep, lots of changes over the last two years…  It’s so awesome to be able to look back over the evolution of this space…

Succulent Terrarium DIY

Happy Monday!  Hope you all had a lovely weekend.

It’s been hot here, so I spent my weekend outside – we had a full beach day on Saturday, and spent yesterday picnicking and watching the America’s Cup races.

In between all of that, I also worked on a small succulent terrarium…

Considering, I have the brownest of brown thumbs, I think I did ok!

I read up a bit on how to plant these out, and it turns out, it’s quite simple.  You will need:
  – Assorted rocks and pebbles
  – Soil with smaller pebbles and sand mixed in
  – A planter
  – An array of succulent plants
  – A flat counter space that you don’t mind getting a lot a bit dirty

 
A misconception of mine… succulents don’t like water.  They are desert plants, and like to be dry.

WRONG.

No wonder I’ve killed so many already.

It’s not that they don’t like to be watered… they just don’t like to sit in water… thus the pebbles, rocks, and sandy soil.  This all helps with drainage, and will be key to prevent me from killing these plants.

See the rocks down at the bottom??  I spread a solid foundation of rocks and pebbles before planting the succulents, so that when I do lightly water them, the water is able to drain to the bottom, preventing the roots from being boggy and wet.

This also will allow me to water them pretty in-frequently.  Amen to that!

Want to hear something crazy??  West Elm sells similar terrariums for $99 EACH!

This project was nowhere near that much – the glass bowl was from Ikea, ~$10.  The succulents were from Trader Joes, $2.50 each, and I bought about 5.  I’ve had the rocks for years, but they were from Michael’s, and were about $5 for a big bag of them.  In total, this cost me, about $20.

Pretty good, right?!

I had a lot of issues keeping the dirt off the plants when I was adding soil around them, and unfortunately for me, their waxy texture is holding onto that dirt as though it’s life depended on it.  Ugh.

I tried wiping it off, using a duster… I’m hoping that over time, it will go away on it’s own??

I’m pretty pleased with how it all turned out.  Look how pretty and bright green they are!!  I’m doing my best not to kill them this time, although I’m not entirely sure how long they will last.

Wish me luck!

Fall Wreath

We are having a bit of a heat spell right now – the weather has been around 85 in the city, which is rare! We’ve been loving every second of it, but even with the warmth, the light has somehow changed, and we’re starting to feel the first few hints of fall.  The leaves on the tree’s have a twinge of yellow to them, and the days are definitely shorter!

With the first inklings of fall, I decided to revamp our doorway decor – not that I’m going nuts with pumpkins in the house (too soon) but just something a bit autumnal.

I had a pine-cone wreath from last year that was very… brown.  Lots of twigs, acorns, and pine-cones… and it looked so depressing hung up, so I always took it down pretty quickly.
Well, I bought some berries and autumn leaf sprigs at Michael’s (literally $5 for everything with my coupon) and busted out the glue gun.  This is the finished result…

There is still plenty of green in the leaves to keep it feeling fresh, and the color from the berries makes these pine-cones the opposite of dreary.  Lively?  Inspired? Awake (at the least!)…

A gold ribbon (mainly to hold it to the door) finishes it off…

I’m super stoked about how this turned out!  Last Christmas, I’d bought a live boxwood wreath from Trader Joe’s, and it dried beautifully, so that’s been hanging on our door for the last year.  The new fall wreath brings some new life to this space, and if you ask me looks awesome with the brass door knob, key hole, and numbers.

Not that I’m biased or anything, but I think it also looks fetching alongside the new gold leafed frames…

Ok, enough talk of leaves changing, and temperatures dropping… Indian Summer is here baby, and I’m heading outside to soak up the heat!

xoxo

DIY Embellished Picture Frames

I got my inspiration for this easy DIY from Courtney over at A Thoughtful Place, but she got her inspiration for this project from House Beautiful… it all trickles down folks!
I have jumped wholeheartedly on the “gold” bandwagon, but realize that it’s best used in moderation… it takes serious self restraint from taking a can of gold spray paint, gold leaf, and gold leaf pen (yes, they make a pen my friends) to everything in sight.  I’m in the process of revamping our currently gold framed gallery wall to something a bit more simple (I think)… but I digress…
Back to my little gold edged frames…

Our entryway has had an empty wall ever since I moved out the ornate Ikea mirror into our hallway… I’d been looking for a larger federal mirror, but having put myself back on a budget after a few shopping sprees, and a splurge on new bedding and the dresser DIY for our bedroom, I’ve decided to hold off on a pretty federal mirror for now.

The question of what to hang in this spot plagued me for a while, and then I spotted these frames in Courtney’s living room, and decided to give it a go…

Super cute right??

Courtney ended up spraying tape, cutting it down to size, and then CAREFULLY wrapping it around the corners of each frame.

I took the lazy approach and taped off the corners of the frame, eyeballing about an inch and a half on each side (nope, didn’t even measure), and then with a craft brush and a small pot of Martha Stewart’s gold leaf paint, just dabbed each corner until it was completely covered with gorgeous texture.

Voila!!

I took the tape off the frame after the second coat went on, and the paint was still wet – it just helped get clean lines on the frame.

So… this DIY is actually just a glorified painted frame!  It was so easy – I literally finished both of these in about 10 minutes, and the paint dries fast – maybe 5 minutes until it’s fully dry?

There are a few small mistakes where the paint bled under the tape, but it’s fine – really from a distance, you don’t notice it at all.

The entryway is really simple, but in such a small space, we figure simple is better than overdone.

Look at that crisp edge… I absolutely LOVE them!

The pretty photographs were from one of my all time favorite Etsy shops, Eye Poetry Photography.  The photographs are really dreamy and pretty, and they have a San Francisco series that I absolutely adore!

I’m not normally a HUGE fan of photographs of city landmarks (the Golden Gate Bridge or Eiffel Tower is SO overdone) but the Ferry Building is so classic, and less photographed, and I just loved the photo of the bridge at dusk – it’s not the in-your-face red towers we’re so used to seeing…

So that’s it – the entry way got a small face-lift this week, these old frames got re-purposed, and everyone wins!
Happy Thursday!!

Wicker Chair Makeover

Hey guys!!  I was at a conference for work all week, and have missed my little blog!  It feels good to be back at home, and I am SO excited to share a little project I finished late last night…
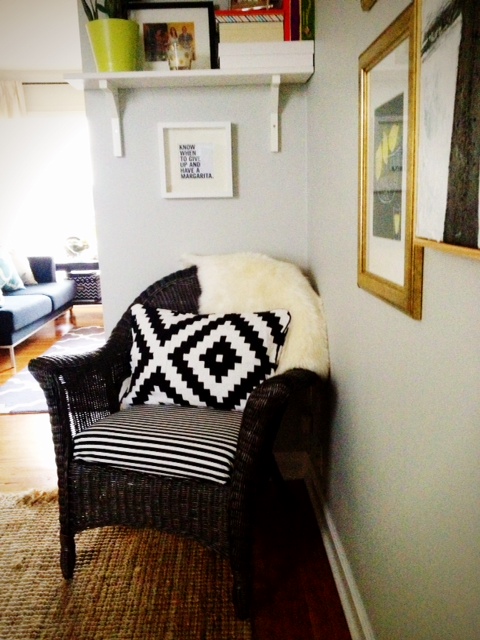
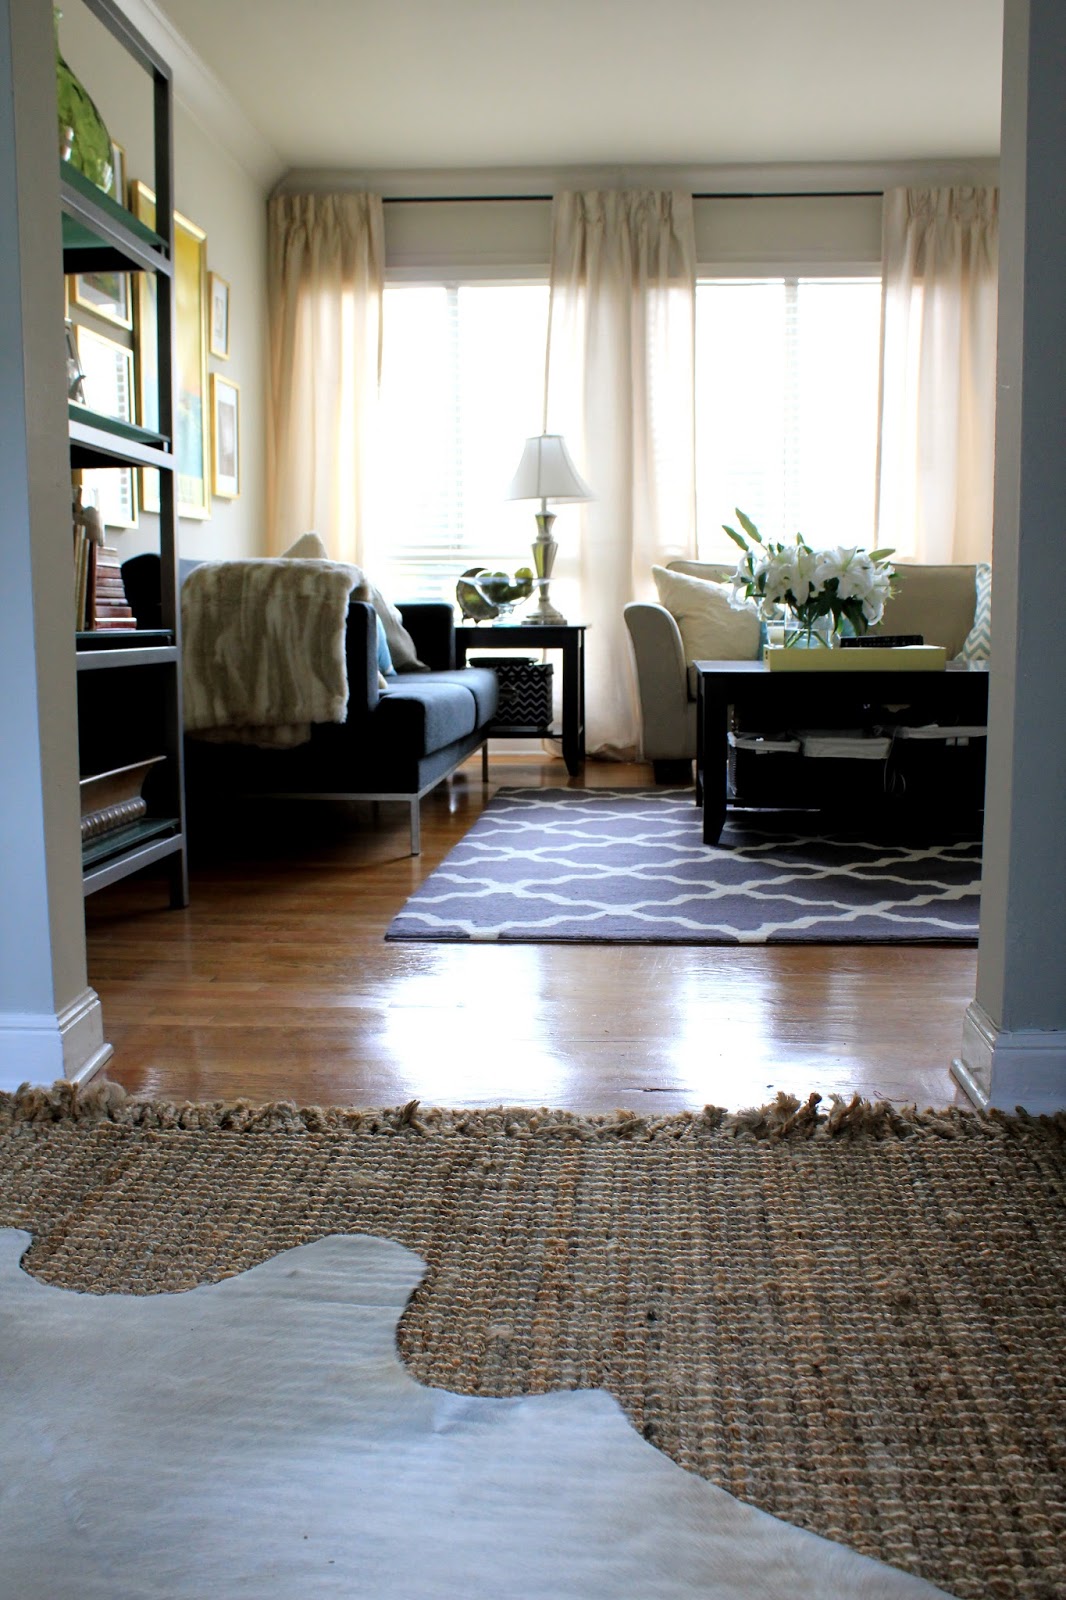
I haven’t shared many pictures of our dining room so far because it’s not “finished” but I’m tired of waiting around!!  Remember this lonely little corner?  I was on the hunt for a comfy overstuffed armchair to wedge in here…
As it turns out, comfy, overstuffed chairs come with a hefty price tag, and since we’re about to spend quite a bit on a sofa, I decided to look for alternatives.  This room is now functioning more as an office than as a dining room (side note: I really need to stop referring to it as a dining room) so we just have one chair at the table now.  Since painting the walls, I had put one of the dining room chairs in the corner, but aside from attracting clutter, it was completely non-functional.  So I moved it down to the garage, and turned to plan b…
The wicker chair that used to be in our living room, but has been sitting in our garage all sad and lonely since I haven’t been able to sell for months. 
I couldn’t even give it away, but since I’ve had it since I was a child, I just didn’t have it in my heart to leave it on our street corner.  I wanted it to find a good home, so it just sat in the garage collecting dust…
Remember it from the living room??
It was white, wicker, and oh so perfect for a little girls room… Not so perfect for a city apartment shared by two adults…
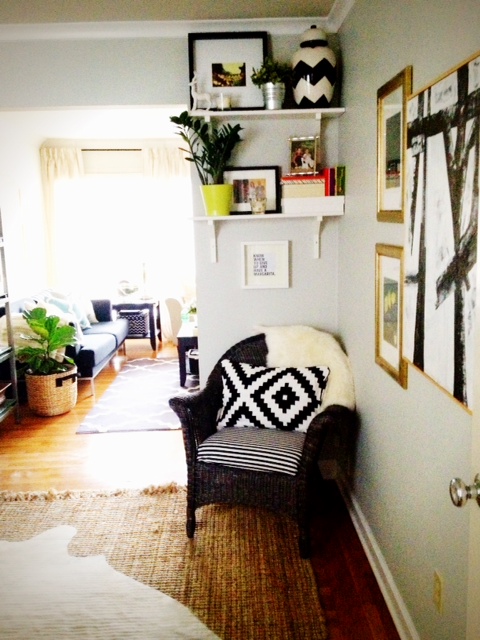
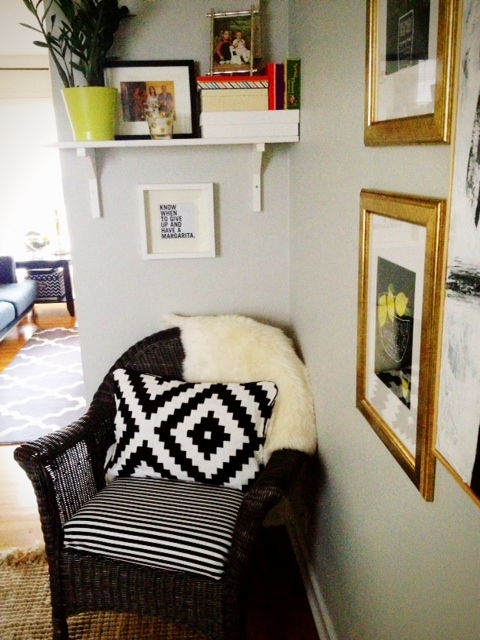
Well, it’s nothing that two cans of Rustoleum Bronze spray paint can’t fix! Here is the chair sitting all sassy and happy in the corner of our dining room as of this morning…
              
HUGE CHANGE right??  
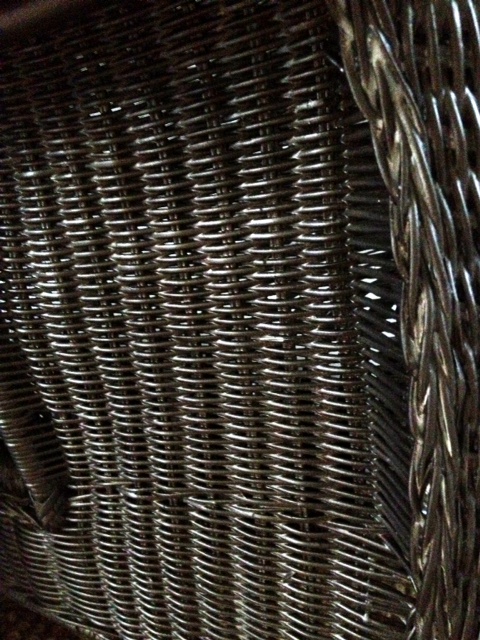
The chair is hardly recognizable now that it’s been sprayed a dark brown.  The paint color is “bronze” but it’s not metallic at all – I promise. It’s a nice dark brown when all is said and done.  Here’s a close up:
                     
This is actually a better, more accurate depiction of it’s color:

Chocolate-y.  I kind of love it.

Ok, let’s talk about the new seat cushion and accessories, shall we?  I have a little crush going on with black and white right now, and while I still think our living room could live without SO MUCH black furniture, this space needed to be grounded with some black since everything else was white, and grey.

Both pillow case, and fabric for the seat cushion are from Ikea.  The pillow cover is one of my all time favorite Ikea finds actually.  It’s thick, and woven, and has amazing texture in person.  And that graphic pattern is like mod-meets-aztec.  AND (it gets better)… it was ONLY $10!!!!  I know – run, don’t walk to Ikea – it took all my strength to limit myself to just two.

The striped fabric was $7.99 a yard.  Pretty good as well.

I’d ordered some striped fabric online, and when it arrived, it was sheer.  Clearly not going to work for any sort of upholstery job.  This is thick and durable – perfect for throw pillows, or projects like this.

Well, I’m sure you don’t remember the seat cushion on the chair when it was white, but my mom (who by-the-way is as talented as Martha Stewart, but unlike Martha hasn’t served prison time) had made a custom fitted cover for it when I was in high-school.  It was cute – a tan color with french quotes scattered on it. Again, perfect for a teenage girl.  We needed an updated cushion cover.

I am no seamstress, but I do own a staple gun, and so I improvised…

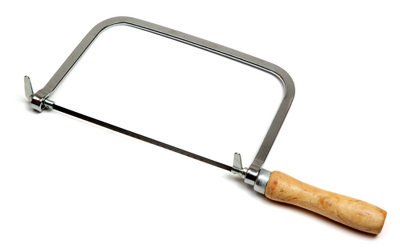
I went to the Home Depot and got a piece of MDF – super cheap.  It was $5 or something.  I also got a little hand saw that the guy at Home Depot recommended.  It looked like this:

I have no idea what it’s called and I tossed the packaging as soon as I got it home.  Sorry!
Anyway, I traced the cushion onto the MDF, and cut(sawed?) the shape out.  I should have gotten batting to wrap around everything, but I got lazy, so I just stapled the fabric onto the MDF – directly over the existing cushion.  I’m sure my mother is cringing at the idea of this.
Turns out, MDF doesn’t really like staples.  Many of them bounced back.  But some stuck (like REALLY stuck… they aren’t going ANYWHERE).
So about 200 staples later, we had this:

LOVE it!

On a whim, I also quickly tapped in a nail to the wall to hang up my new mantra below the final shelf…

Can’t see what it says??????  Here’s a close up:
AMEN TO THAT!
I’m not sure that the size of the frame is quite right, and since I didn’t even bother measuring anything before tapping in the nail, it’s totally not centered, but it’s fine for now.  Maybe a slightly larger frame would do well here…
Moving on…  Since this is a far cry from an overstuffed chair, I wanted there to be a “cozy factor” and picked up one of the sheep skin throws from Ikea (just $30, and it’s oh-so-soft). Wicker is not the most comfortable to lounge against, so the fluffy throw is the perfect solution.
Cheap.  Cozy.  Textural.  I love it.
As a side note, they do have faux sheepskin throws, but they were not as soft, and looked kind of raggedy… 

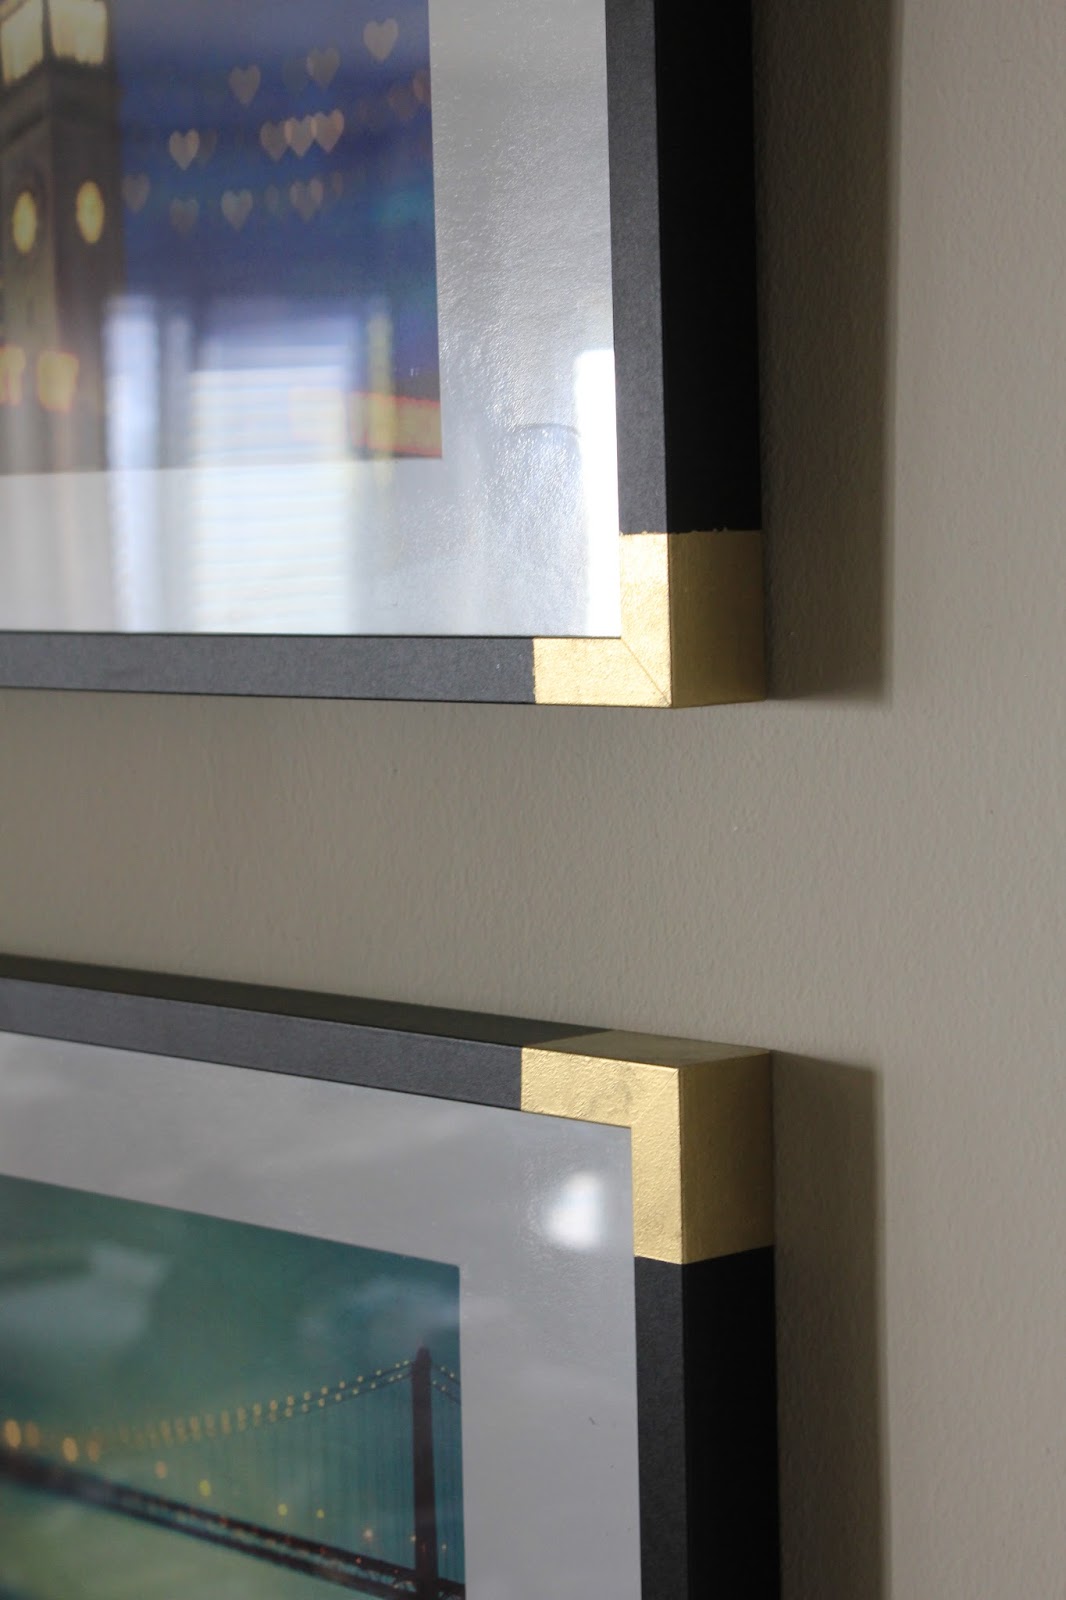
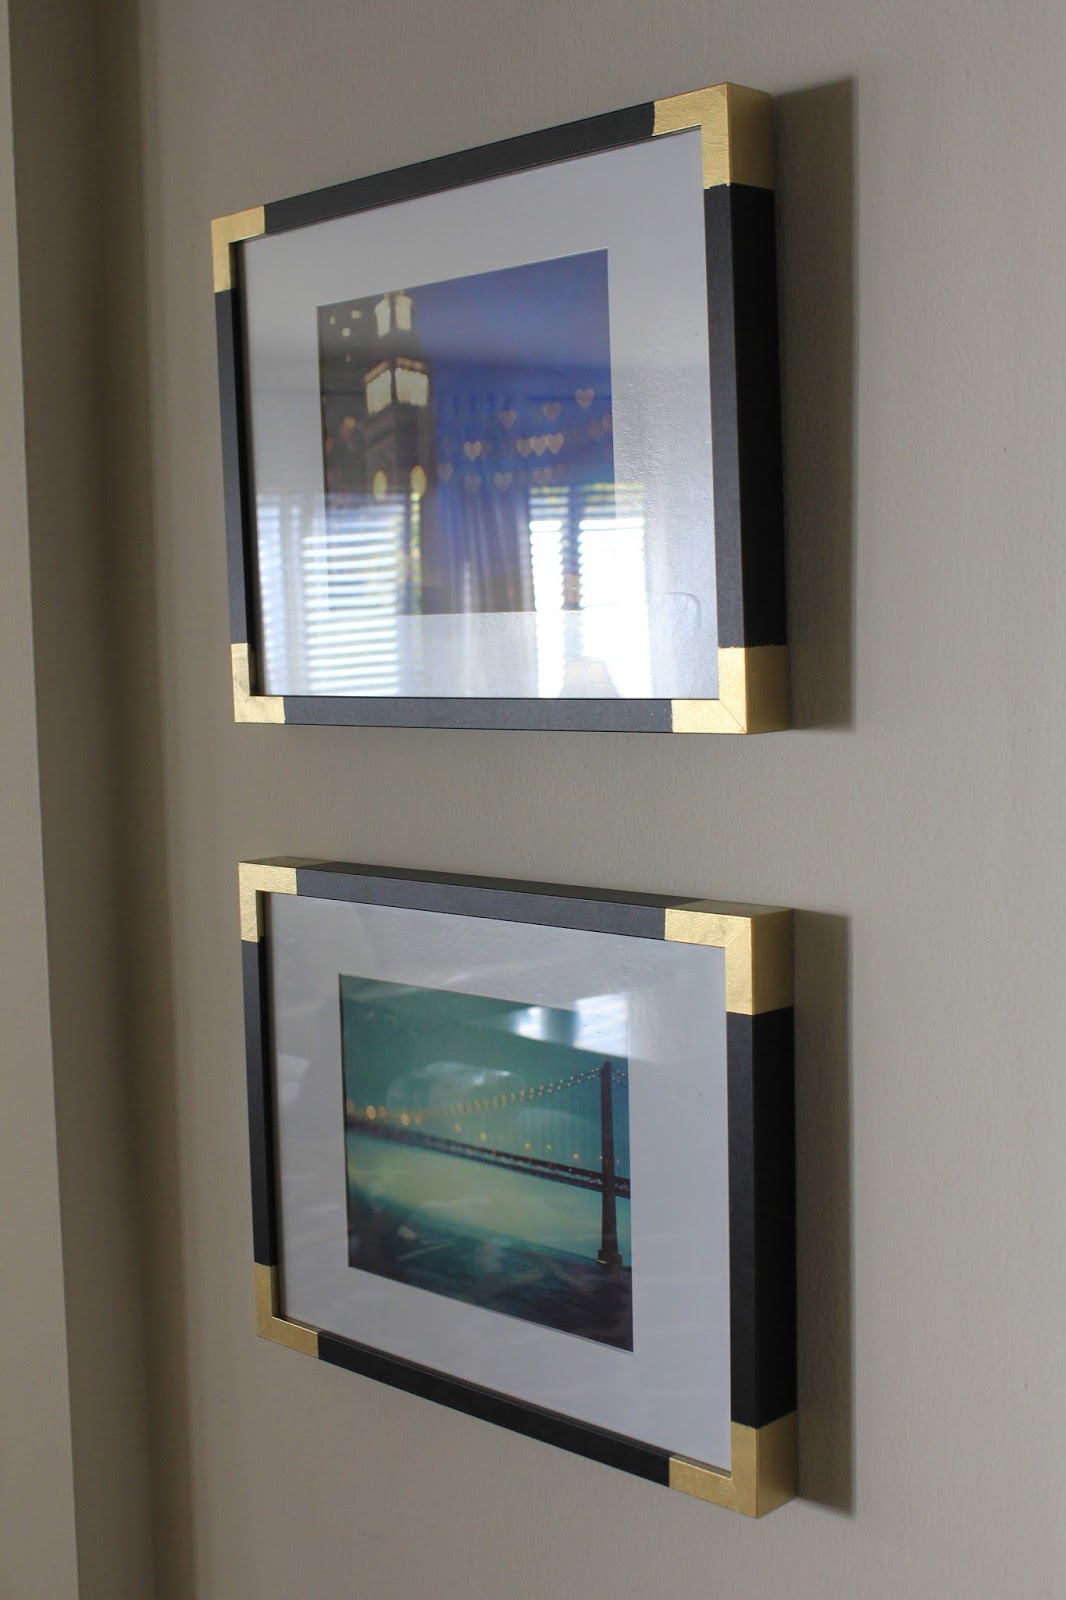
You may also notice the art on the wall… also a few new additions.  I’d been obsessing over the abstract black and white brush stroke art FOREVER, and had debated trying to make some myself, but then saw that West Elm was clearing it out.  I snagged it for $60, and it’s BIG.

It’s really hard to see, but you can see it most clearly in the below photo (I’ll take more later – promise)

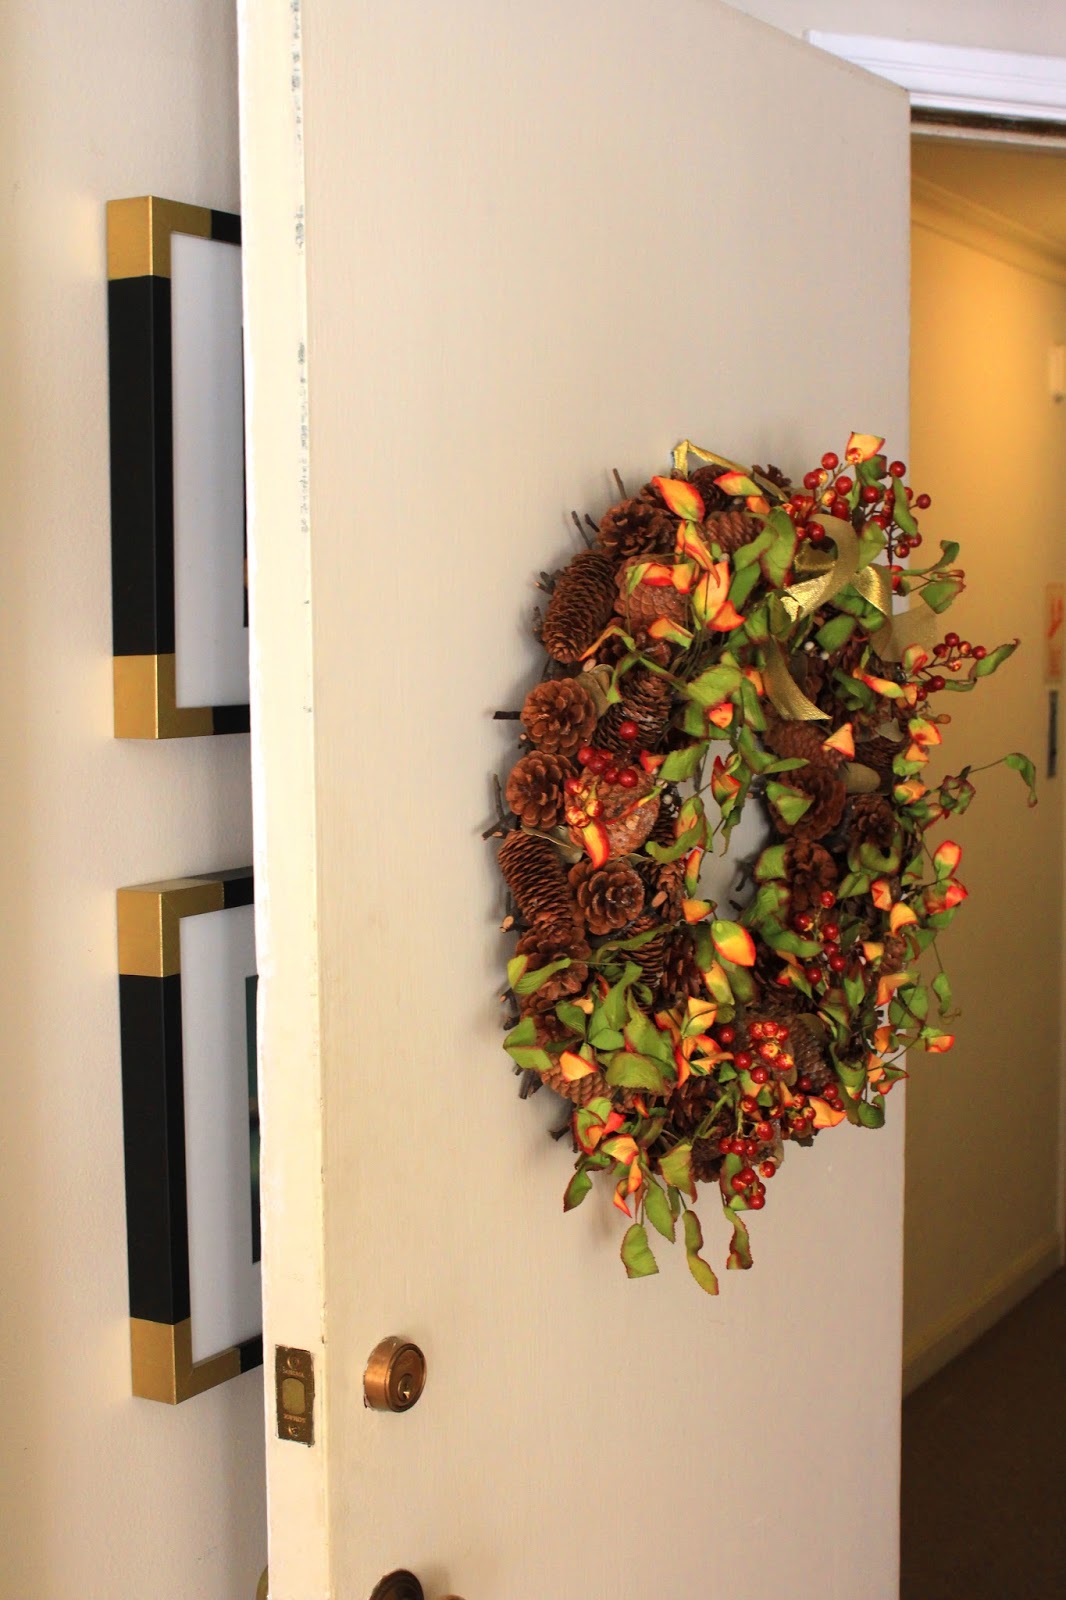
I’m working to figure out how to take the pesky door down to add one more large photo to this wall, and open things up (you can see the knob peeking out in the photo above) but the hinges have been painted over probably… oh…. a thousand times in the last 90 years… so the screws are not going anywhere for now.  I’m looking into different options… paint stripper?  Dissolver?  I don’t really know… but it’s like cement.  It’s one secure door.

Stay tuned for updates on that one…

But anyway, this little corner is MUCH happier now, and I am SO THANKFUL I didn’t end up getting rid of the wicker chair!  I am really liking how it looks here, after a little TLC.
In total, it cost me around $60 (fabric, throw pillow, sheepskin, + spray paint)… most of the cost comes from the sheepskin throw.  Pretty good though, right?!
We’re making progress!!!

Updated Living Room Photos

I always share updates about our house little by little – like last week I posted photos of our side tables with the orchid terrarium, or a few weeks ago there were some photos of our living room when I posted the x-bench makeover – but I rarely ever post lots of photos at once… call me lazy, but I realized this when hunting down pictures of our un-styled wine hutch, and couldn’t find a single one!
I feel like this is a good time to document and share pictures of where our living room is now… before it changes again with a new, beautiful sofa…
Let’s start out with the desk area… not much has changed here since any prior updates.  The sea fan shadow boxes are still alive and well, and I still love them as much now as when I first hung them!!

The tripod lamp is also still one of my favorite things… I got a new lampshade that has a rougher woven texture that I’m planning on swapping in, but nothing earth shattering.

Standing at the desk and turning around to face the rest of the living room, there is lots of color going on for summer and I love it.  As the weather cools down (or should I say, as it warms up with fall since there has not been one day over 60 degrees in the last several weeks)… whatever… as the seasons change, and we move into fall, I want to swap the art out for something a little more moody, and the pillows will be a bit more subdued as well.

For now, the bright blues and yellows remind me that it’s summer (somewhere outside SF), and of course these just make me happy… even in the fog.

My little terrarium is still plugging away… nothing has died yet!

And now, looking to the left, I just posted about our new little vignette on the wine rack… well I felt that I owed it a few nicer photos, since I relocated the memory card for our DSLR camera.

The mirror will eventually be swapped out for something round or more ornate (like I’d posted about here) but since propping up the gold picture frame on the right, I kind of hate the mirror less… either way it will have to do for now.

Besides, the orchids are so arrestingly beautiful, I hardly notice the generic mirror lurking in the background….

Yep, these plants are loving life – bright, indirect light… all. day. long.

I’d mentioned that I’d gathered the plants together on a small tray… here is said tray.  A little feather shape that I picked up from target on sale a few months back.

Ok, last picture of the wine hutch for now… I swear…

Now we are standing in the archway between the unfinished dining room and living room.  Looking back at the wall of windows, and our sofas.

When we first moved in, I absolutely despised Kris’ modern, black couch… but in the last year or so, I’ve either a) gotten used to it, b) piled enough pillows and throw blankets on it to distract the eye, c) balanced out it’s darkness with other dark colors in the living room, or d) all of the above… I kind of don’t hate it anymore.

Don’t get me wrong, that thing is going on Craigslist as soon as humanly possible, but I don’t think it’s the eyesore I used to…

Here I am, scootching back into the dining room to get a little bit more of the room in to the frame…

… and scootching back a little bit more to get the cowhide rug that I simply adore… I think having different textures in adjacent spaces has also really helped balance the room and make it feel less “big box store” than it really is.

Let’s be honest, everything we have in our living room is either from Ikea (frames, curtain rods, sofas), Target (wine hutch, fabric for throw pillows, baskets under the coffee table, lamps, trays), Bed Bath & Beyond (curtain panels), Craigslist (coffee table with matching side tables, console table), Homegoods (basically every accessory from the glass vases to the candle holders to the faux fruit).

Right?!  The natural fiber gives a healthy dose of “organic” to an otherwise, completely in-organic feeling space… just what it needed if you asked me!

And this coffee table… so bad, but I just had to show you all how badly we need a coffee table with storage when we do replace this thing (which I pray to god is very soon!)

I mean, these three baskets in the forefront are stuffed to the gills with wires, cords, TV remotes, video game controllers (because my boyfriend is secretly a 13 year old boy at heart).  On the other side of the table – closest to the couch – the baskets are filled with blankets for cozying up on the couch, and the surplus of wine that won’t fit in that mini wine hutch!

My point??  Storage is important.

Ok, moving onto the other side of the room… let’s first get distracted by the gorgeous flowers I picked up at the grocery store.  They smell as good as they look, and since I’m not one to hide a good deal, they were only $3 for the bunch!!

I kind of hope they die soon so I can get more while the deal is still going… but they are onto their second full week and going strong!

So here we are, sitting on Kris’ couch and looking across to the other side of the room… ignore the painting propped on the ground by the front door.  That came out of the dining room, and needs to find a new home somewhere else…

The white console table moved our of our hallway a few months back, and I has been hanging out on the far wall ever since.  I’ve had a really hard time trying to think of what should go here.  I’m thinking we may ultimately end up selling this console table (despite it’s fabulous new paint job), and maybe the fiddle leaf fig (FLF) can go there with another slightly smaller potted plant next to it?

Or maybe a white or light grey garden stool with a small plant on top of it, to go next to the FLF?

To be honest, the only reason the FLF is out here in the middle of the living room is because I nearly killed it in the dining room next to the heater.  It’s lost 5 leaves so far after moving it away from the heater, and it’s been a few days since the last leaf dropped… I’ve Googled the topic to death, and while I’m not 100% sure, I think we’re in the clear, and I’m going to work on nursing it back to health.  The bald spot on the plant is facing the wall, but you can see where it’s a little bare near the bottom left…

Anyways, I’m sure you’re all completely bored to tears after that story about my houseplant… long story short, unless I want to sign this plant’s death certificate right now, I need to find a home for it in here, and so it might just be at the sacrifice of the console table…

And that’s it!

More updates to come soon with the new sofa, a new coffee table (possibly?) and new or revamped side tables!!

Can you believe this room started out looking like this??

ME EITHER!!!

A new little vignette…

Since doing a mini makeover on the wine rack we have in our living room a few months back, I hadn’t put much thought into styling the top of it, and it looked pretty much like this for the last few months:

I realize this is a terrible picture, but it’s the only one I could find… and probably for good reason.  All we had on there was a mercury glass vase (which I do love) filled with fake flowers.  UGH.

SO. OVER. FAKE. FLOWERS.

I’ve made myself a promise – no more fake flowers in our house ever again.  Ever.

Live plants just look so much prettier.  Period.

Anyways, last weekend I went to the grocery store and stocked up on pretty orchid plants – you saw the orchid terrarium that has a home on our side table now, but on top of our wine hutch are a few new plants… real plants!

Yes, I realize these are not the best photos – I snapped them with my iPhone because I was fairly certain that I lost our memory card for the DSLR camera.  I’d hunted all over, but could not find them…

**Note: we ended up locating the memory card, so all is well.

Actually, since taking these photos, I’ve grouped the smaller orchid and small green plant onto a elongated tray – it just corrals everything, and defines the group of plans.
I also was playing around with the “Panorama” app on my phone the other night, and took this panorama of our living room…

It’s totally warped, and things are not all where they belong, but I kind of love it.

You can see the towel rack by the front door, waiting to get sold on Craigslist… any takers?? 🙂  Ha!  If it doesn’t sell by the end of the week, that baby is going on the street corner!

Orchid Terrarium

Our living room was feeling a bit… cluttered – I have a shamefully bad habit of adding more and more accessories to our space without taking things away.  I feel like a decor pack-rat sometimes.  
The side tables in our living room were in need of simplification – the multiple picture frames, candles, books, vases, etc were too cluttered.  It all had to go.  What to put in their place?  Something simple, clean and pretty…. and what could be more simple or more pretty than an orchid??
I’ve always loved the look of a pretty terrarium, but do not have the expertise to know how to successfully plant one.   
Despite my brown thumb, I thought I might try my hand at a more simple version of a terrarium – I had a pretty glass apothecary jar, and it was crying out to be used, so on Saturday morning, I took a quick trip to the grocery store to pick up some breakfast goodies, and came home with a few small orchids.  
Bear with me as I scientifically explain how I created an orchid terrarium…

Step I: Take orchid plant out of it’s pot as carefully as you can

Step II: dump into apothecary jar

Step III: Admire pretty new “terrarium”

I know, you were hoping for something more special than that, but it was really that simple.

I’m going to get additional soil since there was not much in the pot, and I feel it needs a bit more now that it’s spread out over a larger surface area.  See how the roots look like they need a little more soil coverage? A quick trip to a nursery will fix that!

With the light near our windows, and the slightly mottled glass, this was VERY hard to photograph, but trust me when I say it’s SO pretty!

If you think about it, an apothocary jar (or cloche) is kind of the perfect environment for an orchid – they love lush, humid environments, and the lid on the apothecary jar keeps things nice and humid… it looks so pretty in our living room, but if this orchid ends up dying in a few weeks, it will still be totally worth it! It was only $7!!

Hope you had a great weekend!!
xo

50 Shades of Grey… Literally

Let’s talk about paint colors… shall we?

Let me start this off by admitting that I had no idea how hard it would be to pick a shade of grey.  I mean, I thought I was going to be all clever with the title of this post, but I literally ended up evaluating just about 50 shades of grey… and that was after I had narrowed it down!!

I wanted something light and bright – no yellow undertones, but not too “cool” of a color either.  Just a perfect, clean, true grey.  To cut to the chase, I ended up with Grey Owl, by Benjamin Moore, but ending up with this decision was NOT an easy one…

Here’s where I started…


Yeah… lots of options… too many options…

Here’s where I narrowed it down to…

I decided to do a little Google image search, and found a few that I loved.  Sleigh Bells had been a front runner from the paint chip, but in the pictures it looked really steely and well… silvery.  Just. Like. A. Sligh Bell.  Duh.

Coventry Grey really appealed to me as well, but it looked a bit darker than I’d been thinking, and since the dining room doesn’t get a TON of natural light, it would have been a bit too risky…

Smoke Embers and Nimbus were a little on the “beige” side of the spectrum, and so I was really looking at White Whisp and Grey Owl.

White whisp was too white, and I really wanted the freshly painted trim to pop, so I ended up choosing Grey Owl.  As if it were fate, just before heading out for my paint, I read a blog post by Emily Henderson of Style by Emily Henderson, where she mentioned that Grey Owl is her go-to grey paint.

Sooo… I would pretty much follow Miss Henderson off a cliff (if you have not read her blog, DO – she is my hero and I love LOOVVVEEEE everything she designs), and so I took it as a sign that “Grey Owl” was the one for me.  For easy reference at Benjamin Moore, it can be found on paint chip 2137.

Here’s how it looks after two coats of fresh paint – I had them mix up primer and paint in one, and two coats covered beautifully.

It’s light enough that it doesn’t make this small room feel smaller, and it doesn’t make it feel gloomy, even on foggy days (which we’ve had an abundance of since I painted the walls).

The trim still pops, and the color doesn’t feel disjointed from the rest of the apartment (which does not have another “colored” wall in it).  I am SO HAPPY with Grey Owl – I would paint every wall in our house this color, if I had the energy in me…

This is a great before picture – I don’t have a ton of pictures of this room, just because it’s so dang small and hard to photograph.  Even though the walls have been painted, you can see that the layout was just not working (and we’ve lived with this layout for almost two years! Dah!)
The rug is WAY TOO SMALL for the room, the table blocks the pass-through from the living room to the hall… it just had to change.  But look at that paint… one step closer!!
More updates to come… stay tuned….