Dining Room Revamp – No, I’m not Crazy (yet)

Hope you all had as good of a long weekend as we did – we spent most of it outside, soaking up the warm weather, bbqing, sun bathing, and watching a few fireworks. 

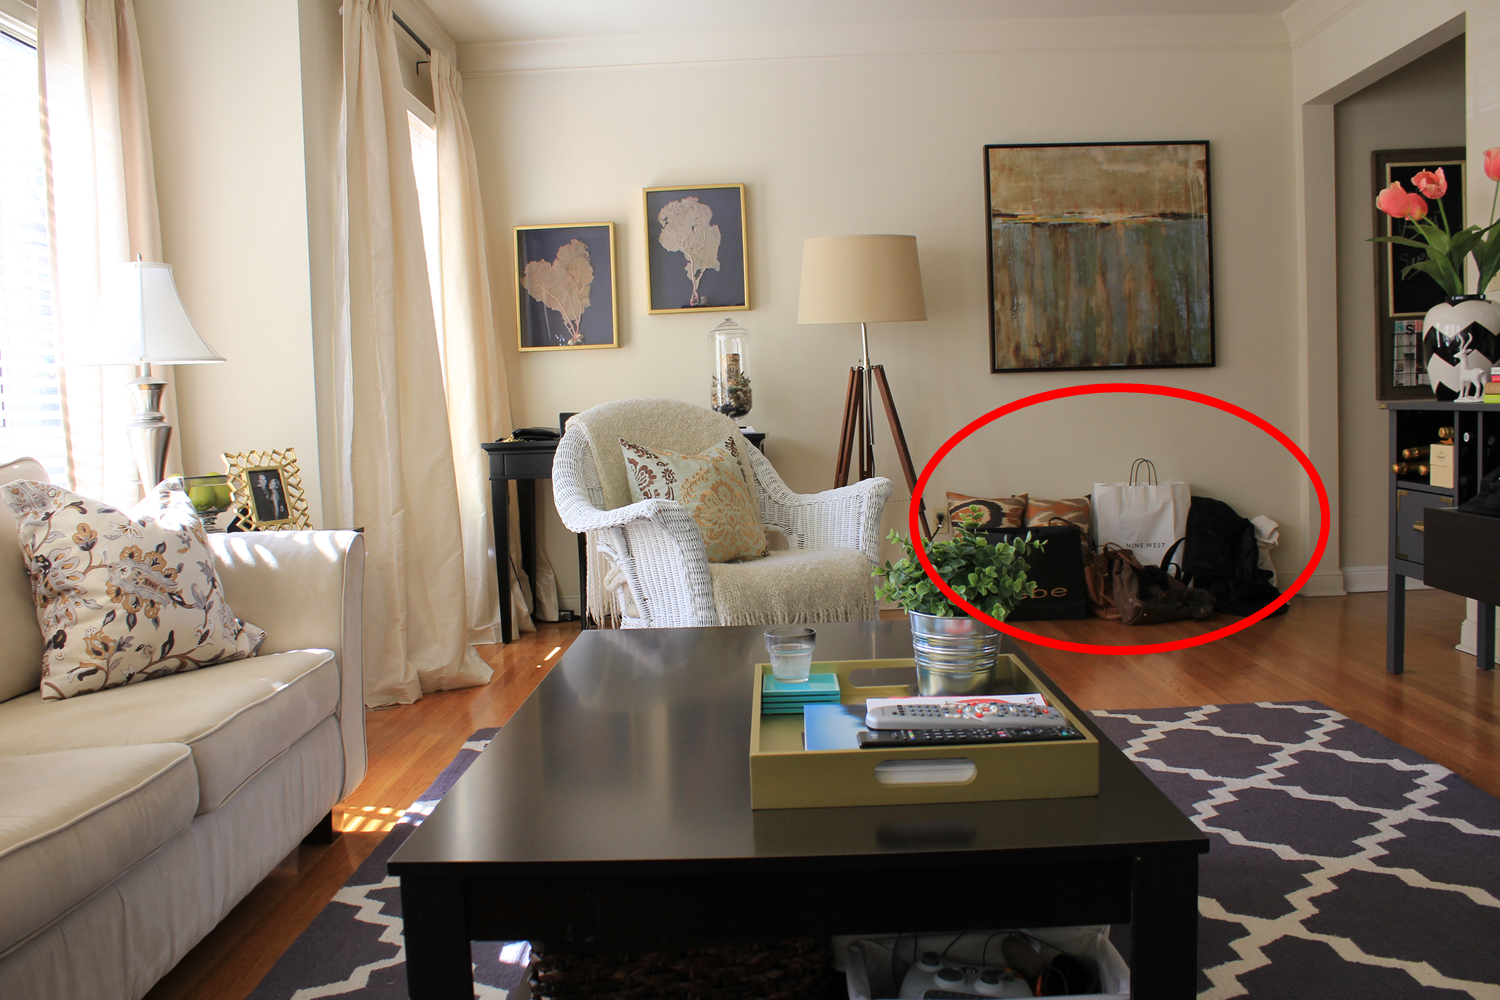
I also spent a few hours doing this:
Yep… that is paint my friends (Side note: can you believe how gross the color of the trim was before??? UGH. That swatch of white paint against it really shows how dingy it was!)  
I had an itch on Sunday and decided that the trim in the dining room needed to be painted immediately, and so I busted out the tape and my paintbrush and went to town… Kris came back from the coffee shop to find all our furniture in the living room, and me knee deep in paint.  Despite his concerns over my mental stability, I kept at it, and a few hours later, the trim was bright and white and clean, and I was able to let out a sigh of relief!
Have you ever read the book “When you Give a Mouse a Cookie”?
If you haven’t, please do, because then you will fully understand what has transpired since I taped and painted the trim in the dining room.  Once the trim was painted, I wanted to paint the rest of the room… even though it’s been painted once already.  I’m thinking a light grey…
Well with ideas of a light grey, simple room, I decided that the seat cushions on our chairs would need an update (something a bit more contemporary), and that with the grey walls, the curtains couldn’t stay as is (they wouldn’t match).  I also decided that with the bookshelf out of the room, it felt so much larger, so perhaps we should get rid of the big bulky bookshelf and install some open shelving…
Oh the domino effect!
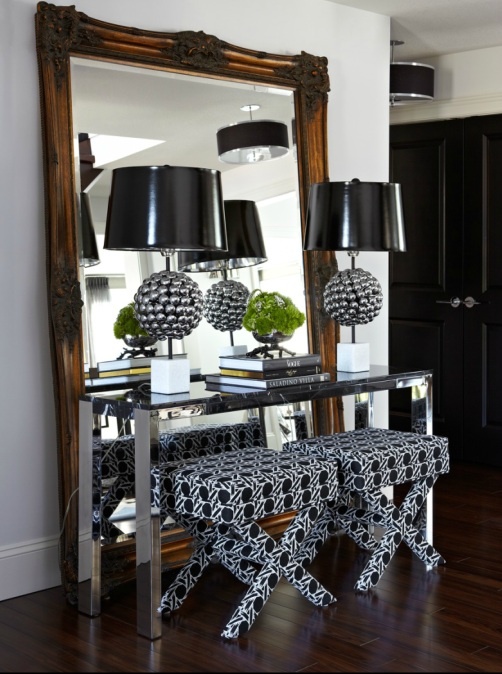
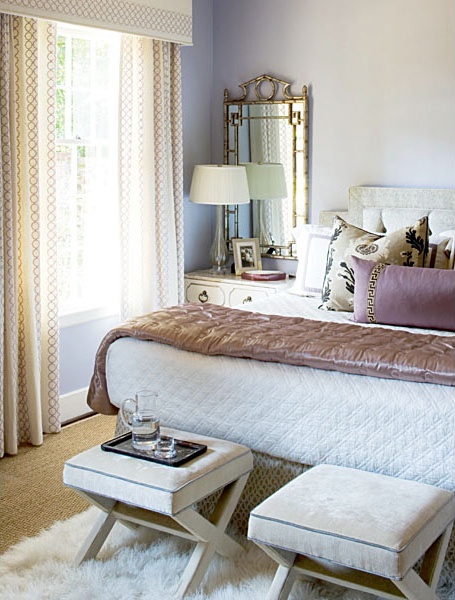
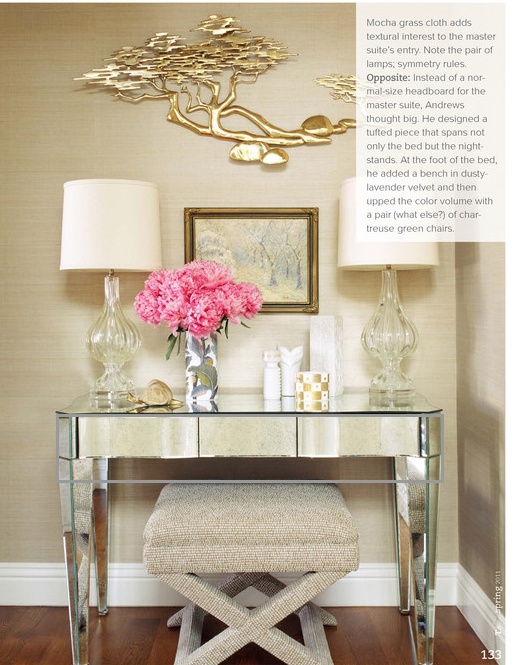
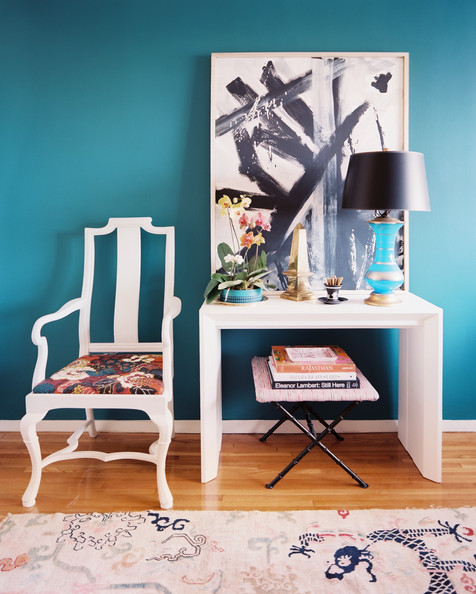
I decided to corral all my ideas into an inspiration board, and here’s what our dining room is soon going to look like:
Light and bright, and sophisticated with a color palette of black white and grey.  I want to bring in some black brush stroke art, fresh white curtain panels, and some bold graphic stripes.
I’ve really enjoyed the light blue color we’ve had, but since the rest of the house has neutral walls, it feels disjointed, and after almost two years with that color, I’m ready for a change.
Actually, there won’t be THAT much changing in here… just a few small tweaks to change the look and feel – the table will stay, but I’ll finally get around to installing the chandelier I bought LAST NOVEMBER (remember this post??), roll out the rug that’s been sitting in my office for the last few months, and pull the trigger on the cowhide rug.  I’ve already placed an order for the striped fabric that will recover the cushions, and the white curtains just require an easy trip to Ikea…
You guys – for once, a project I’m not sitting on!  I seriously can’t wait for before’s and afters 🙂
Happy Monday!

Fourth of July Style Guide

Happy 4th of July!!  Hope you all have fabulous plans for a fun celebration – I’m going to be laying poolside at my friend’s new condo – is there anything better than a rooftop pool on a hot day?? I think not!

Here are a few looks perfect for celebrating America’s Independence in style… Happy 4th!

HANGING POOLSIDE (OR BEACHSIDE):

beach day

Seafolly bathing suit, $53 / Charlotte Russe swimwear / Nine West flat / Calvin Klein tote bag / Fat Face , $31 / ATHENA PROCOPIOU Cover-up

Bring your sunscreen, a cute cover-up, and a big floppy hat – the “red” in your red-white-and-blue outfit should not be coming from your sunburn!

A PATRIOTIC BBQ:

bbq

bbq by beckyc1923 featuring a maxi dress

Splendid maxi dress / Wood Wood striped boatneck shirt / Christian Louboutin high heels / 10 Crosby Derek Lam / GUESS chain necklace / Gold belt, $7.61

Eat all the ribs you want – this dress is forgiving, and with the length, you can comfortably sit on the ground, cross legged without showing your lady bits… bring a casual stripe sweater to throw over your shoulders if the weather cools off in the evening, a smart cross body bag to hold the essentials, and you’re set!

WATCHING THE FIREWORKS:

fireworks

J.Crew j crew top / AG Adriano Goldschmied super skinny jeans, $330 / Soludos espadrille, $38 / Brooks Brothers / Loop scarf

I’ve spent many a 4th of July shivering at the fireworks after the sun goes down – wear a cute sweatshirt disguised to look like a cute cardi, a striped scarf, and some comfy espadrilles for walking around – you’ll thank me later!

X Bench Makeover

Say hello to my little friend(s)…

Last week I mentioned how I’d been lusting after a pair of x benches for our space, but had all but given up on the idea of them, since every bench I found cost hundreds of dollars.  I’d stopped looking for a while, and then found a pair of these guys from Target for ~$50 each.  It was a no brainer to buy them and make them over since the cost of spray paint and fabric is minimal.

I am SO happy with how these turned out…

Especially considering how they started out…

Not attractive…

The dark faux leather was so bad in person… and when I say “so bad” I mean “SOOO BAD”.  The leather was rock hard, super shiny, and had no give – it was like sitting on a slippery brick… but I saw past their sad exterior, and whipped them into shape quickly…. here’s how it went:

Step I: detach the cushions from the base.  Easy peasy…

Step II: Spray the bases the color of your choice (I went with Rustoleum’s trusty gold spray paint – never fails my friends) – while the paint dries on the bases, head upstairs to gleefully rip off the faux leather from the plywood using whatever tools at your disposal.

**This was actually the hardest step for me since the manufacturer really stapled the hell out of each bench.  I was left with lots of bits of leather and random staples I couldn’t get out, but it’s fine… no one cares about the underside…

Step III: Throw away horrible faux leather and breath a sigh of relief.

Step IV: Lay out beautiful new fabric that you will be covering the cushions with, and cut the fabric to size (leave ~3-4 inches around the sides of the plywood and foam)

Step V: Staple fabric securely to the cushion starting with the sides, and finishing with the corners

Step VI: Grab the fully dried bases from the garage, and re-attach the cushions to them (or in my case, get lazy on this step and vow to attach them tomorrow)

Step VII:  Stand back and admire your handiwork

What do you think??  Pretty good right?!

I fid that taking pictures of my projects is super helpful… it really allows me to see the imperfections that I want to go back and fix.  In this case, there is a bit of marred wood on the front side of one of the benches that I’ll want to patch, sand, and repaint for a smooth finish…

I also see now that I’ll want to trim down the extra fabric from the bottom of the cushions and that I really do need to reattach the cushions so they sit flush with the base – easy fixes, but you get the idea overall!

Big picture, these benches under-went a major overhaul!  I think it’s a huge change from dark-and-sad to light-and-bright.

So let’s recap costs and savings for a minute… the two benches cost ~$110, the fabric was marked down to $30 a yard, (I needed just 3/4 yards which came out to $22), and the two cans of spray paint were $14.

All together, this pair of benches cost me $146!

It’s not the least expensive project I’ve ever done, but considering I’d been seeing single benches for $200 each, it’s $146 compared to $400.

Pretty dang good if you ask me!

Living Room Re-design

Do you ever have those moments when you turn around and completely hate everything in your space?? This happens to me most mornings when I try to get dressed – tons of clothes in the closet but nothing to wear…

Well, it’s started happening with decor now too – eek!

Our living room got a few updates earlier this year with a new rug, a gallery wall, and a dolled up wine hutch, but since then it has been at a complete standstill for many months.

I can’t stand the lack of change, so the time has come to switch things up.

I made a laundry list of the things I want to change, and came up with an inspiration board for how I want this space to feel – lighter colors, more natural wood elements, and overall a more organic feel…

Living Room Wishlist:
  – New sofa
  – “New” Area Rug
  – Cowhide rug (for layering)
  – Lighter colored side tables
  – Weathered wood coffee table
  – Additional Seating

I’m desperate for a new sofa (it’s about time!) and while I’ve been talking about getting rid of all the dark furniture (coffee table and side tables), it’s time!

The area rug is an easy fix – this creme colored trellis rug is the exact area rug that we have in our bedroom, and I think the rug currently in our living room would look fabulous in our bedroom with all the white bedding, and navy chevron curtains… so the easy solution is to swap rugs.  Bedroom rug moves to the living room, and living room rug moves to the bedroom.  The annoying part of this??  Moving the mattress, boxsprings, frame and headboard out of the way first…

Ok let’s not think about that… let’s talk about my plans for a cowhide rug… RugsUSA has a fab 75% off sale running over the 4th of July, making this cowhide rug just $245! I think I need to have it…..

Obviously, I can’t afford don’t plan to splurge on a new rug, new side tables, a new coffee table, a new chair (or pair of chairs) and a new sofa all at once, I’m thinking of making some temporary tweaks to what we already have in order to feel happier with this space overall… how will I do this??

PAINT.

Yep – that coffee table and side tables are getting a mini makeover in the meantime before I replace them.  They have no idea what is coming their way! I’m thinking a clean creamy white, or even a pretty light blue like the side table in the inspiration photo… although notice the card catalog drawers??? That side table is high up on my wish list….

I’m also contemplating changing up the layout of the room, but I’ll cross that bridge after making some of the initial changes to color palette…. stay tuned for more………..

Rast Hack – Ostrich Leather Upholstered Side Table

It all started with this image…

Can you imagine anything more extravagant??  To have a side table that is upholstered with ostrich leather??  And that brass hardware… stunning.  You all know how I feel about gold.  To die for…

A piece like this would cost the big bucks (can you hear the ca-ching sound in your head???)

But oh how amazing it would be to own a fabulous side table JUST. LIKE. THIS. Since I’ve been put on a budget, and I could never fathom spending thousands on a side table anyway, I had to get a bit creative in brainstorming up a little DIY for this end table…

Here’s what I came up with…

So that means that with a little patience, and a bit of work that you could recreate one of these side tables for less than $115 –  and for just over $200 you could have a pair of them!  That’s my kind of budget!
To recreate this side table, I imagine the steps going something like this…
STEP I: Piece together the Rast side table, prime and paint the top and sides of it gold (leave the drawers bare)
STEP II: Use Barge’s multi-surface glue to secure the fabric to the drawer fronts.  Leave a half inch of space around the edges of each drawer for the trim (side note, if you ever have a question on what adhesive to use, use this site… it’s AMAZING!!)
STEP III: Measure and cut the pieces for each drawer front (you’ll need 8 pieces of trim total – two long for the top and bottom drawer, and six short for each drawer)
**Note: you could probably have the Home Depot cut the trim for you before you take it home to avoid the hassle of measuring the corners and sawing them yourself…
STEP IV: Prime and paint the trim gold
STEP V: Use finishing nails (or even liquid nails) to secure the trim to the drawers
5. Screw in the pulls to the drawer fronts
Ta-da! You’re done!
The hardware is certainly the most pricey part of this endeavor, and I’m sure that with a bit of scouting around, you could find three plate brass pulls for less than $15 each.  
While I’m on a bit of a DIY hold until we find out if we are moving for sure (and when we are moving for sure) this is definitely a little project I’m itching to test out! 

Beautiful (and Delicious) Ice Cream Cake

Kris hates cake.  It kind of kills me since I LOVE cake.  I could eat yellow cake with chocoalte frosting every day and never get tired of it, but I can barely coerce him into a bite.  For years, I’d make him a cake for his birthday, and he’d pretend to be wowed by it, and push it around on his plate, and ultimately go get a bowl of ice cream.  This past year, I skipped the cake, and bought 4 different kinds of ice cream to make him an enormous banana split.  While he was happy as a clam, it wasn’t the same… for me… birthdays need cake damn it!
My new solution?  
This cake.  This ICE CREAM cake that doesn’t conjure up tacky images of Baskin-Robins’ confections covered in power rangers, or ninja turtles, or whatever superhero show the kids are watching these days.

Not only would it look beautiful on a cake tray with candles to blow out (it’s not a birthday if you’re not blowing out candles) but it’s 90% ice cream… so it’s a win win!

I have been craving a yummy dessert lately, and maybe this is just the thing to try out this weekend!

Here’s the recipe (a la Bon Appetite):

Ingredients:
Cake
   Nonstick vegetable oil spray
   1 cup cake flour
   1 teaspoon baking powder
   1/4 teaspoon salt
   1/2 cup sugar
   1/4 cup (1/2 stick) unsalted butter, room temperature
   1 large egg
   1 teaspoon vanilla extract
   1/3 cup whole milk
Ice cream
   11 large egg yolks
   3/4 cup (packed) golden brown sugar
   3/4 cup malted milk powder
   6 tablespoons bourbon
   1 1/2 tablespoons vanilla extract
   2 1/4 cups whipping cream
   2 1/4 cups whole milk
   1 cup plus 2 tablespoons sugar
   Topping
   1/2 cup water
   6 tablespoons sugar
   4 1/2-pint containers blackberries, divided
Preparation:
Cake
Preheat oven to 375°F. Spray 9-inch-diameter springform pan with nonstick spray. Sift flour, baking powder, and salt 3 times into medium bowl. Using electric mixer, beat sugar and butter in another medium bowl until blended. Add egg and vanilla; beat until thick, about 3 minutes. Beat in dry ingredients in 3 additions alternately with milk. Spread batter in pan (layer will be thin).
Bake cake until tester inserted into center comes out clean, about 15 minutes. Cool cake in pan on rack. Remove pan sides. Cut enough off top of cake to make 1/2-inch-thick layer. Reattach pan sides, leaving cake layer in pan.
ice cream
Whisk first 5 ingredients in large bowl to blend. Stir cream, milk, and 1 cup plus 2 tablespoons sugar in heavy large saucepan over medium heat until mixture comes to simmer. Gradually whisk hot cream mixture into yolk mixture. Return to pan and cook over medium heat until custard thickens enough to coat spoon, stirring constantly, about 3 minutes (do not boil).
Strain custard into large bowl; set over pot of ice and water. Cool 1 hour, stirring often, then chill 1 hour. Process custard in ice cream maker according to manufacturer’s instructions. Spread ice cream over cake in pan.
(or for those of us without an ice cream maker, get reallllyyyyy good ice cream, let it soften, and then spread over the cake…)
Cover and freeze until firm, at least 4 hours and up to 2 days.
Topping
Stir 1/2 cup water and sugar in heavy large saucepan. Add half of berries and bring to boil. Reduce heat and simmer until syrup thickens, mashing berries with back of fork, about 12 minutes. Pour into medium bowl; gently stir in remaining berries. 
Cover and chill until cold, at least 3 hours and up to 1 day.

Using hot knife, cut around pan sides to loosen ice cream cake. Remove pan sides. Transfer cake to platter. Spoon half of berry topping onto center of cake. Cut cake into wedges and serve, passing remaining topping separately.

X (bench) Marks the Spot

For anyone else out there that is a devout follower of the wedding blog, Style Me Pretty, you probably also follow their spin off blog, SMP Living.  Last week they had a FABULOUS feature on “how to makeover an x bench”.
I have been a long-time lover of the x-bench, and had been on the hunt for a pair for a while, to fill the empty space below the large piece of art in our living room (well the space occupied with bags for donation in this photo…)
A few months back, when I first found our tripod lamp, I even created a mock of how I saw this wall looking… complete with x-benches.  Unfortunately, not much has changed in this space since I posted this back in January:
SMP’s x-bench makeover gave me the inspiration to look into getting a pair of x-benches again, and so I hunted about for some additional inspiration…
X-Benches as a lovely accent under a console table…

X-benches are lovely at the foot of a bed…

X-benches are the perfect seat to tuck under a desk

X-benches are the perfect way to add seating in a living room…
Now the real trick is to find a pair of x-benches… they are apparently not available online, and so I suspect I’ll be making some calls to a few stores today…
Happy Monday!

Painted Curtains – Part Deux

Happy Friday friends!!  Are you as ready for the weekend as I am??

I’ll  be heading down to Orange County this weekend for my beautiful friend’s bridal shower, but before I hop on my flight, I wanted to share with you an idea I had for painted curtains…  I’m not sure if you remember the chevron painted curtains I made and posted about here, but after seeing the below image on Pinterest (unfortunately no source folks) I had a brilliant idea for another take on painted curtains.

Something about these curtains spoke to me – I have no idea if the curtain panels in this bedroom involved a DIY, or if the fabric just has a print with a “painted on” look… but either way, that’s not really the point!  I think that an abstract painted curtain would be a fabulous, simple DIY!
Curtains can get really pricey – especially if you are looking for a longer length – but using the simple, white Merete curtain panels from Ikea (only $25 for two 98″ panels) would save you A LOT of money, and I think it would be really fun to tap into your inner Pollock.  Right?? If I were to attempt this, I’d be sure to measure things out beforehand to ensure that each swirly row was roughly the same width, and that they went down the panel in straight rows, but to replicate something like these curtains would require hardly any artistic capabilities!  Right up my alley!
Now that I’m really looking at this photo, those coral striped pillows actually look as though a paintbrush was taken to them as well!  I can’t imagine they would feel very good to lean against, but if you were going for pure aesthetics, these would be another fun DIY to test out with a bit of paint!
If you wanted to try out the pillow version, Ikea also sells two-packs of plain white 20×20 Pillow Covers for $6 – that is a price you cannot beat – and if you mess it all up… it was just $6 down the drain.  I’ve spent more at Starbucks before!
If you need a little inspiration to get the creative juices flowing, check out the walls around Kelly Wearstler’s staircase and entryway!  Phenomenal!
Jenny Komenda of the Little Green Notebook used a paint brush and mint green paint to overhaul the itty bitty powder bath in her Brooklyn apartment…
Or if the chain link swirls are too girly for you, take a more abstract route, and go to town – curtain panels with a large scale black and white abstract would be super edgy and bold, and would really compliment either very simple, or very feminine furnishings.  Best yet??  You wouldn’t need (or probably want) a lot of art to compete!

Spooky Decor??

What is something that sounds like it would be spooky but it’s actually something you sit on…

Any guesses??

. . .

. . .

. . .

No… you give up???

. . .

A ghost chair!!

Oh man… who doesn’t love an lame awesome riddle??

Ok getting serious again, these chairs are just so cool… I mean how could they not be when they have a name like “ghost chair”.

These chairs have been featured in every decor publication from Elle Decor to Traditional Home, which means that pretty much everyone has jumped on the ghost chair bandwagon.  Super trendy?? Yes.  Are they classic pieces that your grandchildren will fight over??  Pretty sure the answer to that is “no”, but considering you can find them for ~$150 each, it’s not a huge investment for a statement piece that you’ll absolutely love for at least a few years.

Let’s be honest, I’ve spent more on shoes I’ve never worn because they pinch my feet… so in the scheme of things, one or two of these oh-so-pretty-chairs would be just a blip on the radar or at least that’s the story I’m going to sell to Kris.

Some people have gone all out, and decked out entire dining rooms with them – traditional meets modern… me likey…

While others opt to integrate them in small understated doses… and the fur draped over this one??? OMG I’m dying!!

Used in a home office full of danish inspired pieces…

… Or in a glammed up breakfast room, complete with sputnik-ish light installation, glass pedestal table, and white galore.

I happen to love the juxtoposition of the rustic dining table, and natural decor with these lucite beauties…

And again here with the rustic unfinished wood of the desk.

So very cool!  I’m thinking that when we move, I may treat myself to one of these – either for our desk, or perhaps as a cool accent chair in the living room…

What do you think?  Would you ever own one?  Do you think they are awesome or awful?  How comfortable do you think they are??

Summer Rompers

I’ve never felt that I could successfully pull off a romper, but after seeing a few girls wear them last weekend in Napa, I really want one of my own.  There is just something about a girl who wears a romper that says “cool factor”… although I realize saying “cool factor” makes me sound like kind of the opposite… I never was too cool.

Anyways… how cute are these??

Rompers

Lanvin / MaxMara jump suit, $530 / RED Valentino , $355 / Dorothy Perkins / Forever 21 romper

I pulled together a few of my favorites here, and I think each has it’s different purpose – clockwise from the far left there’s the work appropriate pants version, the sexy cut out version perfect for Miami or Vegas, the relaxed aztec print version, the dressy black lace version, the floaty feminine version, and the pretty ladylike version.

The reason I’ve never seriously attempted one myself is because I have a long torso, and the last thing I want to do is look like I’m trying to squeeze into kids clothing, BUT what I’ve found is that by following a few rules, just about anyone can pull one off…

1.  Make sure that it’s long enough
Not only do the shorts have to be long enough, but the body has to be long enough too otherwise it will ride up, and make for possibly the most unflattering outfit.  Ever.  EVER.

2.  Make sure they nip in at the waist
If you are wearing a romper that’s too baggy, you’ll look dumpy – for lack of a better word.  Belt it, cinch it, do whatever you have to, but be sure your waist is defined.

3.  Make sure the shorts (or pants) are loose and pull away from your legs
This rule also applies to wearing shorts, and there is nothing less flattering than shorts that are too tight around your legs.  Period.

Andddd, I’m off to do a little online shopping… I need to find me a romper!