DIY Projects: Halloween

I love fall, but the decor for Halloween that you find in stores leaves a little to be desired.  I scoured the internet for some clever decor ideas that are simple, and relatively inexpensive.  It’s such a short lived holiday, no one wants to break the bank on fake witches and over the top lawn displays (or maybe you do… I know I don’t!)

Read on for some fun ideas to get into the Halloween spirit!!


Glittery Pumpkin Candle Holders:

This one is perfection – Twig and Thistle has a fabulous tutorial for turning foam pumpkins into sparkly accessories for fall.  Tutorial here!

Spooky Porch Decor:

Cassie from Hi Sugarplum! decked out her porch with a swarm of bats, which is spooky, not silly (my favorite type of Halloween decor).  She used thick felt, and fake crows from the dollar store, and it’s incredibly striking (and easy!)  Check out her tutorial (and more pictures) here!

Glittery Spider Webs and Spooky Shelves:

Centsational Girl is the ultimate in crafty DIY, and has been making all the stops for Halloween.  These bookshelves capture the Halloween spirit without being tacky. One of my favorite ideas!!  Go look at the whole tutorial here.

DIY Trick or Treat Pillows:

The Cutest Blog on the Block had an easy idea for some DIY Halloween Pillows – these would work indoors or outdoors but with the glitter involved, I think I’d keep these outside on a porch, or in an area you could easily sweep (unless you want to find glitter in your carpet for years to come).  Tutorial here.

Pumpkin Punch Bowl:

You’ll need an extra large pumpkin to pull this off, but Martha Stewart reigns again with her clever ideas for fall entertaining!  Check it out here

“Pick your Poison” Bar Setup:

Throwing a party?  While we are on the topic of entertaining, this is a fabulous little set-up for an adult Halloween Party!  Get more details here on BHG!

DIY Treat Bags:

Hi Sugarplum! made it on this list of fabulous DIY projects twice (she really is that clever) – this time with her cute idea for Treat Bags.  Adorable!!

What did I miss??  Any other cute Halloween DIY’s that I should test out??

Design Icon: Jeff Andrews

For those in the know, you get why Jeff Andrews has made my list of design icons – his work is clean, and he takes bold design concepts and infuses them with warm livability.  He has been featured in so many amazing publications from House Beautiful (a personal favorite of mine) to Traditional Home, Elle Decor UK, Vogue Living AU, BH&G… the list goes on and on… and on some more.

This living room is absolutely amazing… With those big french doors, and wide open windows, my first inclination would have been to paint the room white from head to toe, but going with a dark grey / blue, creates a rich canvas with tons of depth, where the furniture and colorful accents pop.

That fur throw on the bed!!  That ornate black beaded chandelier!!  Those twisted branches!!  The leather!! This room is sexy until the end of time, and the black paint on the walls makes it feel like a cozy little cave.  I think I’d never leave…

This foyer is as grand as it gets… look familiar??  It should if you are a fan of the Kardashians!!  This is Kris Jenner’s foyer that we’ve all seen a thousand times, but it’s classic glamour all the way.  From the curved double staircases, to the black and white tile, I absolutely love this space.

 There is just something about the dining room, that feels incredibly laid back.  Perhaps it’s the fun pumpkin colored silk curtain panels, or the plush bench, but despite the formal art, and traditional vibe, I only imagine lively family dinners here.

Those chairs!  That art installation!!  This space is earthy and warm with a chocolate shag rug (a shag rug in a dining room?!)

Now can you see why I am so obsessed with Jeff’s work?!

Easy Appetizers: Watermelon with Balsamic

I love to have easy appetizer recipes on hand because no one wants to be stuck in a kitchen during a party.  Plus, our place is small, so hot appetizers mean a hot oven… which means a hot house.  No thank you!

That is why I am so in love with this Watermelon with Balsamic dish that I found on Show Food Chef.  It’s simple, and easy to make ahead of time, so I’m all about it!

What do you need??
  – Watermelon
  – Melon Scoop
  – Reduced Balsamic

To prepare:
  – Cut the watermelon into one inch cubes
  – Use the small melon scoop to remove the center of each cube
  – Place cubes upside down on a paper towel to remove extra liquid
      (cover with plastic wrap and put in fridge for at least 20 minutes)
  – Remove from fridge, and add a few drops of the balsamic reduction to the centers
  – Garnish with mint or basil (just to make it pretty)

And it’s that easy!!  Maybe I’ll be making this for our next book club meeting!

Chandelier Envy

If I could add a single thing to our home, it would be a crystal chandelier.  Truth.  Unfortunately, these babies run up a hefty price tag, and I just can’t bring myself to love (REALLY love) the less expensive versions.  Don’t get me wrong, I love a good pendant light with a drum shade or lantern, but our dining room is really calling for a fancy pants chandelier like these babies (on a smaller scale of course)!

 Is this not the epitome of elegance?  You could have the queen for dinner in this contemporary meets classic, white and chocolate dining room.

Emily of a Well Dressed Home does it again – bedroom perfection capped off by a pretty chandelier.

White on white on white – a favorite look of mine (always has been).  This crystal chandelier almost (ALMOST) blends into the background, but the detailed plastered ceiling draws the eye up so it’s almost impossible to miss this beauty.

And finally, traditional meets modern here with pretty chandeliers enclosed by linen drum shades… and flanking a bed?!  Never seen this before, and it’s perfection!

Style Icon: Miranda Kerr

Yes she is a model… a Victoria’s Secret Model… who makes money by wearing lingerie and itty-bitty bikini’s… but dang… she looks just as good in clothes!

The reason I love her so much, is that despite her amazing body, she dresses for real life.  Real life in couture, but still – she isn’t flouncing around town in a crop top and no bra (hello Rihanna and Miley Cyrus).  Also, she sticks with classically tailored pieces, and neutral tones.  You’ll see a lot of nautical pieces with high-waisted trouser jeans, horizontal navy stripes, and plenty of (muted) red, white and blue.
I also love that she embraces feminine silhouettes that nip in at the waist and classic shapes that have been popular for decades.  She could be a Kennedy in either of these dresses!

Her style always seems easily attainable, so while she might be carrying a Valentino tote, and running around town in Manolos, her looks are easy to mimic – who doesn’t have a pair or black pumps that they can pair with dark skinny jeans and a white blouse?!

Her wardrobe is made up of blazers, blouses, and cropped pants with ballet flats, pumps, and large totes – I am obsessed with her style.


Who is YOUR style icon?

Photos courtesy of People.com.stylewatch

Re-envisioning a Living Room

For those of you who have been reading, you know how much I love to work on our apartment, taking it it from a blank slate, and turning it into a a home that reflects us.  Well… I recently started helping my friend re-envision her own space, and it turns out, it is even more fun, because I get to collaborate with someone else!

I actually used to live in this apartment with her, so trust me when I say that it is a great space.  Big rooms, high ceilings, and beautiful crown molding.  She has great taste already, but the challenge is finding a cohesive look and making a space work for both her, and her significant other (ie: How do we get rid of the boyfriend’s hideous bachelor stuff in the nicest way possible, and revamp the space they are living in?)  I can sympathize…

As it stands, the living room is open to the dining room, connected with a large archway.  It gets great light mid-day with a Northwest exposure.  The room is a good size at roughly 17′ in length – so one of the challenges is maximizing that huge expanse of wall, and filling the room out.
In the current layout, the majority of the furniture is grouped in the alcove of the bay window, and there is a lot of negative space in the entryway from the dining room and hallway.
I’d love to see the furniture more spread out, so that the room feels more balanced:
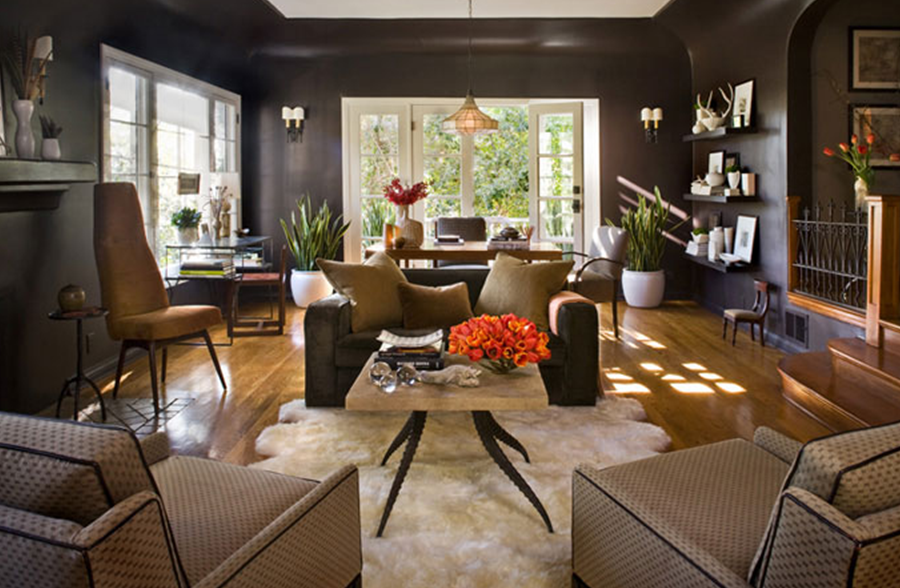
The great news is that she has all the large pieces, and they are all in good shape.  The sofa and over-stuffed armchair came from her parents, and she has some solid Crate and Barrel side tables and a matching coffee table – all of them came from Craigslist.  
Facing the sofa, the room currently looks like this:
While the room has good bones, there are several changes she wants to make – she wants a new, larger rug for the space (the pretty oriental she already has will make a new home in the adjacent dining room), and she wants to bring in more color into the room as well, adding throw pillows, and more art to the wall.
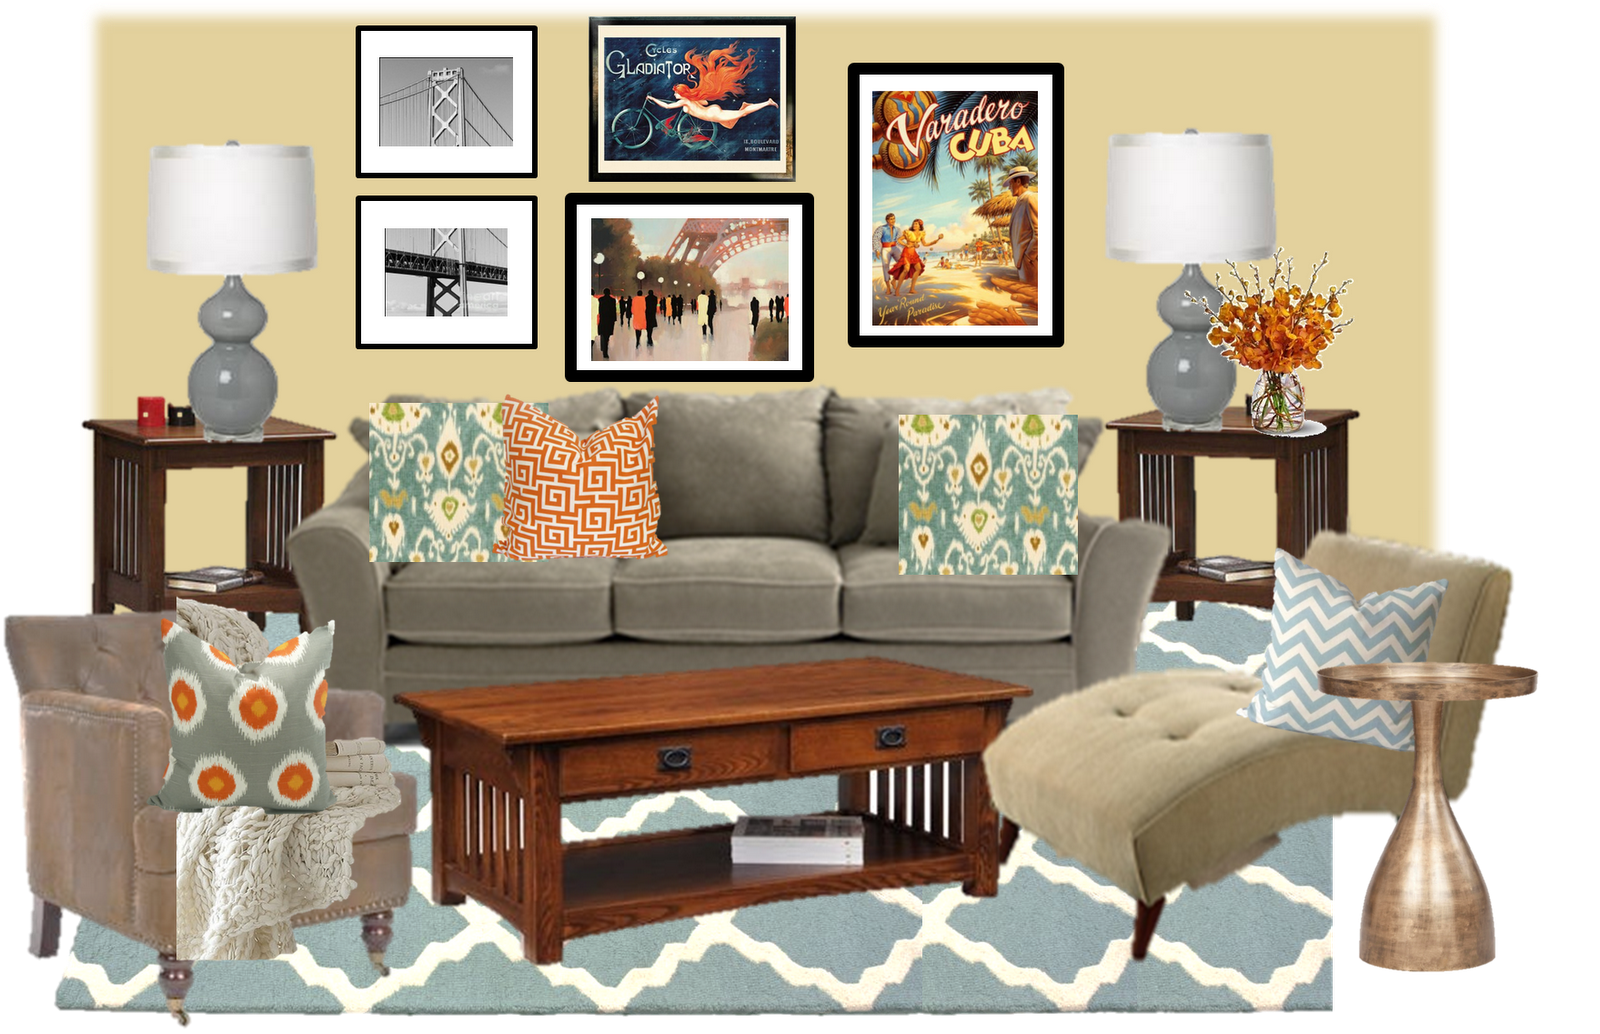
I had some free time on my hands on Sunday, and got a little carried away putting together an inspiration board for her.  I based this on the things we had talked about, and bookmarked online.
This was the original inspiration board…
The adjacent dining room’s walls are a bold orange, and since the rooms are connected by a large entryway, we felt it was important to echo those colors in the living room as well.  
Ultimately, everything had to work with the dark olive colored sofa since this piece isn’t going anywhere, and I think that the palate of blues and oranges work well with it, and almost turn it into a neutral. 
Most of the pattern and color will be coming through the accessories, so the pops of orange will compliment the dining room, but won’t necessarily compete.  Obviously I’m partial to this rug since Kris and I have it in our living room (in grey), but she loves it too, and this sea foam blue works well with orange as the accent color.
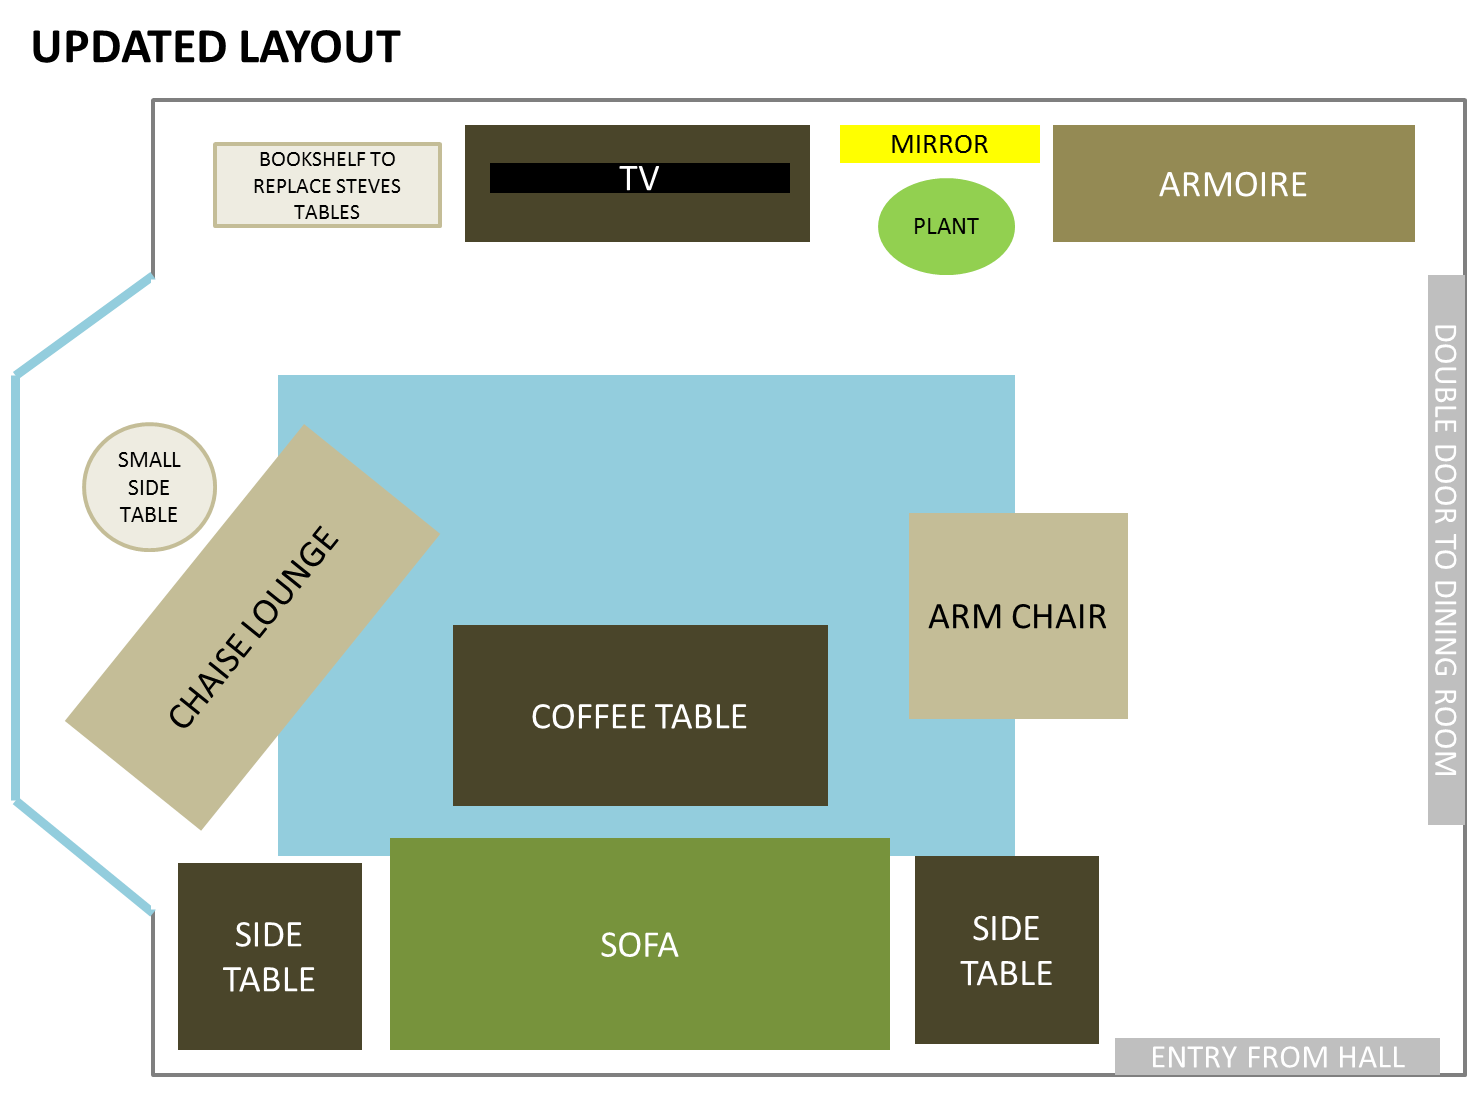
After I had the initial inspiration together, I took it a step further, and tried mocking up the room to see what it will start looking like once she starts making changes.  This is what I came up with…

By moving the large chair to the other side of the room, the super comfy chaise lounge can now be pointed towards the TV for optimal relaxation (that’s where I’d be parked EVERY night). 
The larger ginger jar vases are sculptural as well as pretty, and along with a gallery wall behind the sofa, I think they fill out the space nicely.  The accessories are what gives a room personality – especially when you are re-purposing furniture you already have, and working on a budget .  Pretty pillows give new life to an old sofa, and a fuzzy throw gives softness to a leather chair.  I am actually loving the hammered bronze side table I added in next to the chaise lounge (from World Market).  It’s on sale right now for $139!
With that side of the living room re-envisioned, I decided to take a stab at the other side as well (yes, I got WAY too carried away)!  Right now, the 17′ wall looks something like this… (ok, this is a terrible representation… don’t judge me!)
The point here is that I’d love to see this wall filled out, and create storage for her boyfriend’s stuff.  The ultimate goal? Get rid of the un-necessary side tables her boyfriend brought over from his bachelor days (I didn’t even have the heart to try to re-create them in this “before”)
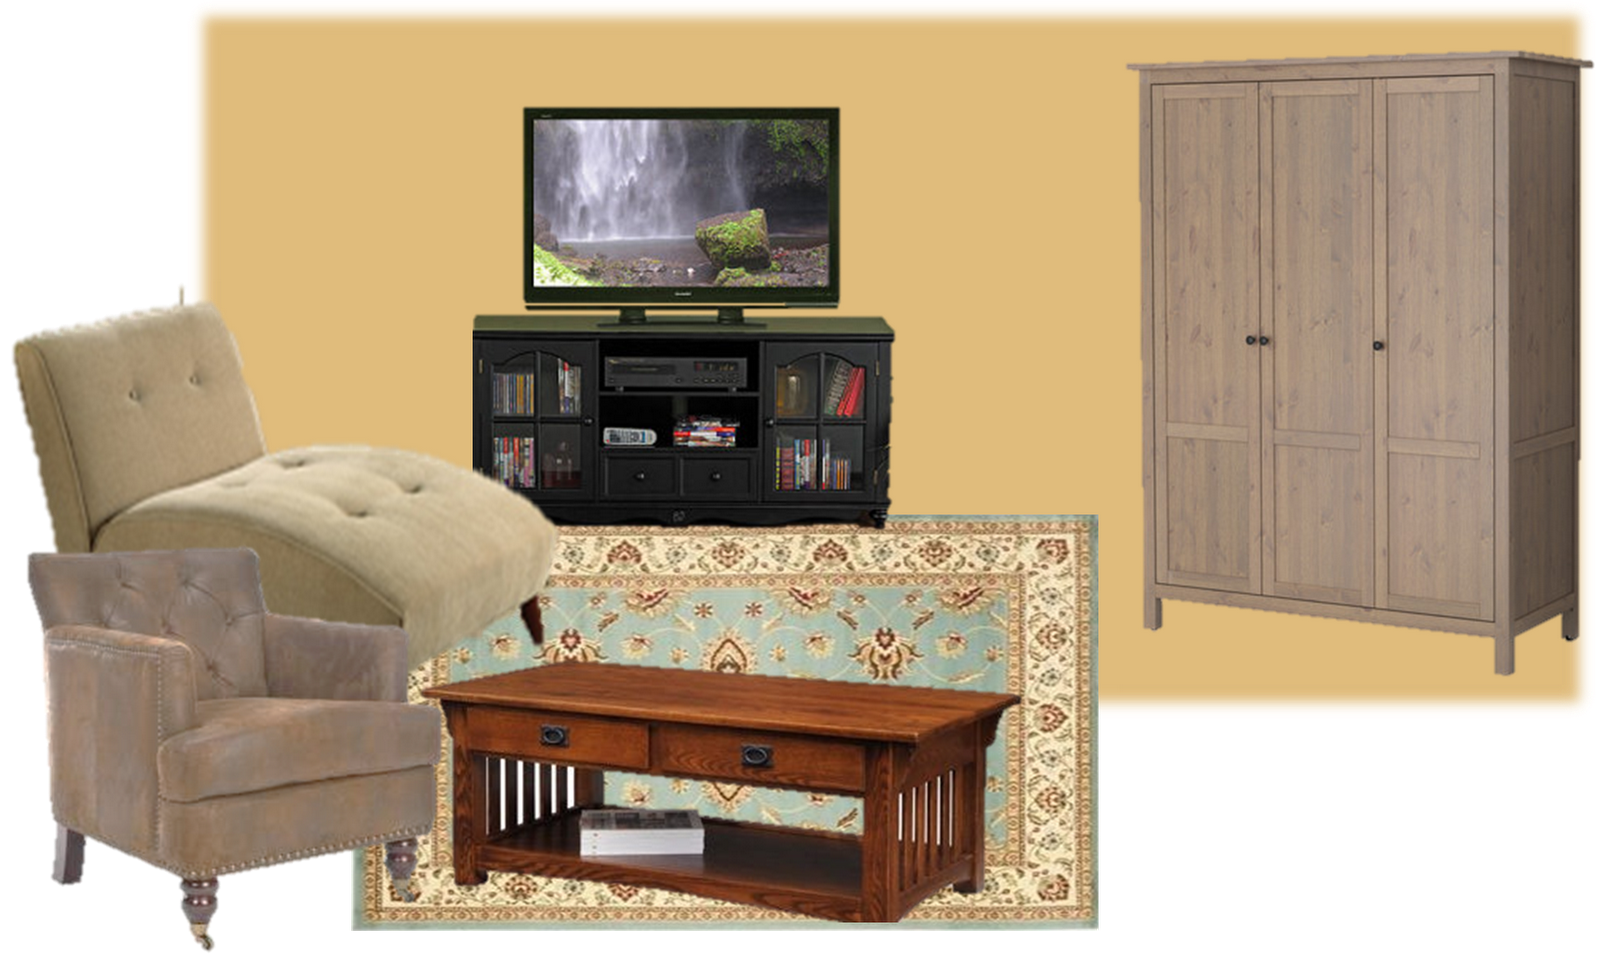
Anyway, here is what I’d love to see this room ending up like:
I need a new program for angling furniture to face the correct direction (chairs will not be angled toward the sofa) but you get the idea.  
On this wall, my friend already has the large armoire for storage, along with the TV and TV stand.  To replace her boyfriend’s tables, I think a bookshelf is a great solution.  They can pack in books, CD’s, paperwork, etc, and use woven baskets to store (and hide) the less visual things.  The lamp on top of the bookshelf is currently on one of her side tables, so once she gets larger lamps to flank the sofa, this little guy can make a new home on top of the bookshelf.  
A tall, wide mirror will help fill in the space between the armoire and TV stand (this photo is not to scale – the gap between the two is actually wider in real life) and my favorite thing about the mirror (and any mirror), is that it opens the space up.  Finally, I am a strong believer that every room needs one living plant in it, and I am LOVING the fiddle leaf fig – an easy care plant that has waxy bright green leaves.  So pretty! 
– — – — – — – — – — – — – — – — – — – — – — – — – — – — – — – — – — – — – — – — – — – —
Anyway, this is just my interpretation of what the room will look like, and obviously, as she prices things out, and heads into the store the room will end up with other pieces outside of these inspiration boards.  Making a room come together is definitely a process, so I’ll keep you updated once the room starts coming together!!
If you like any of the pieces from the inspiration, here are the direct links to buy.
Where to Buy:

It’s a Party… on my Nails!!

glitter gradient manicure

I just got my nails done last night, and decided to go out on a limb for something out of the norm.  I saw this manicure on Pinterest a while back, and thought there was something so sweet and fun about it – like a party on your nails.

I usually go with OPI sweetheart when I want something subtle and pretty, Essie Chinchilla if I want a mid-range taupe, or OPI Linken Park after Midnight if I’m feeling sassy, but this time I let my manicurist take a good look at this photo, and choose the colors for me.

This is what I ended up with:

I am kind of loving them!  What do you think??

Healthy Eating – Chinese Chicken Salad

Our trip to Cabo last month marked the end of working out and eating healthy… and let’s be honest… there are just too many yummy looking things on Pinterest!  Damn you Pinterest and your ooey gooey Au Gratain potato recipes and homemade Oreo cookies!

With the holidays coming up, I knowwww I have lots of parties (and lots of food) in the not so distant future, so I need to be dedicated to watching what I eat, and working out.  I am not the type of person to cut out the foods I love the most, so this means that I need to start eating healthy foods that don’t taste healthy.

Last night, I made an amazing (and easy) recipe for a healthy Chinese chicken salad.  They say, you eat with your eyes first, and this dish was as beautiful as it was yummy.

Ingredients:

Salad:
   Cabbage (half head per serving)
   Carrots (one full carrot per serving)
   Cherry Tomatoes (12 tomatoes per serving)
   Roasted Chicken Breast (one breast per serving)
   Bean Sprouts (a handful per serving)
   Chopped Peanuts (one tablespoon per serving)

Dressing:
   Soy Sauce (two tablespoons)
   Apple Cider Vinigar (three tablespoons)
   Grated Ginger (one teaspoon)
   Cilantro (one tablespoon – or if you like more… go all out)
   Olive Oil (three tablespoons)
   Garlic (one clove finely chopped)
   Red Pepper Flakes (one teaspoon)
   Sesame Seeds (one teaspoon)
   Salt + Pepper (to taste)

I’m not going to lie, the dressing was the hardest part to make (not that it was hard), so if you are feeling lazy, pick up some reduced fat Ginger Soy dressing and call it a day, but I swear to you – this dressing is fresh, and spicy, and delicious.

For the salad:
Shred the cabbage and grate the carrots, and mix together in a bowl with the bean sprouts.  Half the cherry tomatoes, chop the chicken into bite size pieces, and chop the peanuts finely.  Add those to the bean sprout, carrot, and cabbage mixture.

For the dressing:
Combine all the ingredients, mixing quickly to get the dressing to emulsify.  If you don’t like spicy (chili flakes), or hate cilantro, leave those ingredients out.

Dress carefully – you likely won’t need the full mixture.  Just save what you don’t use, or double the recipe if you are making the salad for a larger group.

This salad was really yummy, and really filling, and per serving it has just 380 calories.  THAT’s what I’m talking about!!

Weekend Finds

What a great weekend!  The weather here has been warm and sunny, and it’s days like these that remind me how much I love this city.  We went to the beach on Saturday – Kris to surf, me to run, and you’d swear we weren’t in San Francisco, but in southern California!

Anyway, after my run, I met up with my friend Lindsay, and headed over to Union Street in the Marina for some lunch and a little shopping.  I’ve got the normal stores I go to for clothes, and there is a ZGallerie there too, but I had never noticed this little antique store.  We wandered in to check it out, and it ended up being much larger inside than I would have guessed – two full storefronts packed with pieces ranging from Art Deco mirrors and chandeliers, to mod ’60’s chairs, and tables, lovely turn of the century buffets, and lots of cool small accessories – trays, vintage jewlery, art, lamps, and fur throws (I’m assuming they were real… not faux).
What did we stumble upon before we left???  A vintage bar cart!
I had JUST been saying how much I wanted one, but never in a million years thought that I’d be able to find one in my price range.  The idea of getting a new one sort of took away from the allure – I wanted the character of a vintage piece, so I was absolutely SHOCKED to see that this little guy was priced at just $220!  
I LOVE the bamboo shaped brass, and the teeny casters at the bottom.  There was a bit of damage on the top piece of brass at the top, so I didn’t walk away with it (I’m not one to make an impulse purchase like that) but I am definitely going back this week after work. I want to take a better look at the damage (is it fixable, or does it add character) and also want to check that it feels sturdy.
What else did I find, but an immaculate Dorothy Draper chest of drawers.  I am so in love with this piece, but at nearly $2,000 it’s something I’ll simply lust after for now.
Look at the details in the beveling, and the pretty brass pulls.  Also, the set of champagne glasses on top were fabulous (would look great on my new bar cart, ha!)

Homemade Ice Cream Sandwiches

This was the scene at our house last night.  I had sweets on the brain, so between watching X Factor and Modern Family, I whipped up a batch of homemade ice cream sandwiches.

I decided on a classic chocolate chip cookie with french vanilla, and then a chewy molasses spice cookie with salted caramel ice cream.  Not to toot my own horn, but they were AMAZING!!

A few tips: to get the ice cream evenly spread, let it soften for about 10 minutes before scooping on the cookie.  Don’t spread it all the way to the edges – when you press the cookies together, the ice cream will spread out.  Also, don’t even TRY to make these when the cookies are still warm.  It will turn into a (delicious) mess, as I learned on the first batch.  Yes, I ate more of these than I’d like to admit…

Keep reading for the cookie recipes!

Chocolate Chunk Cookies (adapted from Alton Brown):
Ingredients:
8 ounces unsalted butter
12 ounces bread flour
1 teaspoon kosher salt
1 teaspoon baking soda
2 ounces granulated sugar
8 ounces light brown sugar
1 large egg
1 large egg yolk
1 ounce whole milk
1 1/2 teaspoons vanilla extract
12 ounces semisweet chocolate chips

Directions:
Melt the butter in a 2-quart saucepan over low heat. Set aside to cool slightly.
Sift together the flour, salt and baking soda onto a paper plate. Pour the butter into your stand mixer’s work bowl. Add the sugar and brown sugar and beat with the paddle attachment on medium speed for 2 minutes.
Meanwhile, whisk together the whole egg, the egg yolk, milk and vanilla extract in a measuring cup. Reduce the mixer speed and slowly add the egg mixture. Mix until thoroughly combined, about 30 seconds.
Using the paper plate as a slide, gradually integrate the dry ingredients, stopping a couple of times to scrape down the sides of the bowl. Once the flour is worked in, drop the speed to “stir” and add the chocolate chips. Chill the dough for 1 hour.
Preheat the oven to 375 degrees F and place racks in the top third and bottom third of the oven.
Scoop the dough into 1 1/2-ounce portions onto parchment-lined half sheet pans, 6 cookies per sheet. Bake 2 sheets at a time for 15 minutes, rotating the pans halfway through. Remove from the oven, slide the parchment with the cookies onto a cooling rack and wait at least 5 minutes before devouring.

**Note: The darker the sugar you use, the chewier your cookies will be.

———————————————————————-

Chewy Molasses Spice Cookies (adapted from Martha Stewart):
Ingredients:
2 cups all-purpose flour (spooned and leveled)
1 1/2 teaspoons baking soda
1 teaspoon ground cinnamon
1/2 teaspoon ground nutmeg
1/2 teaspoon salt
1 1/2 cups sugar
3/4 cup (1 1/2 sticks) unsalted butter, softened
1 large egg
1/4 cup molasses

Directions:
Preheat oven to 350 degrees. In a medium bowl, whisk together flour, baking soda, cinnamon, nutmeg, and salt. In a shallow bowl, place 1/2 cup sugar; set aside.
With an electric mixer, beat butter and remaining cup of sugar until combined. Beat in egg and then molasses until combined. 
Reduce speed to low; gradually mix in dry ingredients, just until a dough forms.
Pinch off and roll dough into balls, each equal to 1 tablespoon. Roll balls in reserved sugar to coat.
Arrange balls on baking sheets, about 3 inches apart. Bake, one sheet at a time, until edges of cookies are just firm, 10 to 15 minutes 

**Note: cookies can be baked two sheets at a time, but they will not crackle uniformly. Cool 1 minute on baking sheets; transfer to racks to cool completely.